Overview #
Introduction: The ThinkPad Dock I is an expansion unit adding desktop-like connectivity, stereo speakers, and features to early ThinkPads.
Machine Type 3545 · 1995 · 43 sections
Original ThinkPad docking station.
Introduction: The ThinkPad Dock I is an expansion unit adding desktop-like connectivity, stereo speakers, and features to early ThinkPads.
Note: The diagnostic tests are intended to test only IBM products. Non-IBM products, prototype cards, or modified options can give false errors and invalid system responses.
Note: To run the diagnostics, refer to 'How to Run the Diagnostics'.
Checkout Guide
Use the following procedure as a guide for computer problems.
NOTE: The diagnostic tests are intended to test only IBM products. Non-IBM products, prototype cards, or modified options can give false errors and invalid system responses.
Obtain the failing symptoms in as much detail as possible.- Verify the symptoms by attempting to recreate the failure by running the diagnostic test or by repeating the same operation.
NOTE: To run the diagnostics, refer to 'How to Run the Diagnostics'.
| Symptoms (Verified) | Go to |
|---|---|
| Power failure. (The power | 'Power Systems Checkout'. |
| indicator does not go on | |
| or stay on.) | |
| POST does not complete. | 'Symptom-to-FRU Index', and then use the |
| No beeps or error codes are indicated. | 'No-Beep Symptoms' table. |
| POST beeps, but no error codes | 'Symptom-to-FRU Index', and then |
| are displayed. | use the 'Beep Symptoms' |
| POST detected an error and | 'Symptom-to-FRU Index', and then |
| displayed numeric error codes. | use the 'Numeric Error Codes' table. |
| The diagnostic test detected an | 'FRU Codes'. |
| error and displayed a FRU code. | |
| The configuration is not the same | 'Checking the Installed Devices List'. |
| as the installed devices. | |
| Other symptoms | 'Symptom-to-FRU Index', |
| (such as LCD display problems). | and then use the |
| 'Other Symptoms' table. | |
| Symptoms cannot be recreated. | Use the customer reported symptoms |
| (Intermittent problems.) | and go to 'Symptom-to-FRU Index'. |
Note: Make sure you have the following tools available before starting the tests:
 How to Run the Diagnostics
Use either the TrackPoint III or the cursor move keys to interact with the tests. The Enter key works the same as selecting the OK icon to reply OK.
NOTE: Make sure you have the following tools available before starting the tests:
          A **OK** mark appears beside the selected devices.
         - Select **OK** and press Enter
            if the selection is OK.- Select a device and press Enter to start the tests.- Select **Test All** to test all devices.- Select **Loop Test** to run the tests in a repeated loop.

                  A loop option menu appears in which a device loop or all-device
                  loop can be selected.
                  Select a device and press the **Spacebar** to select
                  a device. Repeat this step to select multiple devices.
                  Press Enter to start the diagnostic loop. If no device is selected,
                  all device tests are looped.

                 - To exit the loop,
                    keep pressing **Ctrl+Pause** until the test exits.
                    A beep sounds to notify
                    that the exit interrupt is sensed
                    by the test program.
Note: Perform the FRU replacement or actions in the sequence shown in the FRU/Action columns. If a FRU did not solve the problem, put the original part back in the computer. Do not replace a non-defective FRU.
Note: For any IBM device not supported by the diagnostic codes in this ThinkPad computer, see the manual for that device.
 Symptom-to-FRU Index
The Symptom-to-FRU Index lists the symptoms and errors and the possible causes. The most likely cause is listed first.
NOTE: Perform the FRU replacement or actions in the sequence shown in the FRU/Action columns. If a FRU did not solve the problem, put the original part back in the computer. Do not replace a non-defective FRU.
This index can also be used to help you decide which FRUs to have available when servicing a computer.
Numeric error codes show the errors detected in POST or system operation. In the following error codes, X can be any number.
If no codes are available, use narrative symptoms.
If the symptom is not listed, go to 'Undetermined Problems'.
NOTE: For any IBM device not supported by the diagnostic codes in this ThinkPad computer, see the manual for that device.
 Numeric Error Codes
| Symptom / Error | FRU / Action in Sequence |
|---|---|
| 10X 101 Interrupt failure. 102 Timer failure. 103 Timer interrupt failure. 104 Protected mode failure. 105 Last 8042 command not accepted. 107 NMI test failure. 108 Timer bus test failure. 109 Low meg-chip select test. | 1. System Board |
| 110 (Planar parity.) |
1. Go to 'Memory Checkout'
2. DIMM 3. The computer is attached to a Port Replicator. 4. System Board |
| 111 (I/O parity.) |
1. Go to 'Memory Checkout'
2. Port Replicator 3. System Board |
| 158 (HDP was not set even though the supervisor password is set.) | 1. Set an HDP for the hard disk drive. |
| 159 (HDP is not set the same as the supervisor password.) | 1. Set a correct HDP for the hard disk drive. |
| 161 (Dead battery.) |
1. Go to 'Checking the Backup Battery'.
2. Backup Battery 3. System Board |
| 163 (Time and Date were not set.) |
1. Set Time and Date.
2. Backup Battery 3. System Board |
| 173 (Configuration data was lost.) |
1. Select OK in the error screen,
then set the time and date
2. Backup Battery 3. System Board |
| 174 (Configuration error: Perform 'Checking the Installed Devices List' before changing any FRUs.) |
1. Check Device Configuration.
2. System Board 3. Diskette Drive Assembly 4. Hard Disk Drive Assembly |
| 175, 177, 178 175 EEPROM CRC #1 error. 177 Supervisor password check sum error. 178 EEPROM is not functional. | 1. System Board |
| 183 (Incorrect password entered at the supervisor password prompt.) | 1. Have the user examine the password. |
| 184 (POP check sum error.) | 1. Reset the POP (power-on password) in Easy-Setup. |
| 185 (The startup sequence is not valid. Suspect that power was off when the startup sequence was being updated.) | 1. Reset the startup sequence in Easy-Setup. |
| 186 | 1. System Board |
| 188 (EEPROM CRC #2 error.) | 1. Set the system identification using the ThinkPad Hardware Maint. Diskette. |
| 190 (Depleted battery pack was installed when the power was on.) | 1. Go to 'Checking the Battery Pack' |
| 191XX (PM initialization error.) |
1. System Board
2. CPU card |
| 195 (The configuration read from the hibernation area does not match the the actual configuration.) | 1. Check if the configuration was changed. For example, check if the hard disk drive is from another computer Also, when a DIMM card has been installed, unsecured DIMM latches can result in this error. Make sure the DIMM is securely seated and fully latched into place. |
| 196 (Read error occurred in the hibernation area of the HDD.) |
1. Run the hard disk drive test.
2. Hard Disk Drive |
| 199XX (Resume error.) | 1. System Board |
| 1XX | 1. System Board |
| 2XX 201 Memory data error. 202 Memory line error 00-15. 203 Memory line error 16-23. 205 Memory test failure on on-board memory. 221 ROM to RAM remap error. |
1. Go to 'Memory Checkout'.
2. DIMM 3. System Board |
| 301, 303, 304, 305, 3XX (301: Keyboard error.) |
1. Go to 'Keyboard/Aux. Input Device Checkout'
2. Keyboard 3. External Numeric Keypad 4. External Keyboard 5. Keyboard/Mouse Cable 6. Keyboard Card 7. System Board |
| 601, 6XX (601: Diskette drive or controller error.) |
1. Go to 'Diskette Drive Test'.
2. Diskette Drive Assembly 3. Diskette 4. System Board |
| 602 (Diskette read error.) |
1. Go to 'Diskette Drive Test'.
2. Diskette 3. Diskette Drive Assembly |
| 604 (Unacceptable ID was read from the diskette drive.) |
1. Go to 'Diskette Drive Test'.
2. Diskette Drive Assembly 3. System Board |
| 11XX 1101: Serial_A test failure. |
1. Serial Device
2. Communication Cable 3. System Board |
| 12XX 1201: Serial_B test failure. | 1. System Board |
| 17XX 1701 Hard disk controller failure. 1780, 1790 Hard disk 0 error. 1781, 1791 Hard disk 1 error. |
1. Hard Disk Drive
2. System Board |
| 24XX (2401: System board video error.) | 1. System Board |
| 808X 8081 PCMCIA presence test failure. (PCMCIA revision number also checked.) 8082 PCMCIA register test failure. |
1. Reseat the PCMCIA Connector.
2. PCMCIA Slot Assembly 3. PCMCIA Device 4. System Board |
| 860X (Pointing device error when TrackPoint III is disabled.) 8601 System bus error-8042 mouse interface. 8602 External mouse error. 8603 System bus error or mouse error. |
1. External Mouse
2. External Keyboard 3. System Board |
| 861X (Pointing device error when TrackPoint III is enabled.) |
1. Reseat the keyboard connector.
2. Reseat the keyboard TrackPoint III cable on the keyboard card. |
| 8611 System bus error-I/F between 8042 and IPDC. 8612 TrackPoint error. 8613 System board or TrackPoint error. |
See '1070 Keyboard Unit'.
3. Keyboard 4. External Mouse 5. 4System Board |
| I9990301 | 1. Reseat the boot device. |
| I9990302 | 2. Check the startup sequence for |
| I9990305 I9990301 Hard disk error. I9990302 Invalid hard disk boot record. I9990305 No bootable device. |
the correct boot device.
3. Check that the operating system has no failure and is installed correctly. |
| I9990303 (Bank 2 flash ROM check sum error.) | 1. System Board |
| Other codes not listed above | 1. Go to 'Undetermined Problems'. |
FRU Codes
If an error is detected by the diagnostic tests, a four-digit FRU code is displayed. The FRU code indicates two suspected FRUs. Replace the FRU that is indicated by the two leftmost digits first, then replace the FRU indicated by the two rightmost digits. No FRU is assigned to code 00. If only one FRU is suspected, the other FRU code is filled with zeros. See the referenced page before replacing the FRU.
| FRU Code | FRU/Action |
|---|---|
| 10 | System Board |
| 11 | CPU Card |
| 20 | Memory (See 'Memory Checkout'.) |
| 30 | Reserved |
| 32 | External Keyboard |
| 33 | External Mouse |
| 40 | LCD Assembly |
| 45 | External CRT |
| 50 | Reseat the Diskette Drive (FDD-1) Diskette Drive (FDD-1) |
| 51 | Reseat the Diskette Drive (FDD-2) Diskette Drive (FDD-2) |
| 60 | Reseat the Hard Disk Drive (HDD) Hard Disk Drive (HDD) |
| 72 | PCMCIA Slot Assembly |
| 90 | CD-ROM Drive |
If the problem remains after replacement of the FRUs, go to 'Undetermined Problems'.
No-Beep Symptoms
| Symptom / Error | FRU / Action in Sequence |
|---|---|
| No beep, power-on indicator | 1. for TP-2626 Go to 'Power Systems Checkout'. |
| not on and a blank LCD during POST. |
1. for TP-2635 Go to 'Power Systems Checkout'.
2. System Board 3. Power sources |
| No beep, power-on indicator on, and a blank LCD during POST. |
1. System Board
2. CPU Card |
| No beep, power-on indicator on, and a blinking cursor only during POST. |
1. System Board
2. CPU Card |
| No beep during POST but but system runs correctly. |
1. Turn the volume up and check
the speaker.
2. Speaker / Volume Switch Assembly 3. (2635-380) Systemboard 4. (2635-380) Subcard |
Beep Symptoms
| Symptom / Error | FRU / Action in Sequence |
|---|---|
| Continuous beeps. | System Board |
| One beep and a blank, unreadable, or flashing LCD. |
1. Reseat the LCD connector.
2. LCD Assembly 3. System Board |
| One beep, and the message 'Unable to access boot source'. |
1. Boot device
2. System Board |
| One long beep, two short beeps, and a blank or unreadable LCD. |
1. System Board
2. LCD Unit |
| One long beep followed by four short beeps each time the power switch is operated. (System cannot power on because of low battery voltage.) | Connect the AC Adapter or install a fully charged battery. |
| One beep every second. (System shuts down because of low battery voltage.) | Connect the AC Adapter or install a fully charged battery (allows system to complete shutdown before changing the battery) |
| Two short beeps with error codes. | POST error. See 'Numeric Error Codes' |
| Two short beeps with blank screen. | System Board |
ThinkPad Common Parts List
Common Parts Listing
This section contains FRUs common to most IBM portable, laptop, and notebook computers.
External Diskette Drives
| 5.25-Inch Diskette Drives: | |
|---|---|
| 360KB External (4869-001) | 72X6759 |
| 360KB External (4869-501) | 72X6768 |
| 1.2MB External (4869-002) | 15X7993 |
| 1.2MB External (4869-502) | 15X7994 |
| Hard Disk Drive. | |
| 1.2GB HDD (for all 9545) | 85G8549 |
| 5.25-Inch Drive Adapter | 72X6757 |
| 5.25-Inch Drive Adapter/A | 15F7996 |
| 5.25-Inch External Diskette Drive Cable | |
| (from system board to adapter) | 27F4211 |
| Diskette Drive Bus Adapter | 72X8524 |
CD-ROM Drives
| Enhanced Internal CD-ROM II Drive | |
|---|---|
| (Eject button below slot) | 61G1901 |
| Internal CD-ROM I Drive | |
| (Eject button above slot) | 81F7930 |
| Terminator Kit (for 81F7930) | 59F3530 |
| Cleaning Kit (for 81F7930) | |
| (Disks, CD Caddy) | 59F3562 |
| Internal CD-ROM II Drive | |
| (Eject button below slot) | 92F0084 |
| Terminator Kit (for 92F0084) | 92F0082 |
| Media Kit (for 92F0084) | |
| (No cleaning necessary, | |
| Test Disk, CD Caddy) | 31F4232 |
| Signal Cable | 34F0043 |
| Power Cable | 72X8521 |
| Remote ID Switch Cable (3510) | 92F0086 |
| Audio Card, Cable, Screws (3510) | 92F0085 |
| CD Caddy | 22F9419 |
| Rail Kit (3510) | 34F0041 |
| Headphones | 53F3610 |
SCSI Adapters, Terminators, Cables
| SCSI Adapter/A (without Cache) | 85F0002 |
|---|---|
| SCSI Internal Cable | 64F4127 |
| SCSI Adapter/A (with Cache) | 85F0063 |
| Terminator, External (for 85F0063) | 33F8464 |
| Terminator, Internal (for 85F0063) | 34F0025 |
| Terminator, Internal (for 85F0002) | 57F2870 |
| SCSI Fast Adapter (16 bit) | 92F0330 |
| SCSI External Cable (for 92F0330) | 32G4089 |
| SCSI Internal Cable (for 92F0330) | 32G0084 |
| Terminator, Inline (space permitting) | 92F0412 |
Rewritable Optical Drives
| 3.5-Inch Rewritable Optical Drive | 92F0167 |
|---|---|
| Rewritable Optical Cartridge | 38F8647 |
| Rewritable Optical Cartridge (5 Pack) | 38F8646 |
| Drive Mounting Slide (for 92F0167) | 85F0022 |
| Tray with Bezel (for 92F0167) | 85F0021 |
| Objective Lens Cleaner (for 92F0167) | 38F8681 |
| Prism Lens Cleaner (for 92F0167) | 38F8682 |
| 3.5-Inch Enhanced Rewritable Optical Drive | 92F0167 |
| Mounting Tray | 92F0269 |
| Mounting Tray/Bezel (Model 3510) | 92F0268 |
External Keyboard/Mouse
| Keyboard Cable | 72X8537 |
|---|---|
| Mouse | 61X8923 |
| Mouse Ball and Pop-Off Retainer | 33F8461 |
| Mouse Ball and Twist-Off Retainer | 33F8462 |
| Mouse (New Style) (33G5420) | 06H4595 |
| Mouse Retainer Ring | 33G5417 |
| Miniature Mouse | 95F5723 |
Enhanced Keyboards (101/102 Key)
| Country | FRU P/N |
|---|---|
| Arabic | 1391490 |
| Belgian | 1391414 |
| Canadian French | 1392011 |
| Cyrillic | 1393866 |
| Danish | 1391407 |
| Dutch | 1391511 |
| French | 1391402 |
| German | 1391403 |
| Greek | 1393285 |
| Hebrew | 1391408 |
| Italian | 1393395 |
| Latin American Spanish | 1392015 |
| Norwegian | 1391409 |
| Portuguese | 1391410 |
| Russian/Cyrillic | 1395622 |
| Spanish | 1391405 |
| Swedish/Finnish | 1391411 |
| Swiss | 1391412 |
| Swiss/French | 1395881 |
| Swiss/German | 1395882 |
| Turkish | 1393286 |
| U.K. English | 1391406 |
| U.S. English (E/ME/A use only) | 1396790 |
| U.S. English | 1392090 |
| Yugoslavian | 1393669 |
Optional Enhanced Keyboards (101/102 Key)
| with PS/2 Style Cable | 59G7980 |
|---|---|
| with AT Style Cable | 59G7981 |
| with 25mm PS/2 Trackball | 59G7982 |
| with 25mm Serial Trackball | 59G9757 |
Keybutton Kits (101/102 Key)
| Keybutton Kits (R), Belgian | 1392033 |
|---|---|
| Keybutton Kits (R), Canadian French | 1392032 |
| Keybutton Kits (R), Danish | 1392026 |
| Keybutton Kits (R), Dutch | 1392034 |
| Keybutton Kits (R), French | 6447047 |
| Keybutton Kits (R), German | 6447048 |
| Keybutton Kits (R), Italian | 6447049 |
| Keybutton Kits (R), Norwegian | 1392028 |
| Keybutton Kits (R), Portuguese | 1392029 |
| Keybutton Kits (R), Spanish | 6447050 |
| Keybutton Kits (R), Spanish / Latin | 1392035 |
| Keybutton Kits (R), Swedish | 1392030 |
| Keybutton Kits (R), Swiss / French / German | 1392031 |
| Keybutton Kits (R), U.K. English | 6447046 |
| Keybutton Kits, U.S. English | 6447045 |
Japanese Keyboard Type 2 (106 Key, DBCS Support)
| Japanese Keyboard | 94X1110 |
|---|---|
| Keyboard Cable | 94X1147 |
Space-Saving Keyboards (84/85 Key)
| Canadian French | 1396046 |
|---|---|
| Spanish/Latin | 1396047 |
| U.S. English | 1393290 |
| Cable Assembly, External | 1393082 |
Tools and Miscellaneous
| Audio Wrap Cable | 66G5180 |
|---|---|
| Ethernet BNC T-Connector | 84F8207 |
| Ethernet BNC 50-ohm Terminator | |
| (2 required) | 85F0037 |
| Grounding Wire Set | 38F4684 |
| Keyboard Key Cap Removal Tool | 6110464 |
| PC Test Card | 33G4703 |
| Screwdriver Kit | 95F3598 |
| SCSI Terminator | |
| (any SCSI device, space permitting) | 92F0142 |
| SCSI Terminator Kit | |
| (R-PAC Terminator Modules (3) for 40, 60, | |
| 80, 120, and 160MB SCSI Hard Disk Drives) | 92F0143 |
| Wrap Plug Ethernet D-Shell | 85F0036 |
| Wrap Plug, Tri-Connector | 72X8546 |
| Wrap Plug (6157 Tape Attachment Adapter/A) | 4178459 |
| Wrap Plug (Token-Ring Network Adapter/A) | 6165899 |
| Plastic Envelope (For Wrap Plug) | 6138013 |
 Safety Notice 4
The lithium battery can cause a fire, explosion, or severe burn. Do not recharge it, remove its polarized connector, disassemble it, heat it above 100°C (212°F), incinerate it, or expose its cell contents to water. Dispose of the battery as required by local ordinances or regulations. Use only the battery in the appropriate parts listing. Use of an incorrect battery can result in ignition or explosion of the battery.
La pile de sauvegarde contient du lithium. Elle présente des risques d'incendie, d'explosion ou de brûlures graves. Ne la rechargez pas, ne retirez pas son connecteur polarisé et ne la démontez pas. Ne l'exposez pas à une temperature supérieure à 100°C, ne la faites pas brûler et n'en exposez pas le contenu à l'eau. Mettez la pile au rebut conformément à la réglementation en vigueur. Une pile inappropriée risque de prendre feu ou d'exploser.
Die Systembatterie ist eine Lithiumbatterie. Sie kann sich entzünden, explodieren oder schwere Verbrennungen hervorrufen. Batterien dieses Typs dürfen nicht aufgeladen, zerlegt, über 100 C erhitzt oder verbrannt werden. Auch darf ihr Inhalt nicht mit Wasser in Verbindung gebracht oder der zur richtigen Polung angebrachte Verbindungsstecker entfernt werden. Bei der Entsorgung die örtlichen Bestimmungen für Sondermüll beachten. Beim Ersetzen der Batterie nur Batterien des Typs verwenden, der in der Ersatzteilliste aufgeführt ist. Der Einsatz falscher Batterien kann zu Entzündung oder Explosion führen.
La batteria di supporto e una batteria al litio e puo incendiarsi, esplodere o procurare gravi ustioni. Evitare di ricaricarla, smontarne il connettore polarizzato, smontarla, riscaldarla ad una temperatura superiore ai 100 gradi centigradi, incendiarla o gettarla in acqua. Smaltirla secondo la normativa in vigore (DPR 915/82, successive disposizioni e disposizioni locali). L'impiego di una batteria non adatta potrebbe determinare l'incendio o l'esplosione della batteria stessa.
La bateria de repuesto es una bateria de litio y puede provocar incendios, explosiones o quemaduras graves. No la recargue, ni quite el conector polarizado, ni la desmonte, ni caliente por encima de los 100°C (212°F), ni la incinere ni exponga el contenido de sus celdas al agua. Deséchela tal como dispone la normativa local.
Power Systems Checkout
To verify the symptom of the problem, power on the computer using each of the power sources as follows:
If you suspect a power problem, see the appropriate power supply check listed below.
To verify the symptom of the problem, power on the computer using each of the power sources as follows.
If you suspect a power problem, see the appropriate power supply check listed below.
Note: For Model 365XD, there are two types of adapters. The procedure for checking both types is the same.
Note: An audible noise from the AC Adapter does not always indicate a defective adapter.
Checking the AC Adapter
You are here because the computer fails only when the AC Adapter is used.
NOTE: For Model 365XD, there are two types of adapters. The procedure for checking both types is the same.
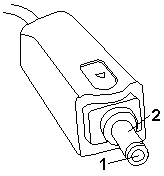
| Pin | Voltage (Vdc) |
|---|---|
| 1 | +14.5 to +17.0 |
| 2 | Ground |
NOTE: An audible noise from the AC Adapter does not always indicate a defective adapter.
Checking Operational Charging
To check operational charging, use a discharged battery pack or a battery pack that has less than 50% of the total power remaining when installed in the computer.
Perform operational charging. If the battery status indicator does not turn on, remove the battery pack and leave it to return to room temperature. Reinstall the battery pack. If the charge indicator still does not turn on, replace the battery pack.
Note: Signal lines, not used in these steps, are used for communication between the system and the battery.
Note: If the voltage of the battery pack is 0 V, it is not defective.
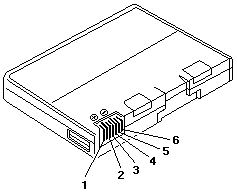
Checking the Battery Pack
Battery charging will not start until the Fuel-Gauge shows that less than 95% of the total power remains, with this condition the battery pack will charge to 100% of its capacity. This protects the battery pack from being overcharged or having a shortened life.
Do the following:
Power off the computer.- Remove the battery pack and measure the voltage between battery terminals 2 (+) and 6 (-).
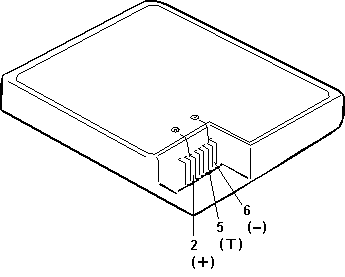
| Terminal | Voltage (Vdc) / Signal |
|---|---|
| 1 | - |
| 2 | +8 to +13.5 |
| 3 | - |
| 4 | - |
| 5 | Thermal |
| 6 | Ground (-) |
NOTE: Signal lines, not used in these steps, are used for communication between the system and the battery.
If the voltage is still less than +9.6 V dc after recharging, replace the battery.
NOTE: If the voltage of the battery pack is 0 V, it is not defective.
If the voltage is more than +9.6 V dc, measure the resistance between battery terminals 5 and 6. The resistance must be 4 K to 30 K ohm.
If the resistance is not correct, replace the battery pack.
If the resistance is correct, replace the system board.
Checking the Backup Battery
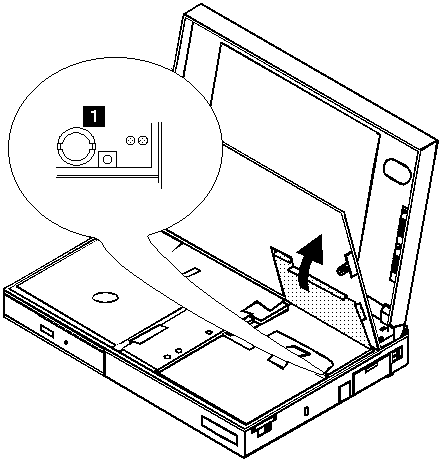

Do not use a metal tool when removing the backup battery.
Use only a plastic tool.
- Using a plastic tool,
remove the backup battery from the system board.- Measure the voltage of the backup battery.
Refer to the following table for voltages:
| Wire | Voltage (Vdc) |
| --- | --- |
| + | +2.5 to +3.7 |
| - | Ground |
Note: An audible noise from the AC Adapter does not always indicate a defective adapter.
You are here because the computer fails only when the AC Adapter is used.
| Pin | Voltage (Vdc) |
|---|---|
| 1 | +14.5 to +17.0 |
| 2 | Ground |
NOTE: An audible noise from the AC Adapter does not always indicate a defective adapter.
Note: Signal lines not used in these steps are used for communication between the system and the battery.
Note: If the voltage of the battery pack is 0 V, it is not defective.
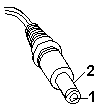
Checking the AC Adapter (2635-380/385)
Power off the computer- Remove the battery pack and measure the voltage between battery terminals 1 (+) and 4 (-).
| Terminal | Voltage (Vdc) / Signal |
|---|---|
| 1 | +0 to +13.5 |
| 2 | N/C |
| 3 | Thermal |
| 4 | Ground (-) |
| 5 | Select |
| 6 | A-Ground |
NOTE: Signal lines not used in these steps are used for communication between the system and the battery.
If the voltage is still less than +11.0 Vdc after recharging, replace the battery.
NOTE: If the voltage of the battery pack is 0 V, it is not defective.
If the voltage is more than +11.0 Vdc, measure the resistance between battery terminals 3 and 4. The resistance must be 4 to 30 K ohm.
If the resistance is not correct, replace the battery pack.
If the resistance is correct, replace the subcard.
Note: Be careful not to measure the wrong side of the backup battery.
 **NOTE:** Be careful not to measure the wrong side of the
  backup battery.
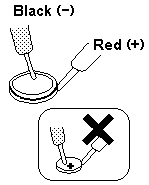
| Wire | Voltage (Vdc) |
|---|---|
| Red | +2.5 to +3.7 |
| Black | Ground |
1020 Battery Pack
 Be careful that the computer does not fall backward when
the battery pack is removed.
Be careful that the computer does not fall backward when
the battery pack is removed.
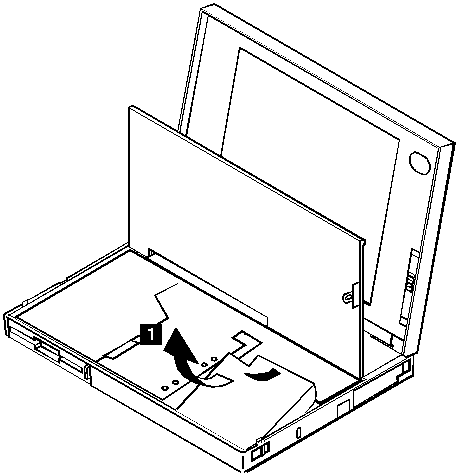
Note: Only loosen the screw in step 2
2 3 4 5 6 DIMM
2 3 7 Backup battery
When replacing
Make sure the plus side is on top when replacing the backup battery.
| Step | Location (Quantity) | Length |
|---|---|---|
| 2 | DIMM cover (1) | - |
NOTE: Only loosen the screw in step 2
Use the ThinkPad Features program or PS2.EXE. to power-on the TV Tuner, then power-on the internal device in the diskette drive compartment.
If power for the internal device is turned off
when the TV Tuner is set up,
nothing appears on the LCD display.
Turn on power for the TV Tuner again.
If you are using DOS, do one of the following:
If you are using OS/2 or Microsoft Windows, do the following:
Note: When a Fn key is pressed, a black square briefly appears.
Keyboard/Auxiliary Input Device Checkout
Remove the external keyboard if the internal keyboard is to be tested.
If the internal keyboard does not work or an unexpected character appears, make sure that the three flexible cables extending from the keyboard are correctly seated in the connectors on the keyboard card.
If the keyboard cable connections are correct, you can run on TP-2635 the - Keyboard Test by doing the following:
 **NOTE:** When a **Fn** key is pressed, a black square briefly appears.
 - Press **Ctrl+Pause** to end the test.
If the test detect a keyboard problem, do the following one at a time to correct the problem. Do not replace a nondefective FRU
Diskette Drive Test
Do the following to isolate the problem to a controller, drive, or diskette. A scratch, write enabled, non-defective 2HD diskette is required.
FDD-1 represents the built-in diskette drive for 365X. FDD-2 represents a diskette drive in the Port Replicator or a diskette drive attached through the external diskette drive connector.
Make sure that the diskette does not have more than one label
attached to it. Multiple labels can cause damage to the drive
or can cause the drive to fail.
Do the following to select the test device:
1070 Keyboard Unit
When replacing the keyboard unit, connect the keyboard connector as shown in the figure, then replace the keyboard.

Some TP 365X / 365XD will have problems with the
Keyboard Position Sensor Switch failing to properly actuate when the keyboard
is lowered into normal usage position. (Cause: enter HIBERNATION mode)
Spacers should be affixed to the underside of the keyboard to ensure that the switch is depressed when keyboard is lowered. More than one spacer (incl. in FRU P/N 39H7105) can be affixed to overcome this problem.
Use the following procedure to isolate the diskette problem to a controller, drive or diskette. A scratch, write-enabled 2HD diskette is required.
Note: Before you replace a display, check the following list to see if it is connected correctly.
Note: The location of the test margin varies with the type of display. The test margin might be on the top, bottom, or one or both sides.
If the display problem occurs only when using an external display, use the following instructions to correct the problem.
Note: Before you replace a display, check the following list to see if it is connected correctly.
If the screen is rolling, replace the display assembly. If that does not correct the problem, replace FRUs in the following order until the problem goes away:
If the screen is not rolling, run the display self-test as follows:
Check for the following conditions:
If you do not see a test margin on the screen, replace the display. If there is a test margin on the screen, replace the system board.
On ThinkPad Models 700, 700C, 720C, 720C, do the following:
The following auxiliary input devices may be available for IBM ThinkPad models.
If you suspect a problem with any of the auxiliary input devices (listed above), replace the device.
If the problem is not corrected, replace the following FRUs one at a time to correct the problem.
If the computer receives an incorrect keyboard response, remove other external devices, check the keyboard connections, and recheck the keyboard responses. If the problem remains, replace the following FRUs one at a time to correct the problem.
If a 00030100 error message appears, power-off the computer and the external devices. Then power-on the computer before you power-on the external devices.
Note: PCMCIA cards can be inserted and removed while
       the system is powered on
  - Power-on the system.
  - Insert the IBM Data/FAX Modem diskette into the default
    diskette drive.
  - If you are servicing a High Speed Internal Data/Fax Modem (Models
    FC3632 and FC3650), at the DOS prompt (for example, A:), type
IBMDIAG, then press Enter.
  - If you are servicing a PCMCIA Data/FAX Modem (Models FC3634 and
    FC3635), at the DOS prompt (for example, A:), type ESTDIAG,
    then press Enter.
  - Follow the instructions on the screen.  (If you need help, press
F1.)
 DID THE DIAGNOSTIC TESTS DETECT AN ERROR?
              +---+
  Yes      No-+002|
   |          +---+
   |           The diagnostic tests have completed successfully.
 +-+-+         If you suspect a problen, go to step 004
 |003|
 +---+
  Go to the Symptom-to-FRU Index for the computer you are servicing.
 ------------------------------------------------------------------------
 +---+
 |004|
 +---+
  - Check the PSTN cable and the DAA cable, if installed, for continuity.
 IS THE CABLE(S) GOOD?
              +---+
  Yes      No-+005|
   |          +---+
 +-+-+         Replace the defective cable(s).
 |006|
 +---+
  - Have the customer transmit a call.
 WAS THE CALL TRANSMITTED SUCCESSFULLY?
              +---+
  Yes      No-+007|
   |          +---+
 +-+-+         Go to step 011
 |008|
 +---+
  - Have the customer receive an incoming call on the modem.
 WAS THE INCOMING CALL RECEIVED?
              +---+
  Yes      No-+009|
   |          +---+
 +-+-+         Go to step 014
 |010|
 +---+
 The diagnostic tests have completed successfully.  If you still suspect
 a problem that is not software related, replace the External DAA, then
 replace the modem.
 ------------------------------------------------------------------------
 +---+
 |011|
 +---+
  - Have the customer transmit a call at a lower speed.
 WAS THE CALL TRANSMITTED SUCCESSFULLY?
              +---+
  Yes      No-+012|
   |          +---+
   |           If installed, replace the external DAA.
   |           If you do not have an external DAA installed,
   |           or replacing the external DAA does not correct
 +-+-+         the problem, replace the modem.
 |013|
 +---+
 Have the telephone line checked.
 ------------------------------------------------------------------------
 +---+
 |014|
 +---+
  - Have the customer receive an incoming call on the modem
    at a lower speed.
 WAS THE INCOMING CALL RECEIVED?
              +---+
  Yes      No-+015|
   |          +---+
   |           If installed, replace the external DAA.
   |           If you do not have an external DAA installed,
   |           or replacing the external DAA does not correct
 +-+-+         the problem, replace the modem.
 |016|
 +---+
 Have the telephone line checked.
+---+
 |001|
 +---+
  - Power-off the computer.
  - Ensure that the modem is installed correctly.
  - If the modem never worked in customer mode, ensure that all
    drivers are loaded correctly onto the computer.
  - Ensure that the communication program is supported on the computer.
  - Ensure that the public switch telephone network (PSTN) cable and the
    data access arrangement (DAA) cable, if installed,
    are connected correctly.
 If you need to correct one of the above conditions, do so now,
 then continue.
NOTE: PCMCIA cards can be inserted and removed while
       the system is powered on
  - Power-on the system.
  - Insert the IBM Data/FAX Modem diskette into the default
    diskette drive.
  - If you are servicing a High Speed Internal Data/Fax Modem (Models
    FC3632 and FC3650), at the DOS prompt (for example, A:), type
IBMDIAG, then press Enter.
  - If you are servicing a PCMCIA Data/FAX Modem (Models FC3634 and
    FC3635), at the DOS prompt (for example, A:), type ESTDIAG,
    then press Enter.
  - Follow the instructions on the screen.  (If you need help, press
F1.)
 DID THE DIAGNOSTIC TESTS DETECT AN ERROR?
              +---+
  Yes      No-+002|
   |          +---+
   |           The diagnostic tests have completed successfully.
 +-+-+         If you suspect a problen, go to step 004
 |003|
 +---+
  Go to the Symptom-to-FRU Index for the computer you are servicing.
 ------------------------------------------------------------------------
 +---+
 |004|
 +---+
  - Check the PSTN cable and the DAA cable, if installed, for continuity.
 IS THE CABLE(S) GOOD?
              +---+
  Yes      No-+005|
   |          +---+
 +-+-+         Replace the defective cable(s).
 |006|
 +---+
  - Have the customer transmit a call.
 WAS THE CALL TRANSMITTED SUCCESSFULLY?
              +---+
  Yes      No-+007|
   |          +---+
 +-+-+         Go to step 011
 |008|
 +---+
  - Have the customer receive an incoming call on the modem.
 WAS THE INCOMING CALL RECEIVED?
              +---+
  Yes      No-+009|
   |          +---+
 +-+-+         Go to step 014
 |010|
 +---+
 The diagnostic tests have completed successfully.  If you still suspect
 a problem that is not software related, replace the External DAA, then
 replace the modem.
 ------------------------------------------------------------------------
 +---+
 |011|
 +---+
  - Have the customer transmit a call at a lower speed.
 WAS THE CALL TRANSMITTED SUCCESSFULLY?
              +---+
  Yes      No-+012|
   |          +---+
   |           If installed, replace the external DAA.
   |           If you do not have an external DAA installed,
   |           or replacing the external DAA does not correct
 +-+-+         the problem, replace the modem.
 |013|
 +---+
 Have the telephone line checked.
 ------------------------------------------------------------------------
 +---+
 |014|
 +---+
  - Have the customer receive an incoming call on the modem
    at a lower speed.
 WAS THE INCOMING CALL RECEIVED?
              +---+
  Yes      No-+015|
   |          +---+
   |           If installed, replace the external DAA.
   |           If you do not have an external DAA installed,
   |           or replacing the external DAA does not correct
 +-+-+         the problem, replace the modem.
 |016|
 +---+
 Have the telephone line checked.
If the printer self-test does not run correctly, the problem is in the printer. Refer to the printer service manual.
If the printer self-test runs correctly, do the following.
Use the following procedure to isolate a port replicator problem. A port replicator attaches to the system expansion connector at the rear of the computer.
           - Serial port test with the wrap plug installed on the replicator.- Parallel port test with the wrap plug installed on the replicator.- PCMCIA-2 test with the PC test card installed.- FDD-2 (FDD-1 if no drive is installed in the computer)
                    drive test on the failing device.

           - If diagnostic errors appear, replace the replicator or diskette
              drive attachment unit.

              If the problem remains after the replacement, replace the
              system board.

             - If power problems appear only when using the replicator, replace the
                replicator.
If power shut downs occur intermittently when using PCMCIA-2 devices via a port replicator, suspect an over-current problem. Some PCMCIA devices use more power; if the maximum usage of each device occurs simultaneously, the total current will exceed the limit, thereby causing a power shut down. Isolate this problem by removing one of the devices, and use the computer under the same condition, and see whether a power shut down occurs. Do this procedure for all devices then determine the cause.
Customer purchase of the larger AC adapter (50W, optional) is recommended, if it is not yet in use.
Note: TrackPoint II automatically compensates to adjust the pointer sensor. This causes the pointer to move slightly on the screen and then stop. Pointer movement might occur when a slight, steady pressure is applied to the TrackPoint II pointer when the computer is powered-on or running, or when exceeded temperature range requires re-adjustment.
If the problem remains, continue.
NOTE: TrackPoint II automatically compensates to adjust the pointer sensor. This causes the pointer to move slightly on the screen and then stop. Pointer movement might occur when a slight, steady pressure is applied to the TrackPoint II pointer when the computer is powered-on or running, or when exceeded temperature range requires re-adjustment.
If the cursor floats or moves erratically, power-off and disconnect the mouse. Power-on the computer. If the problem goes away, replace the mouse. If the problem remains, replace the keyboard.- For click button or pointing stick problems:
If the pointing stick or the click button does not work, do the following.
The TV Tuner Pack (hereafter called TV Tuner) is an option for watching TV programs or videos on the IBM TFT color notebook computer. The computer changes to TV reception when the removable diskette drive is replaced with the TV Tuner.
The TV screen and normal computer display are easily switched by using the Hot key on the front panel of the TV Tuner.
Identifying Names and Functions
The following figure and table show the names and functions of each part of the TV Tuner.
Icons          Functions
 Front Panel      Used to change the TV channels, switch TV mode
                  to computer mode, and operate most functions of
                  the TV Tuner.
 --------------------------------------------------------------
 Headphone Jack
   Connects the headphones.
 --------------------------------------------------------------
 Power Indicator  Shows the TV Tuner is powered on.
 --------------------------------------------------------------
 Power Switch
   Powered on and off the TV Tuner.
 --------------------------------------------------------------
 Hot Key
   Switches between the TV screen and computer screen.
 --------------------------------------------------------------
 Up Switch
   Increases the value such as the channel number.
 --------------------------------------------------------------
 Down Switch
   Decreases the value such as the channel number.
 --------------------------------------------------------------
 Function Key
   Enters the mode to change the value of each function,
                  such as TV channel or color contrast.
 (See 'Using the Function Key')
 --------------------------------------------------------------
 TV/EXT Switch
   Switches the TV mode or external video mode.
 --------------------------------------------------------------
 Volume Knob
   Controls the speaker volume.
 --------------------------------------------------------------
 Audio-In Jack
   Connects the audio-in connector of the AV cable.
 --------------------------------------------------------------
 Video-In Jack
   Connects video-in connector of the AV cable.
 --------------------------------------------------------------
 RF Connector
 Connects the active antenna unit or antenna cable.
--------------------------------------------------------------
Using the Front Panel
The following table shows how to operate all functions of the TV Tuner with the controls on the front panel.
Key Function
Power
Turns on the TV Tuner.
This key is used only when the computer is turned on.
Hot Key
Switches computer display and TV screen.
Up
Increases the value of parameters, Channel Number,
Color, Tint, Brightness, Contrast, Auto Tuning Sensitivity,
On-screen Message Selection.
Down
Decreases the value of parameters, Channel Number
Color, Tint, Brightness, Contrast, Auto Tuning Sensitivity,
On-screen Message Selection.
Function
Selects a function mode to adjust each function parameter.
(See Using the Function Key)
TV/Ext
Switches the displayed video source between
the receiving TV broadcast program and external devices such as
VCR, video camera recorder, laser disk, and so on.
System Board and CPU Card Checkout
The processing functions are performed by both the system board and the CPU card. Processor problems can be caused by either FRU. However, the CPU card generally has a lower probability of failure. When a numeric code calls the system board or the CPU card as a FRU, or the CPU card is called by a diagnostic test by showing FRU code 11, use the following procedure to isolate the problem:
If above procedure does not correct the problem, go to 'Undetermined Problems'.
Undetermined Problems
You are here because the diagnostic tests did not identify which adapter or device failed, installed devices are incorrect, a short circuit is suspected, or the system is inoperative. Follow the procedures below to isolate the failing FRU (do not isolate non-defective FRUs).
Verify that all attached devices are supported by the computer.
Verify that the power supply being used at the time of the failure is operating correctly.
Power off the computer.- Check the cables, wires, and connectors for short circuits and open circuits. Visually check them for damage. If any problems are found, replace the FRU.- Remove or disconnect all of the following devices.
If ThinkPad 2625 365X, XD then replace
If ThinkPad 2635 380/385 then replace
Checking the Installed Devices List
If a device is installed but the icon appears in a gray shade rather than a dark shade on the basic diagnostics screen, the device is defective. Reseat the device connectors. If the symptom remains, replace the device or the system board. If needed, adjust the contrast control to clearly distinguish the shade of the icon.
If a device that is not installed appears in a dark shade (for example, FDD-2 appears in a dark shade when NO second FDD is installed), do the following:
The PCMCIA, Parallel, and Serial icons are always displayed in a dark shade because the icons represent subsystems of the system board and not the actual attachment of the devices.
The FDD-1 icon represents the first drive in the system configuration. Similarly, the FDD-2 icon represents the second drive, attached to the external diskette drive connector or through a Port Replicator.
Note: If you cannot find a symptom or error in this list and the problem remains, see 'Undetermined Problems'.
Other Symptoms
| Symptom / Error | FRU / Action in Sequence |
|---|---|
| Errors occur only when | See Port Replicator Checkout in the |
| Port Replicator is used | Common Devices Checkout section |
| PCMCIA slot pin is damaged. | PCMCIA Slots Assembly |
NOTE: If you cannot find a symptom or error in this list and the problem remains, see 'Undetermined Problems'.
Note: Make sure that the DIMM is fully installed into the connector. Both latches must be latched completely. A loose connection can cause error code 195.
Memory Checkout
DIMM cards are available for increasing memory capacity.
| DIMM | Displayed Value 2625 365X, XD | Displayed Value 2635 380-385 |
|---|---|---|
| No DIMM installed | 7808KB | 16000KB |
| 8MB | 16000KB | 24192KB |
| 16MB | 24192KB | 32384KB |
| 32MB | 40576KB | 48768KB |
Memory errors might stop system operations, show error messages on the screen, or hang the system.
Use the following procedure to isolate memory problems.
NOTE: Make sure that the DIMM is fully installed into the connector. Both latches must be latched completely. A loose connection can cause error code 195.
If memory problems occur intermittently, make sure the DIMM socket latches are latched completely. If the DIMM latches are securely latched, use the loop option to repeat the test. When the test detects an error, an error log is printed on the printer connected to the parallel port.
for more information.
Error Log
Diagnostic errors are printed on the printer that is attached to the parallel port when the error is detected. The error is also logged in the system memory.
Do the following to display the errors:
The error log is not saved when the system is powered-off.
Diagnostic errors are printed on the printer that is attached to the parallel port when the error is detected. The error is also logged in the system memory.
Do the following to display the errors:
The error log is not saved when the system is powered-off.
Each time you press the Function key
one of the following messages (called On-Screen Message)
appears at the top left corner of the LCD.
The changed values are automatically saved when you return to the TV Channel On-Screen message. The values are not saved when you power-off the TV Tuner without returning to this message.
Message on Parameter
LCD
TV Channel
(xx) By using <- and +> you can select the channels
from 2 to 69.
Color Adjustment
COL By pressing and holding <- or +>
you can change the color.
TINT Adjustment
TNT By pressing and holding <- or +>
you can change the tint.
Bright Adjustment
BRT By pressing and holding <- or +>
you can change the brightness.
Contrast Adjustment
CNT By pressing and holding <- or +>
you can change the contrast.
--- (No function)
Reserved.
Auto Tune Sensitivity Selection
LO LO: Means the sensitivity
of the TV is low. In this mode, the TV Tuner receives
strong TV signals only. To set LO,
press <-
HI HI: Means the sensitivity
of the TV is high (factory default).
In this mode, the TV Tuner receives weak and strong TV signals.
To set HI, press +>
D3S Time On-Screen Message appears
D3S: On-screen Message appears for 3 seconds.
To set D3S, press <-
DON DON: On-screen Message always appears.
To set DON press +>
The following table shows what to do to solve problems when the TV Tuner does not work correctly.
Problem Probable Cause
The TV Tuner ° Computer is not powered on.
does not operate. ° Computer is in suspend mode.
(No picture ° Volume control of the TV Tuner or computer
or sound) is not adjusted correctly.
° The power for the TV Tuner is not supplied.
(See Power-on the TV Tuner)
° The wall outlet from the outdoor antenna is not active.
° The video or antenna cable is not connected correctly.
° Antenna elements of the active antenna unit are not adjusted.
° The batteries in the active antenna unit are not inserted
correctly.
° The batteries in the active antenna unit are depleted.
° The TV Tuner is not set up correctly.
° You cannot watch TV or videos on the external display.
° LO is set for the auto tune sensitivity
selection.
No color. ° The program is not in color.
Snow and noise ° Switch the TV/EXT (
) button.
only.
Pictures are out For TV:
of shape, or have ° The channel is not tuned correctly.
double images. ° Adjust the antenna.
For VCR:
° Change the tracking adjustment.
Dotted lines ° Usually caused by interference from
or stripes. neon signs, hair dryers, and so on.
Move the computer to avoid the interference.
Picture control ° Do not power-off the TV Tuner
are not saved. when adjusting functions such as picture control,
color, tint, brightness, or contrast.
Channel number is ° Select your favorite mode for the on-screen message.
always displayed or
is not displayed.
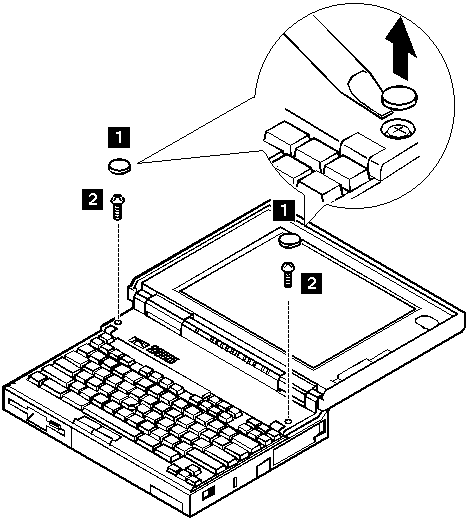
Note: Make sure you use the correct screws when replacing.
1060 Top Cover
| Step | Screw Location (Quantity) | Length |
|---|---|---|
| 2 | Top Cover (2) | M2 x 5 mm |
NOTE: Make sure you use the correct screws when replacing.
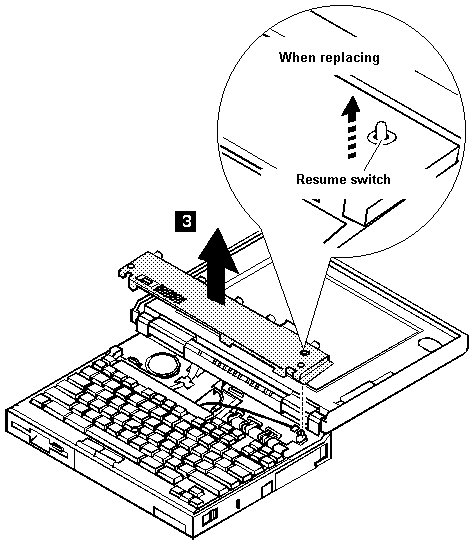
When replacing the top cover, be careful not to damage the
resume switch. Ensure that the resume switch extends
through the hole, as shown in the figure.