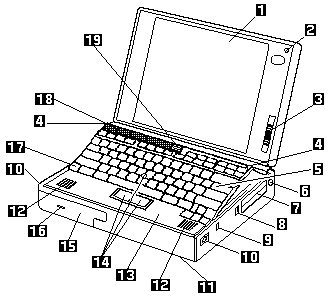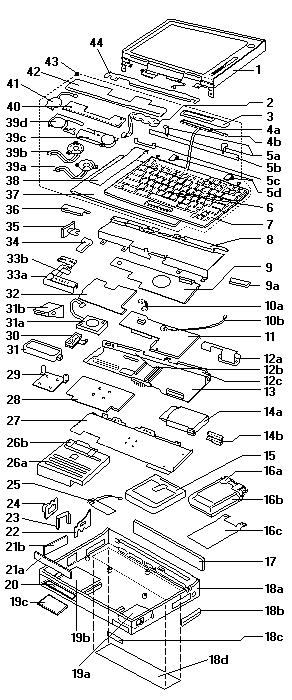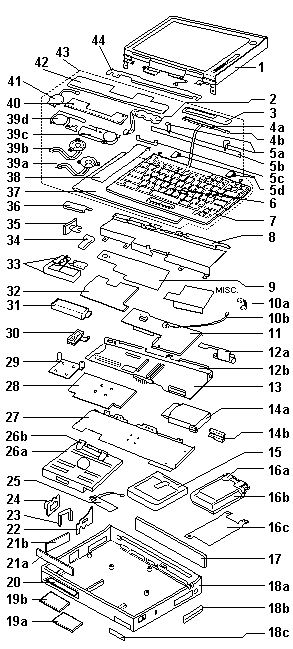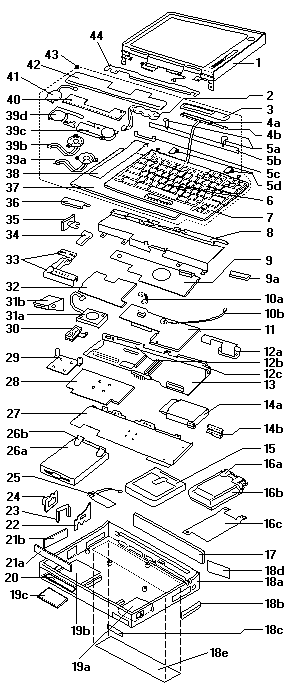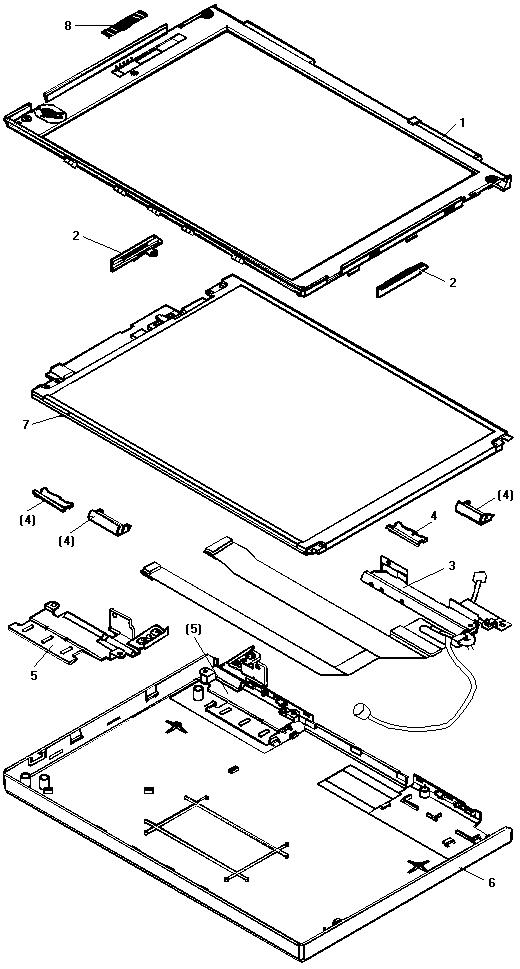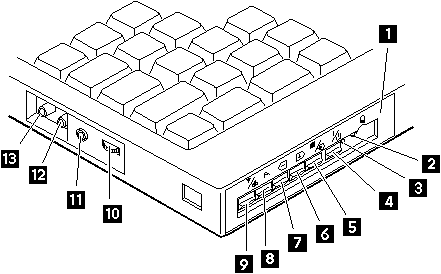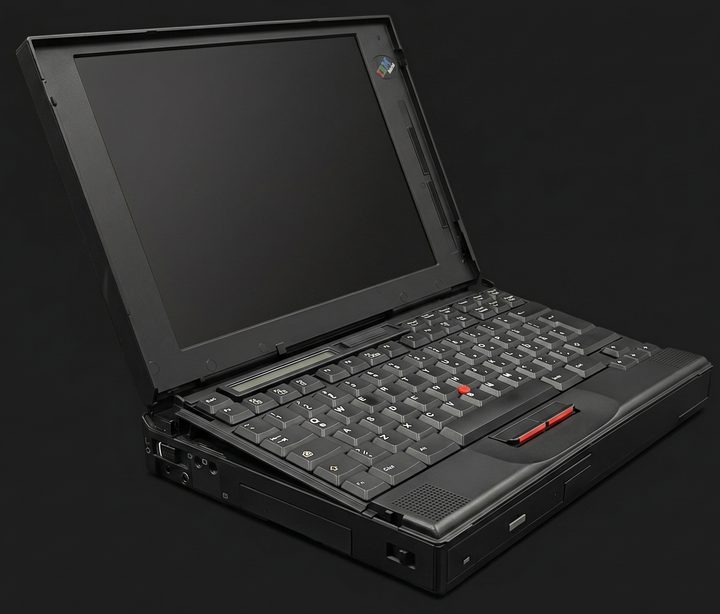
ThinkPad 760EL open, with its keyboard tilted up, the red TrackPoint and the small LCD status panel at the top of the keyboard ThinkPad Laptops

ThinkPad 760 / 765

Machine Types 9546 / 9547 · 1995–97 · 114 sections

IBM's high-end Pentium notebooks of 1995–97, whose keyboard tilts up on risers for typing and lifts open to reach the battery, hard disk and UltraBay. The procedures here come from IBM's ThinkPad 760 Hardware Maintenance Manual (760C to 760XD); the 765D and 765L have their own chapter in Volume 4, linked below.

This is a transcribed historical service reference and may contain incomplete captures. Consult the linked original manuals as the authoritative sources before servicing.

Service Reference

Product Overview #

Twelve variants side by side, compiled from a hardware survey and IBM's product records. A value spanning several columns applies to each of those variants; a dash means no source records it.

Specifications by variant
Specification ThinkPad 760C ThinkPad 760CD ThinkPad 760L ThinkPad 760LD ThinkPad 760E ThinkPad 760ED ThinkPad 760EL ThinkPad 760ELD ThinkPad 760XD ThinkPad 760XL ThinkPad 765L ThinkPad 765D
Released October 1995 February 1996 May 1996 April 1997 June 1997
Processor Intel Pentium, 90 or 120 MHz (soldered TCP package) Intel Pentium, 90 MHz, upgradeable to 120 MHz (soldered TCP package) Intel Pentium, 120, 133 or 150 MHz (soldered TCP package) Intel Pentium, 133 MHz (soldered TCP package) Intel Pentium, 100, 120 or 133 MHz (soldered TCP package) Intel Pentium, 100 MHz, upgradeable to 133 MHz (soldered TCP package) Intel Pentium MMX, 166 MHz (soldered TCP package)
Chipset PicoPower Redwood2 (PT86C768) Intel 430MX
Bus
  • AT bus
  • VESA local bus for video
—
  • PCI bus
  • VESA local bus for video
—
  • PCI bus
  • VESA local bus for video
—
Memory Standard 8 MB; maximum 64 MB; EDO, 2 × 88-pin slots Standard 8 or 16 MB; maximum 104 MB; EDO, 2 × 144-pin slots Standard 16 MB; maximum 104 MB; EDO, 2 × 144-pin slots Standard 8 or 16 MB; maximum 104 MB; EDO, 2 × 144-pin slots Standard 8 MB; maximum 72 MB; EDO, 2 × 144-pin slots Standard 32 MB; maximum 104 MB; EDO, 2 × 144-pin slots Standard 16 or 32 MB; maximum 104 MB; EDO, 2 × 144-pin slots Standard 32 MB; maximum 104 MB; EDO, 2 × 144-pin slots
CMOS RAM 114 bytes — 114 bytes + 4 KB — 114 bytes + 4 KB —
Storage 2.5" IDE: 720 MB or 1.08 GB; drive adapter required 2.5" IDE: 1.2 GB; drive adapter required 2.5" IDE: 810 MB; drive adapter required 2.5" IDE: 810 MB, 1.08 GB or 1.2 GB; drive adapter required 2.5" IDE: 1.2 GB; drive adapter required 2.5" IDE: 810 MB, 1.08 GB, 1.35 GB or 2.1 GB; drive adapter required 2.5" IDE: 810 MB; drive adapter required 2.5" IDE: 3.0 GB; drive adapter required 2.5" IDE: 2.1 GB; drive adapter required 2.5" IDE: 3 GB; drive adapter required
Display
  • 10.4" active matrix, 800 × 600
  • 12.1" active matrix, 800 × 600
12.1" active matrix, 800 × 600 10.4" active matrix, 640 × 480
  • 12.1" active matrix, 800 × 600
  • 12.1" active matrix, 1024 × 768
  • 11.3" passive matrix, 800 × 600
  • 12.1" active matrix, 800 × 600
12.1" active matrix, 800 × 600 12.1" active matrix, 1024 × 768 12.1" active matrix, 800 × 600 13.3" active matrix, 1024 × 768
Graphics Trident Cyber9320, 1 MB video memory
  • Trident Cyber9320, 1 MB video memory (SVGA models)
  • Trident Cyber9385, 2 MB video memory (XGA models)
Trident Cyber9385, 2 MB video memory Trident Cyber9320 or Cyber9385, 1 MB video memory Trident Cyber9320, 1 MB video memory Trident Cyber9385, 2 MB video memory Trident Cyber9385, 1 MB video memory Trident Cyber9385, 2 MB video memory
Audio IBM Mwave MDSP2780 with stereo speakers and microphone ESS AudioDrive 1688 with stereo speakers and microphone IBM Mwave MDSP2780 with stereo speakers and microphone ESS AudioDrive 1688 with stereo speakers and microphone IBM Mwave MDSP2780 with stereo speakers and microphone ESS AudioDrive 1688 with stereo speakers and microphone IBM Mwave MDSP2780 with stereo speakers and microphone
Main battery NiMH or lithium-ion
CMOS battery
  • Lithium CMOS battery
  • 3-cell Varta NiMH reserve battery
Power connector Proprietary 4-pin
Media drives UltraBay (no CD-ROM support) UltraBay Thick UltraBay (no CD-ROM support) UltraBay Thick UltraBay or UltraBay Thick UltraBay Thick UltraBay Thick, taking a 3.5" 1.44 MB or 2.88 MB floppy drive, CD-ROM drive, PCMCIA module, second hard disk, second battery, CDPD or ARDIS wireless modem, TV tuner, Zip 100 drive or travel bezel
PC Card slots 2 × PCMCIA 2 × CardBus
Networking Modem None Modem None Modem None
Ports
  • Parallel
  • Serial
  • VGA out
  • PS/2
  • Docking connector
  • Line in
  • Line out
  • Infrared
  • Parallel
  • Serial
  • VGA out
  • PS/2
  • Docking connector
  • External floppy connector
  • Multimedia connector (proprietary)
  • Line in
  • Line out
  • Infrared
  • Parallel
  • Serial
  • VGA out
  • PS/2
  • Docking connector
  • Line in
  • Line out
  • Infrared
  • Parallel
  • Serial
  • VGA out
  • PS/2
  • Docking connector
  • External floppy connector
  • Line in
  • Line out
  • Infrared
  • Parallel
  • Serial
  • VGA out
  • PS/2
  • Docking connector
  • External floppy connector (UltraBay Thick models)
  • Line in
  • Line out
  • Infrared
  • Parallel
  • Serial
  • VGA out
  • PS/2
  • Docking connector
  • External floppy connector
  • Multimedia connector (proprietary)
  • Line in
  • Line out
  • Infrared
  • Parallel
  • Serial
  • VGA out
  • PS/2
  • Docking connector
  • External floppy connector
  • Line in
  • Line out
  • Infrared
  • Parallel
  • Serial
  • VGA out
  • PS/2
  • Docking connector
  • External floppy connector
  • Multimedia connector (proprietary)
  • Line in
  • Line out
  • Infrared
  • Parallel
  • Serial
  • VGA out
  • PS/2
  • Docking connector
  • External floppy connector
  • Line in
  • Line out
  • Infrared
  • Parallel
  • Serial
  • VGA out
  • PS/2
  • Docking connector
  • Line in
  • Line out
  • Infrared
  • Parallel
  • Serial
  • VGA out
  • PS/2
  • Docking connector
  • Multimedia ports for composite and S-Video in/out and MIDI/game port (proprietary)
  • Line in
  • Line out
  • Infrared
BIOS IBM BIOS with Easy-Setup
Pointing device TrackPoint
IBM model codes — 252 models of machine types 9546 and 9547
VariantModel codes
ThinkPad 760C9546-951, 9546-952, 9546-953, 9546-A11, 9546-A1A, 9546-A21, 9546-A22, 9546-A27, 9546-A2A, 9546-A2B, 9546-A2H, 9546-C01, 9546-C02, 9546-C03, 9546-C10, 9546-C11, 9546-C12, 9546-C1A, 9546-C21, 9546-C22, 9546-C27, 9546-C2A, 9546-C2B, 9546-C2H, 9546-C50, 9546-C51, 9546-C52, 9546-CD1, 9546-CDA, 9546-CDW, 9546-E11, 9546-E1A, 9546-E21, 9546-E22, 9546-E27, 9546-E2A, 9546-E2B, 9546-E2H, 9546-F11, 9546-F1A, 9546-F21, 9546-F2A, 9546-J11, 9546-J1A, 9546-J21, 9546-J22, 9546-J27, 9546-J2A, 9546-J2B, 9546-J2H, 9546-P11, 9546-P1A, 9546-P21, 9546-P27, 9546-P2A, 9546-P2H, 9546-S11, 9546-S1A, 9546-S21, 9546-S27, 9546-S2A, 9546-S2H, 9546-U11, 9546-U1A, 9546-U21, 9546-U22, 9546-U27, 9546-U2A, 9546-U2B, 9546-U2H, 9546-Y41
ThinkPad 760L9547-13B, 9547-A01, 9547-A0A, 9547-A0R, 9547-A31, 9547-A3A, 9547-A3R, 9547-C01, 9547-C0R, 9547-C31, 9547-C3A, 9547-C3R, 9547-D01, 9547-DC1, 9547-DP1, 9547-E01, 9547-E0A, 9547-E31, 9547-E3A, 9547-F01, 9547-F0A, 9547-F31, 9547-F3A, 9547-J01, 9547-J0A, 9547-J0R, 9547-J31, 9547-J3A, 9547-J3R, 9547-L01, 9547-LD1, 9547-LP1, 9547-P01, 9547-P0A, 9547-P31, 9547-P3A, 9547-S01, 9547-S0A, 9547-S31, 9547-S3A, 9547-U01, 9547-U0A, 9547-U0R, 9547-U31, 9547-U3A, 9547-U3R, 9547-W01, 9547-WC1, 9547-WD1, 9547-WL1
ThinkPad 760E9546-A3A, 9546-A3B, 9546-A4A, 9546-A4B, 9546-A9A, 9546-A9B, 9546-E1W, 9546-E3A, 9546-ED9, 9546-EP1, 9546-F3A, 9546-F3B, 9546-F9A, 9546-F9B, 9546-J3A, 9546-J9B, 9546-P3A, 9546-P4A, 9546-P9A, 9546-P9B, 9546-S3A, 9546-S4A, 9546-S9A, 9546-S9B, 9546-U3A, 9546-U3B, 9546-U3L, 9546-U4A, 9546-U9A, 9546-U9B, 9546-X9A, 9546-X9B
ThinkPad 760EL9547-A48, 9547-A4G, 9547-A4K, 9547-E4G, 9547-F4G, 9547-F6H, 9547-J4G, 9547-J4K, 9547-L04, 9547-P4G, 9547-P6H, 9547-S4G, 9547-S6H, 9547-U48, 9547-U4G, 9547-U4K, 9547-U4T, 9547-U6H, 9547-X4G, 9547-X4K, 9547-X4T, 9547-X6H
ThinkPad 760XD9546-A9E, 9546-E9E, 9546-F9E, 9546-J9E, 9546-P9E, 9546-S9E, 9546-U9E, 9546-X9E
ThinkPad 760XL9547-A9C, 9547-A9K, 9547-A9L, 9547-F9C, 9547-F9K, 9547-F9L, 9547-J9C, 9547-J9K, 9547-P9C, 9547-S9C, 9547-U9C, 9547-U9K, 9547-U9L, 9547-X9C, 9547-X9K, 9547-X9L
ThinkPad 765L9547-A9J, 9547-F9J, 9547-J9J, 9547-U9J, 9547-X9J
ThinkPad 765D9546-A9H, 9546-F9H, 9546-J9H, 9546-P9H, 9546-S9H, 9546-U9H, 9546-X9H
Variant not recorded9546-U4B, 9547-A3F, 9547-A4F, 9547-A4H, 9547-A6F, 9547-A6G, 9547-C0A, 9547-E3F, 9547-E4F, 9547-E4H, 9547-E6F, 9547-E6G, 9547-F4H, 9547-F6F, 9547-J3F, 9547-J4F, 9547-J4H, 9547-J6F, 9547-J6G, 9547-LP2, 9547-LP4, 9547-P3F, 9547-P4F, 9547-P4H, 9547-P6F, 9547-P6G, 9547-S3F, 9547-S4F, 9547-S4H, 9547-S6F, 9547-S6G, 9547-U3F, 9547-U4F, 9547-U4H, 9547-U4R, 9547-U4S, 9547-U6F, 9547-U6G, 9547-U6R, 9547-WL2, 9547-WL4

Status Indicators #

Source: Hardware Maintenance Manual Volume 3: ThinkPad Computers, p.384

The system status indicators show the current computer status in different colors (green, yellow, and orange).

Symbol Color Meaning
Battery symbol Green Battery fully charged
Orange Battery charging
Blinking orange Battery needs charging
Suspend symbol Green Computer is in suspend mode
Blinking Green Computer is entering suspend mode or hibernation mode, or is resuming normal operation
Power-on indicator Green Power on

See LCD Information Panel.

Fn Key Combinations #

Source: Hardware Maintenance Manual Volume 3: ThinkPad Computers, p.388

The following table shows the Fn key and function key combinations and their corresponding functions.

The Fn key works independently from the operating system. The operating system obtains the status through the system management interface to control the system.

Fn + Description
F1 Reserved
F2 Fuel-Gauge display on or off
F3 Standby mode invocation
F4 Suspend mode invocation
F5 Reserved
F6 Reserved
F7 LCD or CRT display
F8 Reserved
F9 Reserved
F10 Reserved
F11 Power management mode (toggling between high power, intelligent, and economy)
F12 Hibernation invocation

Using the Function Key #

Each time you press the Function key (Fn key), one of the following messages (called On-Screen Message) appears at the top left corner of the LCD.

The changed values are automatically saved when you return to the TV Channel On-Screen message. The values are not saved when you power-off the TV Tuner without returning to this message.

Message on LCD Parameter
(xx) TV Channel:
By using <- and +> you can select the channels from 2 to 69.
COL Color Adjustment:
By pressing and holding <- or +> you can change the color.
TNT TINT Adjustment:
By pressing and holding <- or +> you can change the tint.
BRT Bright Adjustment:
By pressing and holding <- or +> you can change the brightness.
CNT Contrast Adjustment:
By pressing and holding <- or +> you can change the contrast.
--- (No function) Reserved.
LO
HI

Auto Tune Sensitivity Selection:

LO: Means the sensitivity of the TV is low. In this mode, the TV Tuner receives strong TV signals only. To set LO, press <-.

HI: Means the sensitivity of the TV is high (factory default). In this mode, the TV Tuner receives weak and strong TV signals. To set HI, press +>.

D3S
DON

Time On-Screen Message appears:

D3S: On-screen Message appears for 3 seconds. To set D3S, press <-.

DON: On-screen Message always appears. To set DON press +>.

Checkout Guide #

Source: Hardware Maintenance Manual Volume 3: ThinkPad Computers, p.353

Start here when a ThinkPad 760 or 765 has a fault: confirm the symptom, then use the table to find the procedure that applies.

Use the following procedure as a guide for computer problems.

Note: The diagnostic tests are intended to test only IBM products. Non-IBM products, prototype cards, or modified options can give false errors and invalid system responses.

  1. Obtain the failing symptoms in as much detail as possible.
  2. Verify the symptoms by attempting to re-create the failure by running the diagnostic test or by repeating the same operation.

    Note: To run the diagnostics, refer to How to Run the Diagnostics.

  3. Use the following table with the verified symptom to determine which page to go to. Search the symptoms column and find the description that best matches your symptom; then go to the page shown in the “Go to” column.

    Symptoms (Verified) Go to
    Power failure. (The power indicator does not go on or stay on.) Power Systems Checkout.
    POST does not complete. No beeps or error code are indicated. Symptom-to-FRU Index, and then use the No Beep Symptoms table.
    The configuration is not the same as the installed devices. Checking the Installed Devices List.
    POST beeps, but no error codes are displayed. Symptom-to-FRU Index, and then use the Beep Symptoms table.
    POST detected an error and displayed numeric error codes. Symptom-to-FRU Index, and then use the Numeric Error Codes table.
    The diagnostic test detected an error and displayed an FRU code. FRU Codes.
    Other symptoms (such as LCD display problems). Symptom-to-FRU Index, and then use the Other Symptom table.
    Symptoms cannot be re-created. (Intermittent problems.) Use the customer reported symptoms and go to Symptom-to-FRU Index.

What to Do First #

The servicer must include the following in the parts exchange form or part return form that is attached to the returned FRU:

  1. Name and phone number of servicer.
  2. Date of service.
  3. Date when part failed.
  4. Date of purchase.
  5. Failure symptoms, error codes appearing on display, and beep symptoms.
  6. Procedure index and page number in which failing FRU was detected.
  7. Failing FRU name and part number.
  8. Machine type, model number, and serial number.
  9. Customer's name and address.

Before checking problems with the computer, determine whether or not the damage applies the warranty by referring to the following:

Note for Warranty: During the warranty period, the customer may be responsible for repair costs if the computer damage was caused by misuse, accident, modification, unsuitable physical or operating environment, or improper maintenance by the customer. The following list provides some common items that are not covered under warranty and some symptoms that may indicate the system was subjected to stresses beyond normal use:

The following is not covered under warranty:

  • LCD panel cracked by applying excessive force or by being dropped.
  • Scratched (cosmetic) parts.
  • Cracked or broken plastic parts, broken latches, broken pins, or broken connectors caused by excessive force.
  • Damage caused by liquid spilled into the system.
  • Damage caused by improperly inserting a PCMCIA card or installation of an incompatible card.
  • Damage caused by foreign material in the FDD or UltraBay.
  • Diskette drive damage caused by pressing the diskette drive cover or inserting diskettes with multiple labels.
  • Damaged or bent diskette eject button.
  • CD-ROM drive damage caused by excessive forces shock, or by being dropped.
  • Fuses blown by attaching a nonsupported device.
  • Forgotten computer or hard disk password. (making computer or hard disk unusable.)

If the following symptoms are present, they may indicate damage caused by non-warranted activity:

  • Missing parts may be a symptom of unauthorized service or modification.
  • HDD spindles can become noisy if subjected to excessive force or by being dropped.
  • I9990303 errors can be caused by exposure to strong magnetic fields.

Read This First #

Source: Hardware Maintenance Manual Volume 3: ThinkPad Computers, p.350

Before you go to the checkout guide, be sure to read this section.

Attention Important Notes

  • Only certified trained personnel should service the computer.
  • Read FRU service procedures before replacing any FRUs.
  • Be extremely careful during write operations such as copying, saving, or formatting. Drives in the computer that you are servicing might have been rearranged or the drive startup sequence might have been altered. If you select an incorrect drive, data or programs can be written over.
  • Replace FRUs only for the correct model. When you replace the FRU, make sure the model of the machine and FRU part number are correct by referring to the part list.
  • FRUs should not be replaced because of a single, un-reproducible failure. Single failures can occur from a variety of reasons that have nothing to do with a hardware defect such as: cosmic radiation, electrostatic discharge, or software errors. FRU replacement should be considered only when a recurring problem exists. If this is suspected, clear the error log and run the test again. Do not replace any FRUs if log errors do not reappear.
  • Be careful not to replace a non-defective FRU.

How to Use Error Messages

Use the error codes displayed on the screen to diagnose failures. If more than one error code is displayed, begin the diagnosis with the first error code. The cause of the first error code can result in false error codes being displayed. If no error code is displayed, see if the error symptom is listed in the Symptom-to-FRU Index.

Port Replicator Problems

If you suspect a problem with the Port Replicator, see Port Replicator Checkout in the Common Devices Checkout section for more information.

How to Diagnose Multiple FRUs

If the adapter or device has more than one FRU, the error code could be caused by either FRU. Before replacing multiple FRUs, try removing or exchanging each FRU, one by one in the designated sequence, to see if the symptoms change.

Keyboard and Auxiliary Input Device Checkout #

Source: Hardware Maintenance Manual Volume 4: ThinkPad Computers, p.221

Remove the external keyboard if the internal keyboard is to be tested.

If the internal keyboard does not work or an unexpected character appears, make sure that the flexible cable extending from the keyboard is correctly seated in the connector on the video card.

If the keyboard cable connection is correct, check the DSP card (see DSP Card Checkout) or Audio Card (ESS) card (see Audio (ESS) Card Checkout).

If the tests do not detect a keyboard problem, run the Keyboard Test by doing the following:

  1. Go to the diagnostic menu screen by selecting Test in the Easy-Setup menu.
  2. Press Ctrl+A to enter to the advanced diagnostic mode.
  3. Press Ctrl+K, a layout of the keyboard appears on the screen.
  4. Check that when each key is pressed, the key's position on the keyboard layout on the screen changes to a black square.

    Note: When the Fn key is pressed, a black square briefly appears.

If the tests detect a keyboard problem, do the following one at a time to correct the problem. Do not replace a nondefective FRU.

  • Reseat the keyboard card cable.
  • Replace the keyboard card cable.
  • Replace the keyboard card assembly.
  • Replace the video card.
  • Replace the system board.

The following auxiliary input devices are supported for this computer:

  • Numeric keypad
  • Mouse (PS/2 compatible)
  • External keyboard (with keyboard/mouse cable)

If any of these devices do not work, reseat the cable connector and repeat the failing operation.

If the problem does not occur again, recheck the connector.

If the problem is not corrected, replace the device, and then the system board.

TrackPoint III Checkout #

Source: Hardware Maintenance Manual Volume 3: ThinkPad Computers, p.358

If the TrackPoint III will not work, check the configuration in the ThinkPad Features program. If the configuration of the TrackPoint III is disabled, select Enable to enable it.

If this does not correct the TrackPoint III problem, continue with the following.

The TrackPoint III does automatic compensations to adjust the pointer sensor. During this process, the pointer moves on the screen automatically for a short time. This self-acting pointer movement can occur when a slight, steady pressure is applied to the TrackPoint III pointer while the computer is powered on or while the system is running, or when readjustment is required because the temperature has exceeded its normal temperature range. This symptom does not indicate a hardware problem. No service actions are necessary if the pointer movement stops in a short period of time.

If a click button problem or pointing stick problem occurs, do the following:

  1. Go to the Easy-Setup menu.
  2. Select an item with the pointing stick.
  3. Press either the left or right click button.
  4. Verify that both buttons work correctly.

If either the pointing stick or the click button does not work, do the following actions one at a time to correct the problem. Do not replace a nondefective FRU.

  • Reseat the keyboard card cables.
  • Replace the keyboard card cables.
  • Replace the keyboard card assembly.
  • Replace the video card.
  • Replace the system board.

Diskette Drive Test #

Source: Hardware Maintenance Manual Volume 3: ThinkPad Computers, p.360

Do the following to isolate the problem to a controller, drive, or diskette. A scratch, write enabled, nondefective 2HD diskette is required.

FDD-1 represents the diskette drive in the UltraBay.

FDD-2 represents the port replicator, expansion unit, or diskette drive attached through the external diskette drive connector.

Attention Warning: Make sure that the diskette does not have more than one label attached to it. Multiple labels can cause damage to the drive, or can cause the drive to fail.

Do the following to select the test device:

  1. Select the advanced diagnostics mode and select Tool, then select FDD-1 or FDD-2 and press the Spacebar. A √ mark appears next to the selected icon. Insert the blank diskette when instructed.
  2. Run the diskette drive test.
  3. If the controller test detects an error, FRU code 10 appears. Replace the system board.
  4. If the controller test runs without errors, the drive read/write tests start automatically.
  5. If the drive test detects an error, FRU code 50 for FDD-1 or 51 for FDD-2 appears. If the diskette itself is known to be good, replace the drive.
  6. If FDD-2 test detects an error, move the drive to the computer's diskette drive connector directly, if possible, and test it again as FDD-1. If no errors occur in the FDD-1 position, the drive is not defective. Go to Port Replicator Checkout in the Common Devices Checkout section to isolate the replicator problem.
  7. If the drive is attached through an Expansion Unit, go to the service manual of the Expansion Unit to isolate the problem.
  8. If the drive is attached through a Diskette Drive Attachment Unit, replace the unit.

If an error occurs when the external diskette drive is attached through the external diskette drive connector and there is not a diskette drive in the UltraBay, reseat the connector on the video card. If the error still remains, reseat the external diskette drive connector. If the error still remains, replace the following FRUs one at a time:

  1. External diskette drive kit
  2. Video card
  3. External diskette drive connector

PC Test Card LED #

Source: Hardware Maintenance Manual Volume 3: ThinkPad Computers, p.387

The green LED on the PC test card turns on when the PCMCIA test is running.

If the LED does not turn on, check that the card is installed correctly by reseating the card. If it still does not turn on after it is reseated, try using another slot for the test. If the LED still does not turn on and the test fails, replace the FRU shown by the diagnostic error code.

External Diskette Drive Test #

Source: Hardware Maintenance Manual Volume 3: ThinkPad Computers, p.604

Use the following procedure to isolate the diskette problem to a controller, drive or diskette. A scratch, write-enabled 2HD diskette is required.

  1. Select the icon FDD on the TEST MENU. By doing this, the controller test and the drive read/write test run. If the controller test detects an error, FRU code 10 appears. In this case, replace the system board.
  2. If the controller test run without errors, follow the instructions on the screen and insert a scratch diskette.
  3. If the drive test detects an error, FRU code 50 appears. If the diskette media are known to be good, replace the drive or the drive cable.

External Keyboard / Auxiliary Input Device Checkout #

Source: Hardware Maintenance Manual Volume 4: ThinkPad Computers, p.695

The following auxiliary input devices may be available for IBM ThinkPad models.

  • Numeric keypad
  • Mouse (PS/2 compatible)
  • External keyboard (with Keyboard/Miniature Mouse cable)
  • If you suspect a problem with any of the auxiliary input devices (listed above), replace the device.

    If the problem is not corrected, replace the following FRUs one at a time to correct the problem.

    • Keyboard control card
    • System board
  • If the computer receives an incorrect keyboard response, remove other external devices, check the keyboard connections, and recheck the keyboard responses. If the problem remains, replace the following FRUs one at a time to correct the problem.

    • Keyboard
    • Keyboard control card
    • System board
  • If a 00030100 error message appears, power-off the computer and the external devices. Then power-on the computer before you power-on the external devices.

Fax/Modem Checkout #

Source: Hardware Maintenance Manual Volume 3: ThinkPad Computers, p.606

001
  • Power-off the computer.
  • Ensure that the modem is installed correctly.
  • If the modem never worked in customer mode, ensure that all drivers are loaded correctly onto the computer.
  • Ensure that the communication program is supported on the computer.
  • Ensure that the public switch telephone network (PSTN) cable and the data access arrangement (DAA) cable, if installed, are connected correctly.

If you need to correct one of the above conditions, do so now; then continue.

Note: PCMCIA cards can be inserted and removed while the system is powered on.

  • Power-on the system.
  • Insert the IBM Data/FAX Modem diskette into the default diskette drive.
  • If you are servicing a High Speed Internal Data/Fax Modem (Models FC3632 and FC3650), at the DOS prompt (for example, A:\), type IBMDIAG; then press Enter.
  • If you are servicing a PCMCIA Data/FAX Modem (Models FC3634 and FC3635), at the DOS prompt (for example, A:\), type ESTDIAG; then press Enter.
  • Follow the instructions on the screen. (If you need help, press F1.)

Did the diagnostic tests detect an error?

Yes — go to Step 003. No — go to Step 002.

002

The diagnostic tests have completed successfully. If you suspect a problem, go to Step 004.

003

Go to the Symptom-to-FRU Index for the computer you are servicing.

004
  • Check the PSTN cable and the DAA cable, if installed, for continuity.

Is the cable(s) good?

Yes — go to Step 006. No — go to Step 005.

005

Replace the defective cable(s).

006
  • Have the customer transmit a call.

Was the call transmitted successfully?

Yes — go to Step 008. No — go to Step 007.

007

Go to Step 011.

008
  • Have the customer receive an incoming call on the modem.

Was the incoming call received?

Yes — go to Step 010. No — go to Step 009.

009

Go to Step 014.

010

The diagnostic tests have completed successfully. If you still suspect a problem that is not software related, replace the External DAA; then replace the modem.

011
  • Have the customer transmit a call at a lower speed.

Was the call transmitted successfully?

Yes — go to Step 013. No — go to Step 012.

012

If installed, replace the external DAA. If you do not have an external DAA installed, or replacing the external DAA does not correct the problem, replace the modem.

013

Have the telephone line checked.

014
  • Have the customer receive an incoming call on the modem at a lower speed.

Was the incoming call received?

Yes — go to Step 016. No — go to Step 015.

015

If installed, replace the external DAA. If you do not have an external DAA installed, or replacing the external DAA does not correct the problem, replace the modem.

016

Have the telephone line checked.

Printer Checkout #

Source: Hardware Maintenance Manual Volume 3: ThinkPad Computers, p.608

  1. Make sure the printer is correctly connected and is powered-on.
  2. Run the printer self-test.

If the printer self-test does not run correctly, the problem is in the printer. Refer to the printer service manual.

If the printer self-test runs correctly, do the following.

  1. Verify the port settings in configuration.
  2. Install a wrap plug on the port (indicated in configuration) and run the advanced diagnostic tests.
  3. If the advanced diagnostic tests (with the wrap plug installed) do not detect a failure, replace the printer cable. If the problem is not corrected, replace the system board.

Port Replicator Checkout #

Source: Hardware Maintenance Manual Volume 3: ThinkPad Computers, p.609

Use the following procedure to isolate a port replicator problem. A port replicator attaches to the system expansion connector at the rear of the computer.

  1. Power-off the computer.
  2. Remove the failing devices from the replicator.
  3. Unplug the AC adapter from the replicator, if attached.
  4. Remove the port replicator from the computer.
  5. Reconnect the failing device directly to the computer. (If another device occupies the connector, remove it first.)
  6. Go to General Checkout and follow that procedure.
  7. If the advanced diagnostic device test does not find an error, suspect a problem with the port replicator or the system expansion bus.
  8. Power-off the computer and reconnect the port replicator.
  9. Power-on the computer and run the following advanced diagnostic tests:
    • Serial port test with the wrap plug installed on the replicator.
    • Parallel port test with the wrap plug installed on the replicator.
    • PCMCIA-2 test with the PC test card installed.
    • FDD-2 (FDD-1 if no drive is installed in the computer) drive test on the failing device.
  10. If diagnostic errors appear, replace the replicator or diskette drive attachment unit. If the problem remains after the replacement, replace the system board.
  11. If power problems appear only when using the replicator, replace the replicator.

If power shut downs occur intermittently when using PCMCIA-2 devices via a port replicator, suspect an over-current problem. Some PCMCIA devices use more power; if the maximum usage of each device occurs simultaneously, the total current will exceed the limit, thereby causing a power shut down. Isolate this problem by removing one of the devices, and use the computer under the same condition, and see whether a power shut down occurs. Do this procedure for all devices then determine the cause.

Customer purchase of the larger AC adapter (50W, optional) is recommended, if it is not yet in use.

TrackPoint II Checkout #

  • If the TrackPoint II does not work, check the configuration. If the configuration of the TrackPoint II is set to Disabled or Off, change it to Enable or On.

    If the problem remains, continue.

Note: TrackPoint II automatically compensates to adjust the pointer sensor. This causes the pointer to move slightly on the screen and then stop. Pointer movement might occur when a slight, steady pressure is applied to the TrackPoint II pointer when the computer is powered-on or running, or when exceeded temperature range requires re-adjustment.

  • If the cursor floats or moves erratically, power-off and disconnect the mouse. Power-on the computer. If the problem goes away, replace the mouse. If the problem remains, replace the keyboard.
  • For click button or pointing stick problems:

    1. Go to the Easy-Setup screen.
    2. Select an item with the pointing stick.
    3. Press either left or right click button.
    4. Verify that both buttons work correctly.

    If the pointing stick or the click button does not work, do the following.

    1. Reseat the keyboard cables.
    2. Replace the keyboard.
    3. Replace the interposer card (355x, 360x, 750x, 755x).
    4. Replace keyboard control card (720).
    5. Replace the system board.

Memory Checkout #

Source: Hardware Maintenance Manual Volume 3: ThinkPad Computers, p.354

DIMM cards are available for increasing memory capacity.

Note: Models 760XL and 760XD have a dip switch on the DIMM adapter card. When a 64 MB 2bank DIMM is installed, the dip switch is located to the left as case 2, and the base memory (8 MB) on the DIMM adapter card is disabled.

The 64MB 2 bank DIMM is accepted only in slot 2. If the card is installed in slot 1, the card will not be recognized as 64MB DIMM.

Models 760C/760CD/760L/760LD

DIMM Displayed Value
0MB 7808KB
8MB 16000KB
12MB 20096KB
16MB 24192KB
20MB 28288KB
24MB 32384KB
28MB 36480KB
32MB 40576KB

Models 760E/760ED/760EL/760ELD

DIMM Displayed Value
Base Memory 8MB Base Memory 16MB
0MB 7808KB 16000KB
8MB 16000KB 24192KB
16MB 24192KB 32384KB
24MB 32384KB 40576KB
32MB 40576KB 48768KB
40MB 48768KB 56960KB
48MB 56960KB 65152KB
64MB 73344KB 81536KB

Models 760XL/760XD

Dip Switch Slot 1 Slot 2 Total Memory Displayed Value
Right 16MB 0MB 32MB 32384KB
8MB 40MB 40576KB
16MB 48MB 48768KB
32MB 64MB 65152KB
32MB 32MB 80MB 81536KB
Left 16MB 64MB 88MB 89728KB
32MB 64MB 104MB 106112KB

Memory errors might stop system operations, show error messages on the screen, or hang the system.

Use the following procedure to isolate memory problems:

Note: Make sure that the DIMM adapter card is fully installed into the connector. A loose connection can cause an error.

  1. Power-off the computer and remove the DIMM adapter card from its slot (if installed).
  2. Press and hold the F1 key; then power-on the computer. Hold the F1 key down until the Easy-Setup screen appears.
  3. Select Test and press Enter.
  4. Select Memory and press Enter to run the memory test on base memory. If an error appears, replace the system board.
  5. Power-off the computer and reinstall the DIMM adapter card; then power-on the computer. Verify the memory size; then test the memory. If an error appears, replace the DIMM adapter card.

If memory problems occur intermittently, use the loop option to repeat the test. When the test detects an error, an error log is printed on the printer connected to the parallel port. See Error Log for more information.

System Programs in Flash Memory

System setup programs and diagnostic tests are stored in flash memory.

Flash Memory Update

A flash memory update is required for the following conditions:

  • New versions of system programs.
  • New features or options are added.

To update the flash memory, do the following:

  1. Get the appropriate diskette containing the update.
  2. Insert the System Program Service Diskette into drive A and power-on the computer.
  3. Select Update system programs from the menu.

System Board and CPU Card Checkout #

Source: Hardware Maintenance Manual Volume 3: ThinkPad Computers, p.356

The processing functions are performed by both the system board and the CPU card. Processor problems can be caused by either FRU. However, the CPU card generally has a lower probability of failure. When a numeric code calls the system board or the CPU card as a FRU, or the CPU card is called by a diagnostic test by showing FRU code 11, use the following procedure to isolate the problem:

  1. Run the system board test to verify the symptom. This test verifies both the system board and the CPU card. If no error is detected, return to Checkout Guide.

    Note: Don't touch the keyboard and pointing device when the system board test is running. This may cause an unexpected error.

  2. If FRU code 10 appears, replace the system board but do not replace the CPU card. Transfer the CPU card from the old system board to the new system board.
  3. If FRU code 11 appears, reseat the CPU card.
  4. Rerun the test to verify the fix.
  5. If FRU code 11 remains, replace the CPU card.

If this procedure does not correct the problem, go to Undetermined Problems.

Game Port Checkout #

Source: Hardware Maintenance Manual Volume 3: ThinkPad Computers, p.360

Do the following if a joystick problem occurs:

  1. Connect the joystick to the game port.
  2. Go to the Easy-Setup menu.
  3. Select an item with the joystick.
  4. Press any button of the joystick.
  5. Verify that all buttons work correctly.

If either the joystick or a button does not work, replace the video board. If the problem still remains, replace the system board.

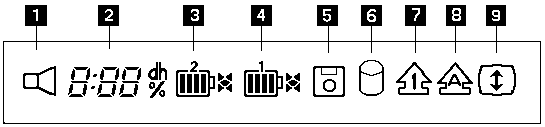
LCD Information Panel Checkout #

Source: Hardware Maintenance Manual Volume 3: ThinkPad Computers, p.361

If an LCD information panel problem occurs, do the following:

  1. Power-off the computer.
  2. Power-on the computer.
  3. All the icons in the LCD information panel appear for a moment soon after the computer is powered-on. Verify that all icons appear correctly. If some of the icons do not appear, replace the keyboard.

If the problem still remains, replace the video card.

Checking the Installed Devices List #

Source: Hardware Maintenance Manual Volume 3: ThinkPad Computers, p.386

If a device is installed but the icon appears in a gray shade rather than a dark shade on the basic diagnostics screen, the device is defective. Reseat the device connectors. If the symptom remains, replace the device or the system board. If needed, adjust the contrast control to clearly distinguish the shades of the icon.

If a device that is not installed appears in a dark shade (for example, FDD-2 appears in a dark shade when no second FDD is installed), do the following:

  1. Replace the first device in the configuration, such as an FDD-1, an HDD-1, or a PCMCIA-1.
  2. If the problem remains, replace the system board.

The PCMCIA-1, Parallel, and Serial icons are always displayed in a dark shade because the icons represent subsystems of the system board and not the attachment of the devices.

The FDD-1, HDD-1, or PCMCIA-1 icons represent the first drive in the system configuration for each type of device.

Similarly, the FDD-2 or PCMCIA-2 icons represent the second drive, usually attached through a port replicator or an expansion unit. The HDD-2 icon represents the hard disk drive in the UltraBay.

The HDD-3 and HDD-4 icons represent the hard disk drive, attached through an expansion unit.

Power Systems Checkout #

Source: Hardware Maintenance Manual Volume 3: ThinkPad Computers, p.361

To verify the symptom of the problem, power-on the computer using each of the power sources as follows:

  1. Remove the battery pack, diskette drive, and hard disk drive.
  2. Connect the AC Adapter and check that power is supplied.
  3. Install the diskette drive or hard disk drive one at a time, and check that power is supplied from each power source.
  4. Disconnect the AC Adapter, remove the hard disk and diskette drive, and install the charged battery pack; then check that power is supplied by the battery pack.

If you suspect a power problem, see the appropriate power supply check in the following list:

Power Shutdown Switch #

The power shutdown switch resets the system regardless of the microcode status and forces the power off. Use this push button to power-off when power is not completely off or the microcode is in a hung state.

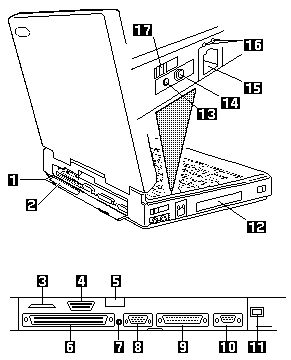
See Rear View for the power shutdown switch.

Checking the AC Adapter #

You are here because the computer fails only when the AC Adapter is used.

  • If the power problem occurs only when the port replicator is used, replace the replicator.
  • If the power-on indicator does not turn on, check the power cord of the AC Adapter for correct continuity and installation.
  • If the operational charge does not work, go to Checking Operational Charging.

Note: For Model 760CD, 760ED, 760LD, 760ELD, 760XL, and 760XD, there are two types of adapters. The procedure for checking both types is the same.

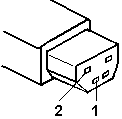
  1. Unplug the AC Adapter cable from the computer and measure the output voltage at the plug of the AC Adapter cable. See the following figure:

    Output plug of the adapter cable, with pins 1 and 2 labelled for voltage measurement

    (20 - 10 V)
    Pin Voltage (Vdc)
    1 +18.0 to +21.0
    2 Ground
    (16 - 10 V)
    Pin Voltage (Vdc)
    1 +14.5 to +17.0
    2 Ground
    • If the voltage is correct, make sure the connection between DC/DC card and system board is not loose.
    • Replace the DC/DC card.
    • If the problem is not corrected, replace the system board.
    • If the problem is still not corrected, go to Undetermined Problems.
    • If the voltage is not correct, go to the next step.
  2. Unplug the AC Adapter cable from the ac power outlet and wait five minutes or longer to allow the over-voltage protection circuit to be fully discharged and initialized.
  3. Plug the AC Adapter cable into the ac power outlet.
  4. Measure the output voltage of the AC Adapter.
  5. If the voltage is still not correct, replace the AC Adapter.

Note: An audible noise from the AC Adapter does not always indicate a defective adapter.

Checking Operational Charging #

To check operational charging, use a discharged battery pack or a battery pack that has less than 50% of the total power remaining when installed in the computer.

Perform operational charging. If the battery status indicator does not turn on, remove the battery pack and leave it to return to room temperature. Reinstall the battery pack. If the charge indicator still does not turn on, replace the battery pack.

Checking the Battery Pack #

Battery charging will not start until the Fuel-Gauge shows that less than 95% of the total power remains; with this condition the battery pack will charge to 100% of its capacity. This protects the battery pack from being overcharged or having a shortened life.

Do the following:

  1. Power-off the computer.
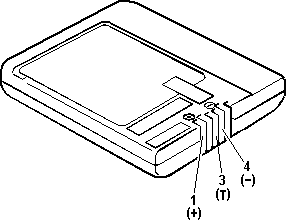
  2. Remove the battery pack and measure the voltage between battery terminals 1 (+) and 4 (-).

    Battery pack showing its terminals, with terminal 1 (+), 3 (T) and 4 (-) labelled

    Terminal Voltage (Vdc) / Signal
    1 +0 to +13.5
    2 Send
    3 Thermal
    4 Ground (-)
    5 Select

    Note: Signal lines, not used in these steps, are used for communication between the system and the battery.

  3. If the voltage is less than +11.0 Vdc, the battery pack has been discharged. Recharge the battery pack.

    If the voltage is still less than +11.0 Vdc after recharging, replace the battery.

    Note: If the voltage of the battery pack is 0 V, it is not defective.

  4. If the voltage is more than +11.0 Vdc, measure the resistance between battery terminals 3 and 4. The resistance must be 4 to 30 K ohm.

    If the resistance is not correct, replace the battery pack.

    If the resistance is correct, replace the DC/DC card.

Checking the Car-Battery Adapter #

  1. Unplug the Car-Battery Adapter cable from the computer.
  2. Plug the Car-Battery Adapter into the cigarette lighter socket.

    Note: If the adapter is already plugged in, reseat it.

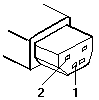
  3. Measure the output voltage of the Car-Battery Adapter cable.

    Rectangular DC plug of the adapter cable with pins 1 and 2 labelled for measuring the output voltage

    Pin Voltage (Vdc)
    1 +19.0 to +21.0
    2 Ground
    • If the voltage is correct, the Car-Battery Adapter is working correctly. Check that the computer runs with the AC Adapter. If it runs correctly with the AC Adapter, check the system board. If the problem still remains, replace the following FRUs one at a time.

      1. DC/DC card
      2. System board

      If the problem is not resolved when the system board is replaced, go to Undetermined Problems.

    • If the voltage is outside the normal voltage range, do one of the following:

      • Try these test procedures in a different car, if one is available.
      • Replace the Car-Battery Adapter if the computer works correctly with the AC Adapter.

Note: If the output voltage from the cigarette lighter socket of the car is less than 10.5 Vdc, a continuous noise may be heard. The condition of the car battery should be checked by appropriate service personal.

Checking the Backup Battery #

  1. Power-off the computer and unplug the AC Adapter from the computer.
  2. Open the keyboard, and remove the diskette drive/CD-ROM drive, the battery pack, and the hard disk drive.
  3. Remove the top cover and keyboard unit.
  4. Open the keyboard unit, then remove the keyboard card.
  5. Remove the backup battery from the keyboard card. (Refer to Backup Battery, Speaker, Standby Battery to remove the battery.)
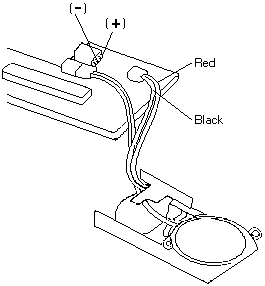
  6. Measure the voltage of the backup battery. See the following figure:

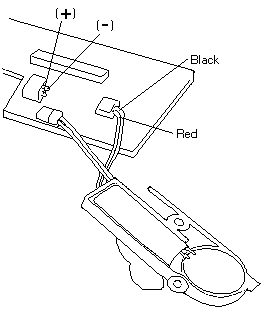
    Backup battery in its holder with its cable connector, with the (+) and (-) pins and the red and black wires labelled

    Wire Voltage (Vdc)
    Red +2.5 to +3.7
    Black Ground
    • If the voltage is correct, replace the system board.
    • If the voltage is not correct, the backup battery has been discharged. Replace the backup battery.
    • If the backup battery discharges quickly after replacement, replace the system board.

Checking the Standby Battery #

  1. Power-off the computer and unplug the AC Adapter from the computer.
  2. Open the keyboard, remove the diskette drive/CD-ROM drive, the battery pack, and hard disk drive.
  3. Remove the top cover and keyboard unit.
  4. Open the keyboard unit and remove the keyboard card.
  5. Remove the standby battery from the keyboard card. (Refer to Backup Battery, Speaker, Standby Battery to remove the battery.)

    Attention Warning: Be careful not to cause a short circuit when measuring the voltage.

  6. Measure the voltage of the standby battery.

    • If the voltage between red and black is 3.5 Vdc or greater, the voltage is correct. Go to step 12 to verify standby battery operation.
    • If the voltage is less than 3.5 Vdc, go to the next step.
  7. Plug the AC Adapter into the computer and power-on the computer.

    Warning: Be careful not to cause a short circuit when measuring the voltage.

  8. Measure the output voltage at the connector on the system board.

    Standby battery and its connector on the system board, with the (+) and (-) pins and the black and red wires labelled

    Pin Voltage (Vdc)
    + +4.0
    - Ground
    • If the voltage is less than +4.0 Vdc, replace the DC/DC card. If the voltage is still low, replace the system board.
    • If the voltage is more than +4.0 Vdc, power-off the computer, replace the standby battery, and go to the next step.
  9. Ensure that the AC Adapter is plugged into the computer, then power-on the computer.
  10. Charging of the standby battery starts. A depleted battery needs approximately 30 minutes to be recharged to the operational voltage of +3.5 Vdc.
  11. Unplug the AC Adapter.
  12. Verify the standby battery function by removing and installing the battery pack during suspend mode.

    Note: Removing and installing the battery pack during suspend mode should be done within one minute. The resume operation must start. If the resume operation does not work, switching of power from the battery pack to standby battery will not be correct. Replace the DC/DC card.

    If replacing the DC/DC card does not resolve the problem, replace the system board.

Power Management Features #

Source: Hardware Maintenance Manual Volume 3: ThinkPad Computers, p.368

Three power management modes are provided by the computer to reduce power consumption and prolong battery power.

Standby Mode

When in standby mode the following occurs:

  • The LCD backlight turns off.
  • The hard disk motor stops.

Events that cause the computer to enter standby mode:

  • Standby requested by the Fn key (Fn+F3).
  • No activity under auto-standby enabled by the ThinkPad Features program.

Events that cause the computer to exit or resume standby mode:

  • (Resume) Any key operation.

Suspend Mode

When in suspend mode, the following, in addition to the four actions of standby mode, occur:

  • The LCD is powered off.
  • The hard disk is powered off.
  • The CPU is stopped.

Notes:

  1. In the ThinkPad Features program, the computer can be set to “Will not suspend even if LCD is closed”.
  2. In the ThinkPad Features program, the computer can be set to “suspend hibernate while docked”.
  3. When the computer is powered with ac power and is used with one of the communication PC cards, the computer enters standby mode, the PC card and application program remain active.
  4. In the following conditions, the computer cannot enter suspend mode:
    • While a communication link is running.
    • While the computer is attached to a Dock I.

Events that cause the computer to enter suspend mode:

  • Suspend mode is requested by the Fn key (Fn+F4).
  • The LCD is closed.
  • The keyboard is opened.
  • The specified time has elapsed from the last operation with the keyboard, mouse, hard disk drive, parallel connector, or diskette drive, or the AC Adapter is plugged in. The time is specified by Suspend Timer in the ThinkPad Features program.
  • The battery condition is low. The battery power indicator blinks orange.
  • In the ThinkPad features program, the computer can be set to “Hibernate when battery becomes low.” The default setting is suspend.
  • Either the PS2 OFF or PS2 SUSpend command is set in the ThinkPad Features program.

Events that cause the computer to exit or resume suspend mode:

  • (Resume) The LCD is opened.
  • (Resume) The keyboard is closed.
  • (Resume) The real time clock alarm is signaled.
  • (Resume) The ring indicator (RI) is signaled by a serial or PCMCIA device.
  • (Resume) The Fn key is pressed.
  • (Resume) An external keyboard key is pressed while operating with ac power.
  • (Exit) Timer conditions are satisfied for entering hibernation mode.

Hibernation Mode

When in hibernation mode, the following occurs:

  • The system status, RAM, VRAM, and setup data are stored on the hard disk.
  • The system is powered off.

Notes:

  1. In the ThinkPad Features program, the computer can be set to suspend hibernate while docked.
  2. The computer cannot enter hibernation mode when:
    • It is powered with ac power and a communication PC card is used.
    • The computer is attached to a Dock I.

Any of the following events can cause the computer to enter hibernation mode:

  • Hibernation mode is requested by the Fn key (Fn+F12).
  • Timer conditions are satisfied in suspend mode.
  • A critical low battery condition occurs.
  • The PS2 HIBernation command is set in the ThinkPad Features program.

The following event causes the computer to exit hibernation mode:

  • The power-on switch is turned on.

When power is turned on, the hibernation history in the boot record on the hard disk is recognized and system status is restored from the hard disk to resume operation.

Port Replicator Power Overload #

Source: Hardware Maintenance Manual Volume 4: ThinkPad Computers, p.234

If power shutdowns occur intermittently when using PCMCIA-2 devices via a port replicator, suspect a current overload. Some PCMCIA devices use much power; if the maximum usage of each device occurs simultaneously, the total current will exceed the limit, thereby causing a power shutdown. Isolate this problem by removing one of the devices, and use the computer under the same condition to see whether a power shutdown occurs. Do this procedure for all devices, then determine the cause.

Power-on the TV Tuner #

Use the ThinkPad Features program or PS2.EXE. to power-on the TV Tuner; then power-on the internal device in the diskette drive compartment.

Attention If power for the internal device is turned off when the TV Tuner is set up, nothing appears on the LCD display. Turn on power for the TV Tuner again.

  • If you are using DOS, do one of the following:

    • Power-on the computer and type PS2 from the command prompt to start the ThinkPad Features program.

      Select Set Power Features from the ThinkPad Features menu; then put a check mark at Internal Serial Port (or Diskette Drive Compartment) under the Power for devices. If you need help, press F1 to display the help menu.

    • Type PS2 MODEM ON (or PS2 DDC ON) from the command prompt; press the Enter key to set the power ON.
  • If you are using OS/2 or Microsoft Windows, do the following:

    1. Power-on the computer and start the ThinkPad Features program.
    2. Select the Power icon; then move the pointer to Internal Serial Port (or Diskette Drive Compartment) under the Power for devices and click the button to check mark it.
    3. Press the OK button.

How to Run the Diagnostics #

Use either the TrackPoint III or the cursor move keys to interact with the tests. The Enter key works the same as selecting the OK icon to reply OK.

  1. Press and hold the F1 key, then power-on the computer. Hold the F1 key down until the Easy-Setup screen appears.
  2. Select Test and press Enter.
  3. Select a device and press Enter to run the test.
  4. The test progress screen appears.
  5. OK appears when the test ends without any errors.
  6. Start the Advanced Diagnostic test by pressing Ctrl+A on the basic diagnostic menu screen.
  7. Select Tool to install the tools.

    Note: The following tools are required.

    • FDD: Erasable 2HD diskette
    • Parallel: Wrap plug (P/N 72X8546)
    • Serial: Wrap plug (P/N 72X8546)
    • PCMCIA: PC Test Card (P/N 35G4703)
    • CDROM: Any CD (data CD is recommended)
  8. Select a device, press the Spacebar, and install the tool. Multiple devices can be selected by repeating this step. A √ mark appears beside the selected devices.
  9. Select OK and press Enter if the selection is OK.
  10. Select a device and press Enter to start the tests.

    Note: Don't touch the keyboard and pointing device when the system board test in running. This may cause an error.

  11. Select Test All to test all devices.
  12. Select Loop Test to run the tests in a repeated loop. A loop option menu appears where you can select a device loop or all-device loop. Select a device by pressing the Spacebar. Repeat this step to select multiple devices. Press Enter to start the diagnostic loop. If no device is selected, all device tests are looped.
  13. To exit the loop, keep pressing Ctrl+Pause until the test exits. A beep sounds to notify that the exit interrupt is sensed by the test program.

External Display Self-Test #

Source: Hardware Maintenance Manual Volume 3: ThinkPad Computers, p.604

If the display problem occurs only when using an external display, use the following instructions to correct the problem.

Note: Before you replace a display, check the following list to see if it is connected correctly.

  • 8506 and 8508 displays must be connected to an Image Adapter/A or an Image-I Adapter/A.
  • 63XX and 85XX systems support either 63XX or 85XX displays.
  • 85XX systems with an XGA-2 adapter support 95XX displays.
  • 95XX systems support either 63XX, 85XX, or 95XX displays.
  • ThinkPad models support either 85XX or 95XX displays.

If the screen is rolling, replace the display assembly. If that does not correct the problem, replace FRUs in the following order until the problem goes away:

  1. Video card
  2. Display adapter (any type)
  3. System board
  4. Bus adapter (if used)

If the screen is not rolling, run the display self-test as follows:

  1. Power-off the computer and display.
  2. Disconnect the display signal cable.
  3. Power-on the display.
  4. Set the contrast to its maximum position.
  5. Set the brightness control to the center detent position.

Check for the following conditions:

  • You should be able to vary the screen intensity by adjusting the contrast and brightness controls.
  • The screen should be white or light gray, with a black margin (test margin) on the screen.

Note: The location of the test margin varies with the type of display. The test margin might be on the top, bottom, or one or both sides.

If you do not see a test margin on the screen, replace the display. If there is a test margin on the screen, replace the system board.

Note: On ThinkPad Models 700, 700C, 720C, 720C, do the following:

  1. Video card
  2. System board

How to Run a Low-Level Format #

Source: Hardware Maintenance Manual Volume 3: ThinkPad Computers, p.387

Do the following to format the hard disk.

Attention Attention: Make sure the address of the drive to be formatted is correct. This procedure erases all information on the disk.

  1. Power-off the computer.
  2. Insert the ThinkPad Hardware Maintenance Diskette Version 1.20 into diskette drive A and power-on the computer.

    Note: You can use this maintenance diskette for any ThinkPad model.

  3. Select Format the hard disk from the main menu.
  4. Select the drive from the menu.
  5. Follow the instructions on the screen.

Symptom-to-FRU Index #

Source: Hardware Maintenance Manual Volume 3: ThinkPad Computers, p.371

Symptoms The Symptom-to-FRU Index lists the symptoms and errors and the possible causes. The most likely cause is listed first.

Note: Perform the FRU replacement or actions in the sequence shown in the “FRU/Action in Sequence” column. If a FRU did not solve the problem, put the original part back in the computer. Do not replace a nondefective FRU.

This index can also be used to help you decide which FRUs to have available when servicing a computer.

Numeric error codes show the errors detected in POST or system operation. In the following error codes, X can be any number.

  • If no codes are available, use narrative symptoms.
  • If the symptom is not listed, go to Undetermined Problems.

Note: For IBM devices not supported by diagnostic codes in the ThinkPad notebook computers, see the manual for that device.

For Error codes see Numeric Error Codes.

Undetermined Problems #

Source: Hardware Maintenance Manual Volume 3: ThinkPad Computers, p.383

You are here because the diagnostic tests did not identify which adapter or device failed, installed devices are incorrect, a short circuit is suspected, or the system is inoperative. Follow the procedures below to isolate the failing FRU (do not isolate nondefective FRUs).

Verify that all attached devices are supported by the computer.

Verify that the power supply being used at the time of the failure is operating correctly. (See Power Systems Checkout.)

  1. Power-off the computer.
  2. Check the cables, wires, and connectors for short circuits and open circuits. Visually check them for damage. If any problems are found, replace the FRU.
  3. Remove or disconnect all of the following devices:

    1. Non-IBM devices
    2. Devices attached to the expansion bus connector
    3. Printer, mouse, and other external devices
    4. Battery pack
    5. Hard disk drive
    6. Diskette drive/CD-ROM drive or the device attached in the UltraBay.
    7. DIMM card
    8. PC Cards
  4. Power-on the computer.
  5. Determine if the problem has changed.
  6. If the problem does not occur again, reconnect the removed devices one at a time until you find the failing FRU.
  7. If the problem remains, replace the following FRUs one at a time. Do not replace a nondefective FRU.
    • DC/DC card
    • Video card
    • Keyboard card
    • LCD assembly
    • System board
    • DSP card or audio (ESS) card
    • CPU card

Error Log #

Source: Hardware Maintenance Manual Volume 3: ThinkPad Computers, p.386

Diagnostic errors are printed on the printer that is attached to the parallel port when the error is detected. The error is also logged in the system memory.

Do the following to display the errors.

  1. End the test, if it is running.
  2. Press Ctrl+A to select the advanced diagnostic mode.
  3. Press Ctrl+E.
  4. The error log appears.
  5. To exit the screen, select the cancel icon or press Esc.

The error log is not saved when the system is powered-off.

Troubleshooting #

The following table shows what to do to solve problems when the TV Tuner does not work correctly.

Problem Probable Cause
The TV Tuner does not operate. (No picture or sound)
  • Computer is not powered on.
  • Computer is in suspend mode.
  • Volume control of the TV Tuner or computer is not adjusted correctly.
  • The power for the TV Tuner is not supplied. (See Power-on the TV Tuner.)
  • The wall outlet from the outdoor antenna is not active.
  • The video or antenna cable is not connected correctly.
  • Antenna elements of the active antenna unit are not adjusted.
  • The batteries in the active antenna unit are not inserted correctly.
  • The batteries in the active antenna unit are depleted.
  • The TV Tuner is not set up correctly.
  • You cannot watch TV or videos on the external display.
  • LO is set for the auto tune sensitivity selection. (See Using the Function Key.)
No color.
  • The program is not in color.
Snow and noise only.
  • Switch the TV/EXT (TV/EXT button) button.
Pictures are out of shape, or have double images.

For TV:

  • The channel is not tuned correctly.
  • Adjust the antenna.

For VCR:

  • Change the tracking adjustment.
Dotted lines or stripes.
  • Usually caused by interference from neon signs, hair dryers, and so on. Move the computer to avoid the interference.
Picture control are not saved.
  • Do not power-off the TV Tuner when adjusting functions such as picture control, color, tint, brightness, or contrast.
Channel number is always displayed or is not displayed.

Numeric Error Codes #

Source: Hardware Maintenance Manual Volume 3: ThinkPad Computers, p.371

Error codes

Symptom / Error FRU / Action in Sequence
10X
  • 101: Interrupt failure.
  • 102: Timer failure.
  • 103: Timer interrupt failure.
  • 104: Protected mode failure.
  • 105: Last 8042 command not accepted.
  • 107: NMI test failure.
  • 108: Timer bus test failure.
  • 109: Low meg-chip select test.
  1. System board
110 (System board parity.)
  1. Go to Memory Checkout.
  2. DIMM Adapter Card and DIMM
  3. The computer is attached to the expansion unit.
  4. System board
111 (I/O parity.)
  1. Go to Memory Checkout.
  2. Expansion Unit/Port Replicator
  3. System board
158 (HDP was not set even though the supervisor password is set.)
  1. Set HDPs for both hard disk drives in the HDD bay and the UltraBay.
159 (HDP is not set the same as the supervisor password.)
  1. Set correct HDPs for both hard disk drives in the HDD bay and the UltraBay
161 (Dead battery.)
  1. Go to Checking the Backup Battery.
  2. Backup battery
  3. System board
163 (Time and date were not set.)
  1. Reseat the keyboard connector on the video card.
  2. Set time and date.
  3. System board
173 (Configuration data was lost.)
  1. Reseat the keyboard connector on the video card.
  2. Select OK in the error screen, then set the time and date.
  3. Backup battery
  4. System board
174 (Configuration error: Perform Checking the Installed Devices List before changing any FRUs.)
  1. Check device configuration.
  2. System board
  3. Diskette drive assembly
  4. Hard disk drive assembly
175, 177, 178
  • 175: EEPROM CRC #1 error.
  • 177: Supervisor password check sum error.
  • 178: EEPROM is not functional.
  1. System board
183 (Incorrect password entered at the supervisor password prompt.)
  1. Have the user examine the password.
184 (POP check sum error.)
  1. Reset the POP (power-on password) in Easy-Setup.
185 (The startup sequence is not valid. Suspect that power was off when the startup sequence was being updated.)
  1. Reset the startup sequence in Easy-Setup.
186
  1. System board
188 (EEPROM CRC #2 error.)
  1. Set the system identification using the ThinkPad Hardware Maintenance Diskette Version 1.20.
190 (Depleted battery pack was installed when the power was on.)
  1. Go to Checking the Battery Pack.
191XX (PM initialization error.)
  1. System board
  2. CPU card
195 (The configuration read from the hibernation area does not match the actual configuration.)
  1. Check if the configuration was changed. For example, check if the disk drive is from another computer.
196 (Read error occurred in the hibernation area of the HDD.)
  1. Run the hard disk drive test.
  2. Hard disk drive
1XX
  1. System board
2XX
  • 201: Memory data error.
  • 202: Memory line error 00-15.
  • 203: Memory line error 16-23.
  • 205: Memory test failure on on-board memory.
  • 221: ROM to RAM remap error.
  1. Go to Memory Checkout.
  2. DIMM, or DIMM Adapter
  3. System board
301, 303, 304, 305, 3XX (301: Keyboard error.)
  1. Go to Keyboard and Auxiliary Input Device Checkout.
  2. Keyboard
  3. Video card
  4. External numeric keypad
  5. External keyboard
  6. Keyboard/mouse cable
  7. System board
601, 6XX (601: Diskette drive or controller error.)
  1. Go to Diskette Drive Test.
  2. Diskette drive assembly
  3. Diskette
  4. System board
602 (Diskette read error.)
  1. Go to Diskette Drive Test.
  2. Diskette
  3. Diskette drive assembly
604 (Unacceptable ID was read from the diskette drive.)
  1. Go to Diskette Drive Test.
  2. Diskette drive assembly
  3. System board
11XX
  • 1101: Serial_A test failure.
  1. Serial device
  2. Communication cable
  3. System board
17XX
  • 1701: Hard disk controller failure.
  • 1780, 1790: Hard disk 0 error.
  • 1781, 1791: Hard disk 1 error.
  1. Hard disk drive
  2. System board
24XX (2401: System board video error.)
  1. System board
  2. Video card
808X
  • 8081: PCMCIA presence test failure. (PCMCIA revision number also checked.)
  • 8082: PCMCIA register test failure.
  1. PCMCIA slot assembly
  2. PCMCIA device
  3. System board
860X (Pointing device error when TrackPoint III is disabled.)
  • 8601: System bus error.-8042 mouse I/F
  • 8602: External mouse error.
  • 8603: System bus error or mouse error.
  1. External mouse
  2. External keyboard
  3. System board
861X (Pointing device error when TrackPoint III is enabled.)
  • 8611: System bus error.-I/F between 8042 and IPDC.
  • 8612: TrackPoint error.
  • 8613: System board or TrackPoint error.
  1. Reseat the keyboard connector on the video card.
  2. Reseat the keyboard TrackPoint III cable on the keyboard card. See Keyboard Cable.
  3. Keyboard
  4. External mouse
  5. Video card
  6. System board
  • I9990301 Hard disk error.
  • I9990302 Invalid hard disk boot record.
  • I9990305 No bootable device.
  1. Check that the operating system is installed in the HDD. Install the operating system if it is not installed.
  2. Reseat the boot device.
  3. Check the startup sequence for the correct boot device.
  4. Check that the operating system has no failure and is installed correctly.
I9990303 (Bank-2 flash ROM check sum error.)
  1. System board
Other codes not listed above
  1. Go to Undetermined Problems.

Beep Symptoms #

Source: Hardware Maintenance Manual Volume 3: ThinkPad Computers, p.376

Symptom / Error FRU / Action in Sequence
Continuous beeps.
  1. System board
One beep and a blank, unreadable, or flashing LCD.
  1. Reseat the LCD connector.
  2. LCD assembly
  3. Video card
  4. System board
  5. DC/DC card
One beep, and the message Unable to access boot source.
  1. Boot device
  2. System board
One long, two short beeps and a blank or unreadable LCD.
  1. System board
  2. Video card
  3. LCD assembly
One long beep followed by four short beeps each time the power switch is operated. (System cannot power-on due to low battery voltage.)
  1. Connect the AC Adapter or install a fully charged battery.
One beep every second. (System is shutting down due to low battery voltage.)
  1. Connect the AC Adapter or install a fully charged battery (allows system to complete shutdown before changing the battery)
Two short beeps with error codes.
  1. POST error. See Numeric Error Codes.
Two short beeps with blank screen.
  1. System board

No-Beep Symptoms #

Source: Hardware Maintenance Manual Volume 3: ThinkPad Computers, p.377

Symptom / Error FRU / Action in Sequence
No beep, power-on indicator not on, and a blank LCD during POST.
  1. Go to Power Systems Checkout.
  2. System board
  3. DC/DC card
  4. Power sources
No beep, power-on indicator on, and a blank LCD during POST.
  1. System board
  2. DC/DC card
  3. CPU card
No beep, power-on indicator on, and a blinking cursor only during POST.
  1. System board
  2. CPU card
  3. DC/DC card
No beep during POST but system runs correctly.
  1. Turn the volume up and check the speaker.
  2. Check whether the DSP card or Audio (ESS) card connector is loose and reseat the connector.
  3. Speaker
  4. DSP card/audio (ESS) card
  5. DC/DC card

FRU Codes #

Source: Hardware Maintenance Manual Volume 3: ThinkPad Computers, p.375

If an error is detected by the diagnostic tests, a four-digit FRU code is displayed. The FRU code indicates two suspected FRUs. Replace the FRU that is indicated by the two leftmost digits first, then replace the FRU indicated by the two rightmost digits.

No FRU is assigned to code 00.

If only one FRU is suspected, the other FRU code is filled with zeros. See the page referred to before replacing the FRU.

FRU Code FRU/Action
10 System board
11 CPU card
15 Audio card (ESS)
16 DSP card
17 Front IR unit
18 Rear IR unit
20 Memory (See Memory Checkout.)
30 Reserved
32 External keyboard
33 External mouse
40 LCD assembly
42 Video card
45 External CRT
50
  1. Reseat the drive (FDD-1)
  2. Diskette drive (FDD-1)
51
  1. Reseat the diskette drive (FDD-2)
  2. Diskette drive (FDD-2)
60
  1. Reseat the hard disk drive (HDD-1)
  2. Hard disk drive (HDD-1)
61
  1. Reseat the hard disk drive (HDD-3)
  2. Hard disk drive (HDD-3)
62
  1. Reseat the hard disk drive in the UltraBay (HDD-2)
  2. Hard disk drive in the UltraBay (HDD-2)
63
  1. Reseat the hard disk drive (HDD-4)
  2. Hard disk drive (HDD-4)
70 PCMCIA-2 (replicator)
71 PCMCIA (under UltraBay)
72 PCMCIA slot assembly
90 CD-ROM drive
91 External CD-ROM drive

Note: The device ID and error codes are used to indicate the detail portion of the FRU which caused the error. If replacing a FRU does not correct a problem, see the device ID or error code from the previous failure. If they have changed, the cause might be because the new FRU is defective or that the FRU was incorrectly installed.

If the problem remains after replacement of the FRUs, go to Undetermined Problems.

Intermittent Problems #

Source: Hardware Maintenance Manual Volume 3: ThinkPad Computers, p.382

Intermittent system hang problems can be caused by a variety of reasons that have nothing to do with a hardware defect, such as cosmic radiation, electrostatic discharge, or software errors. FRU replacement should only be considered when a recurring problem exists.

When analyzing the intermittent problem, do the following:

  1. Run the advanced diagnostic test for the system board in loop mode at least 10 times.
  2. If no error is detected, do not replace any FRUs.
  3. If any error is detected, replace the FRU shown by the FRU code. Rerun the test to verify that there are no more errors.

FRU Removals and Replacements #

Source: Hardware Maintenance Manual Volume 3: ThinkPad Computers, p.394

Removals and replacements This section contains information about removals and replacements.

  • Do not damage any parts. Only certified and trained personnel should service the computer.
  • The arrows in this section show the direction of movement to remove a FRU, or to turn a screw to release the FRU. The arrows are marked in numeric order, in square callouts, to show the correct sequence of removal.
  • Any FRUs that must be removed before removing the failing FRU are listed at the top of the page.
  • To replace a FRU, reverse the removal procedure and follow any notes that pertain to replacement. See Locations for internal cable connections and arrangement information.
  • When replacing a FRU, use the correct screw size, as shown in the procedure.

Attention Safety Notice 1: Translation

Before the computer is powered-on after FRU replacement, make sure all screws, springs, or other small parts, are in place and are not left loose inside the computer. Verify this by shaking the computer and listening for rattling sounds. Metallic parts or metal flakes can cause electrical short circuits.

Warning Safety Notice 3: Translation

The battery pack contains small amounts of nickel. Do not disassemble it, throw it into fire or water, or short-circuit it. Dispose of the battery pack as required by local ordinances or regulations.

Safety Notice 8: Translation

Before removing any FRU, power-off the computer, unplug all power cords from electrical outlets, remove the battery pack, and then disconnect any interconnecting cables.

Safety Notice 4: Translation

The lithium battery can cause a fire, explosion, or severe burn. Do not recharge it, remove its polarized connector, disassemble it, heat it above 100°C (212°F), incinerate it, or expose its cell contents to water. Dispose of the battery as required by local ordinances or regulations. Use only the battery in the appropriate parts listing. Use of an incorrect battery can result in ignition or explosion of the battery.

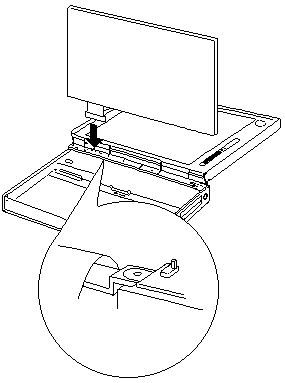
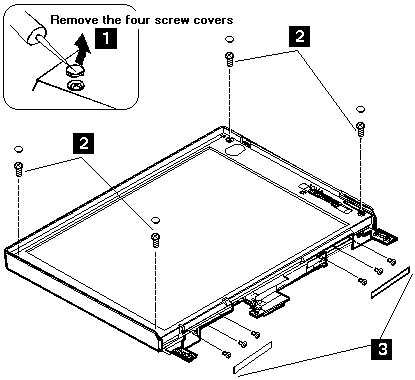
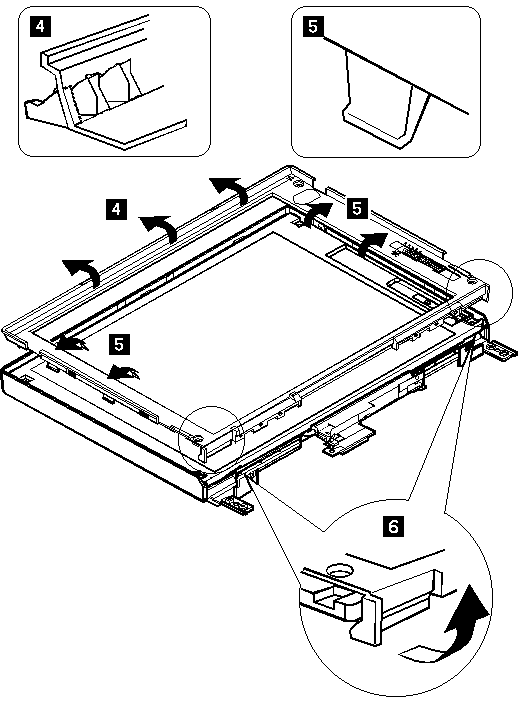
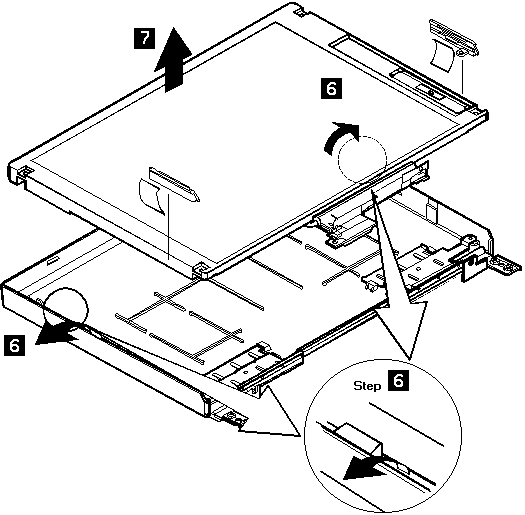
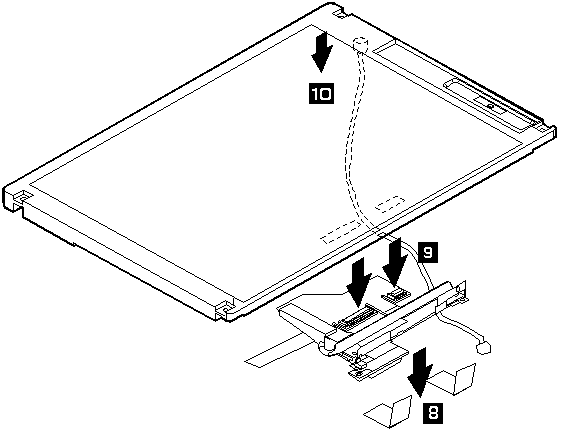
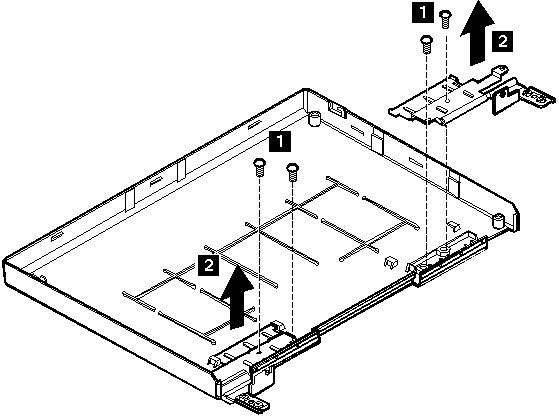
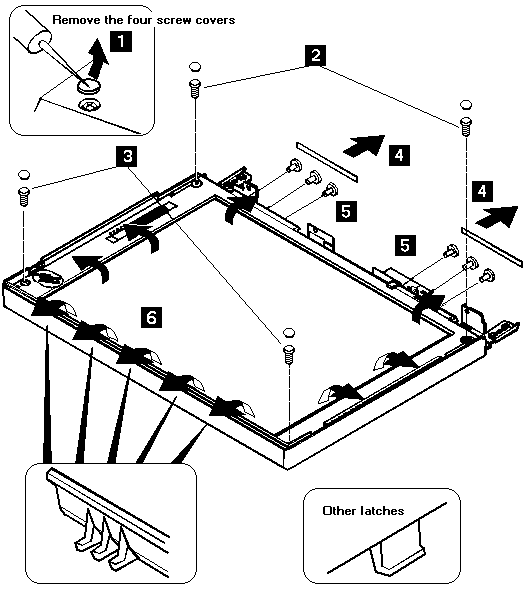
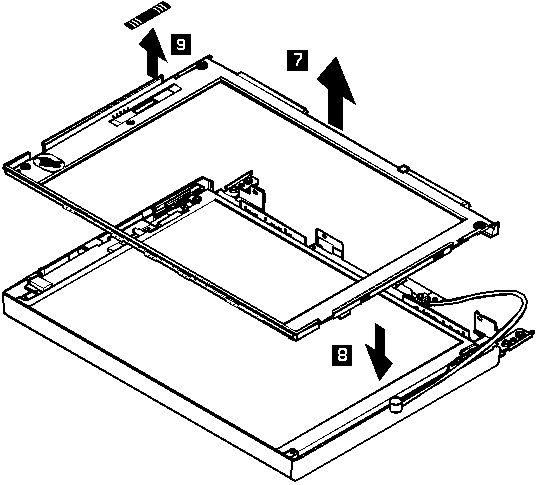
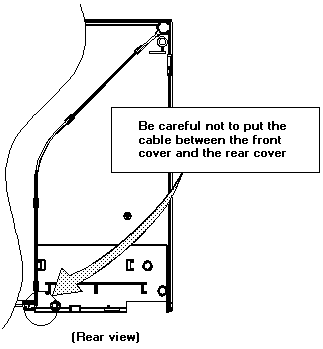
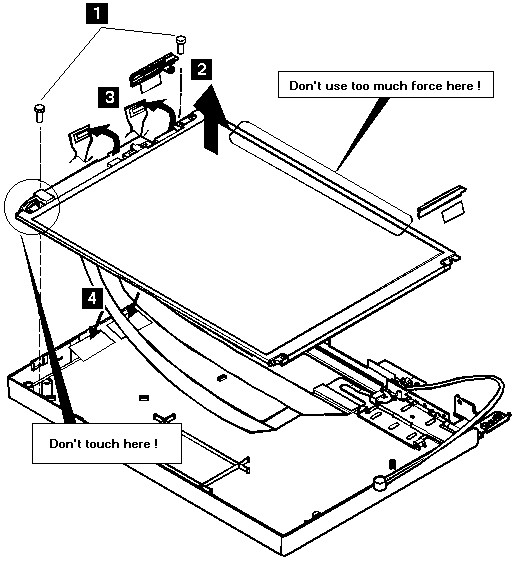
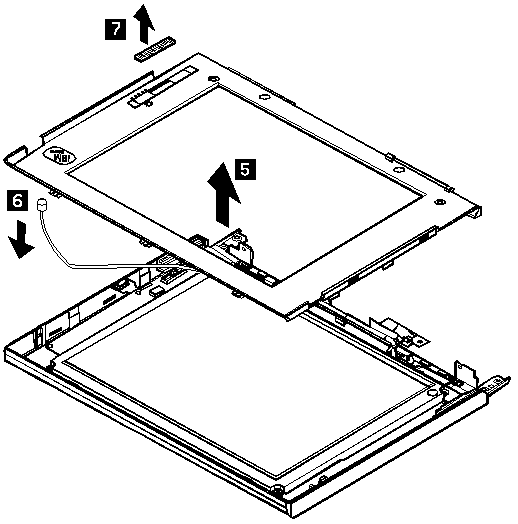
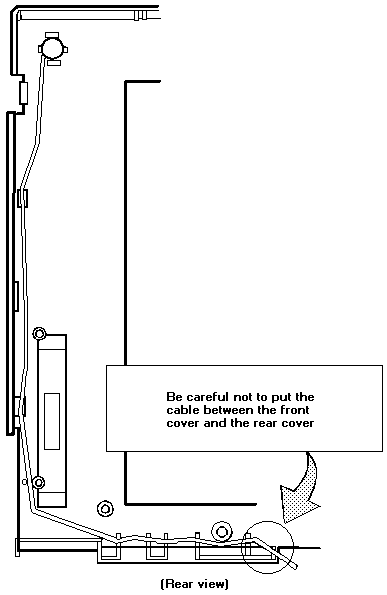
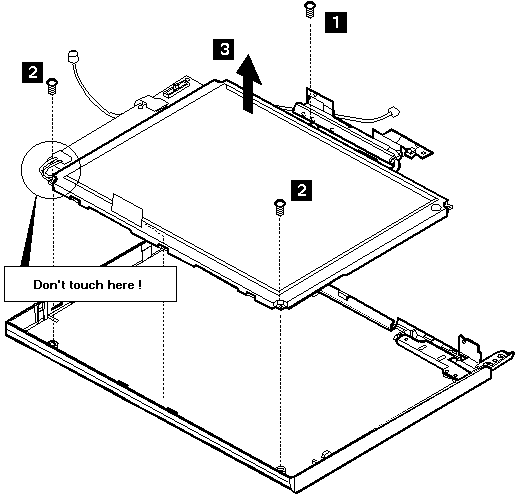
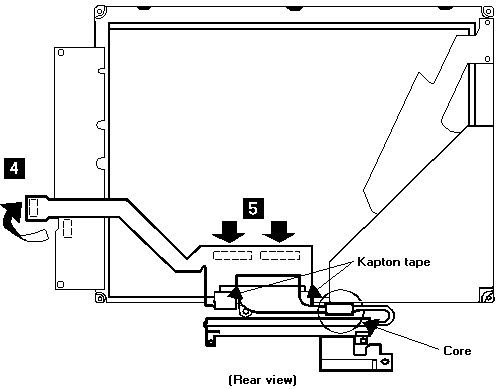
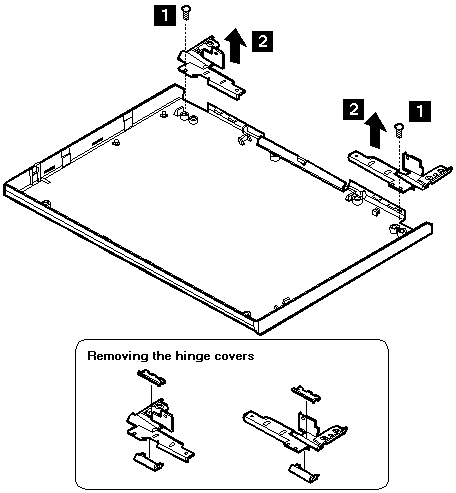
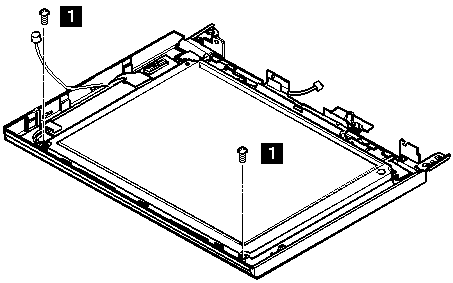
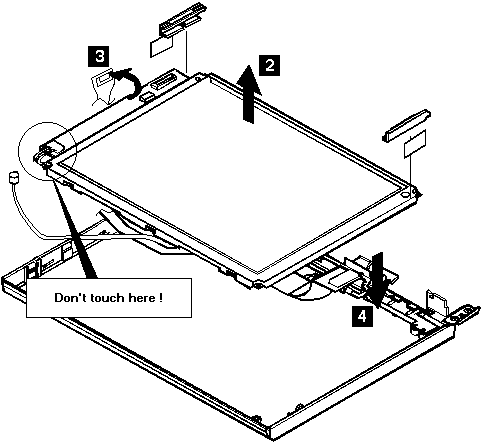
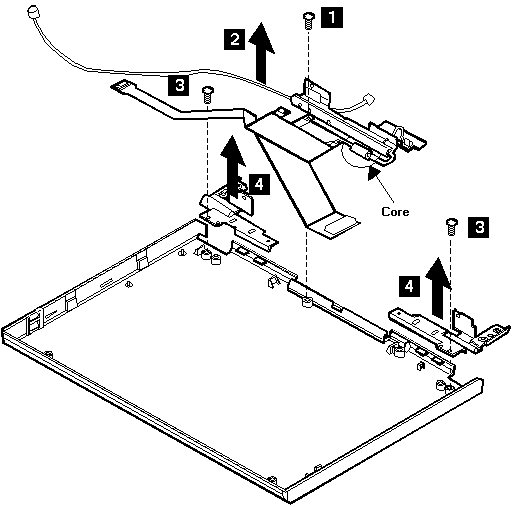
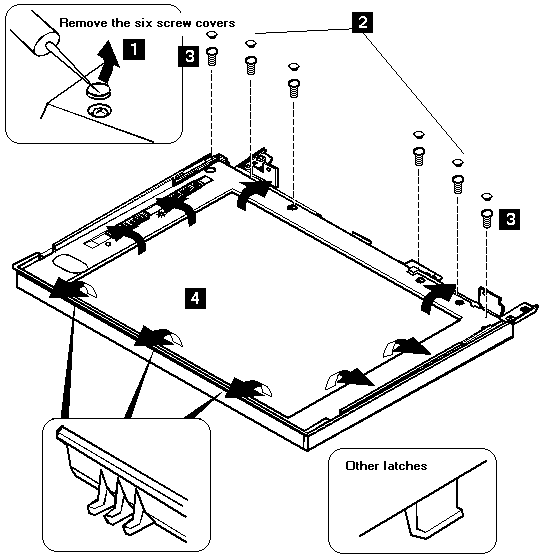
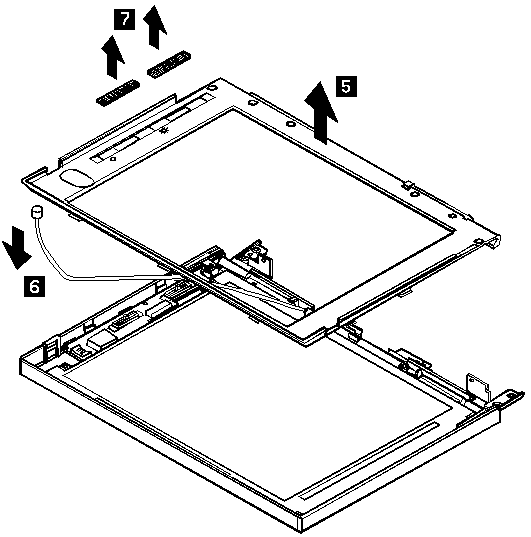
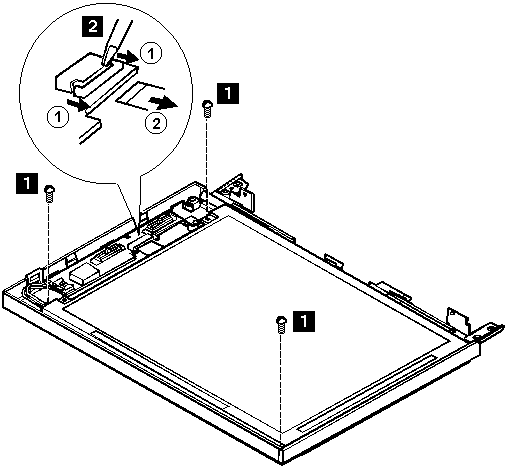
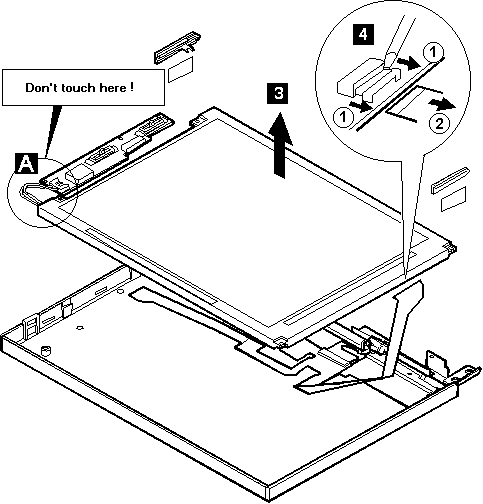
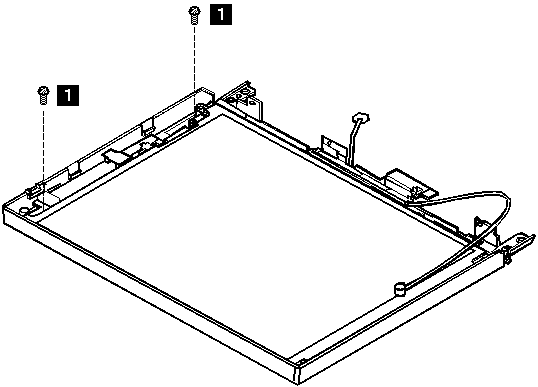
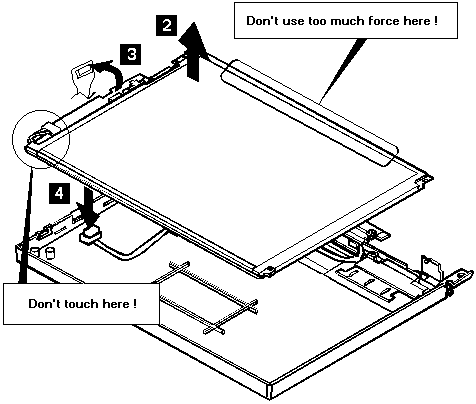
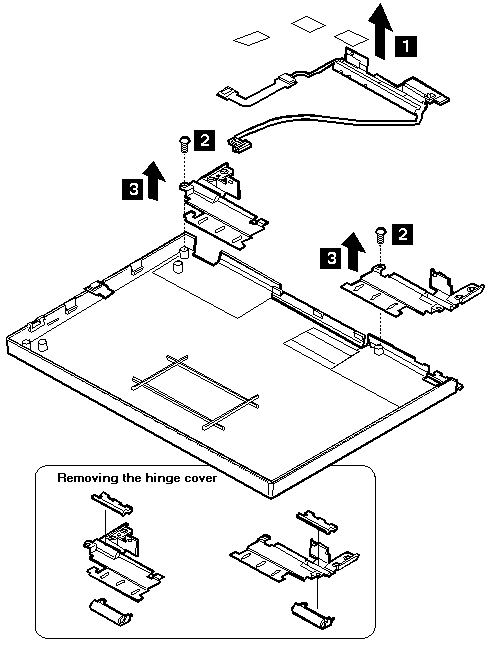
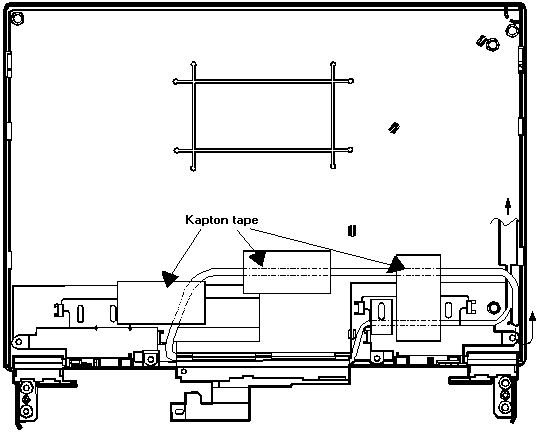
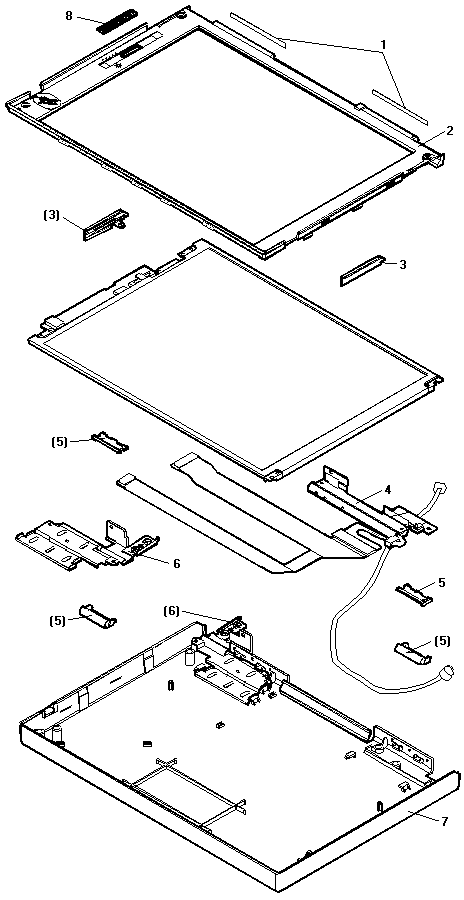
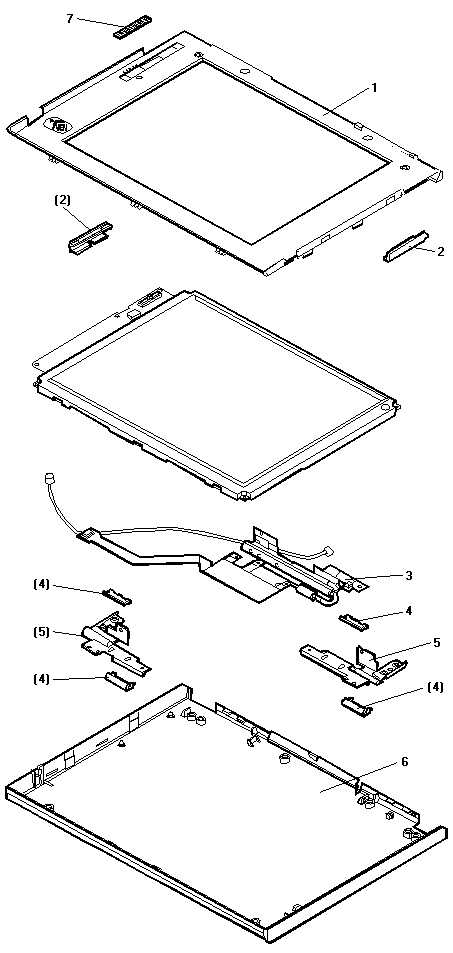
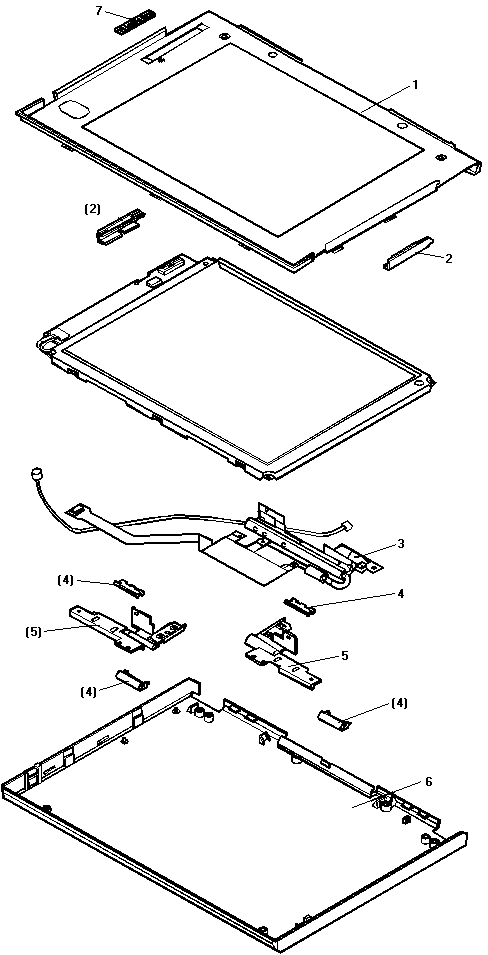
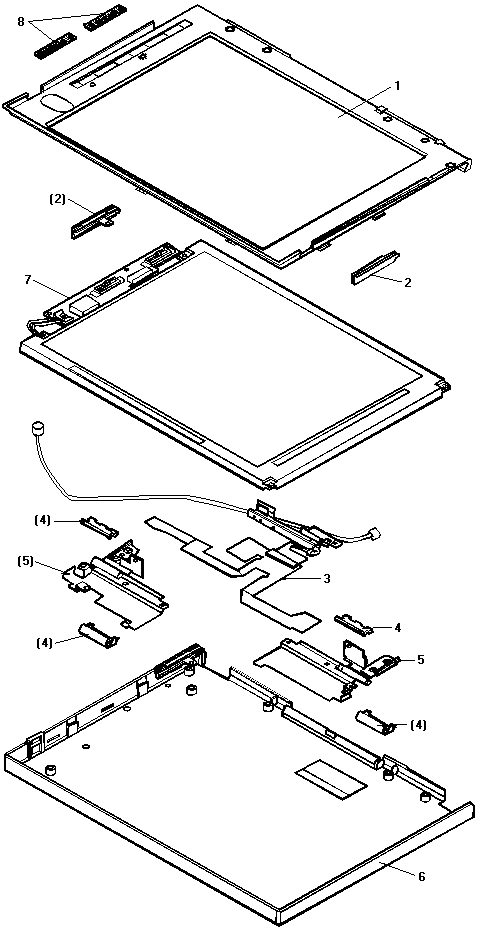
1100 LCD Removal and Replacement #

Removals and replacements This section discusses removal and replacement procedure for the LCD unit of the ThinkPad 760 series. After removing the LCD unit, check its part number, then go to the appropriate section:

1077 Keyboard Cable #

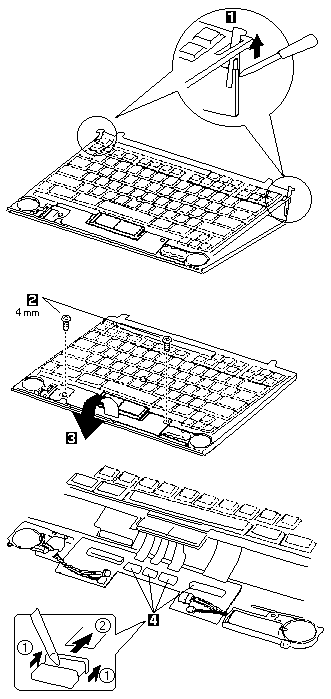
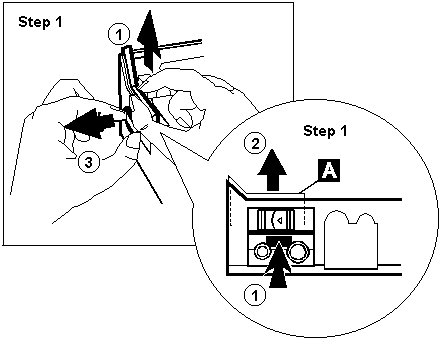
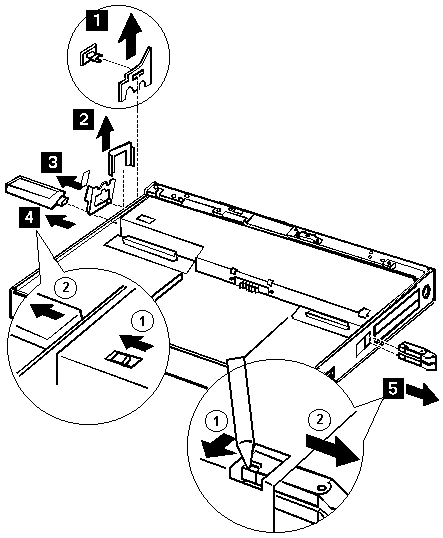
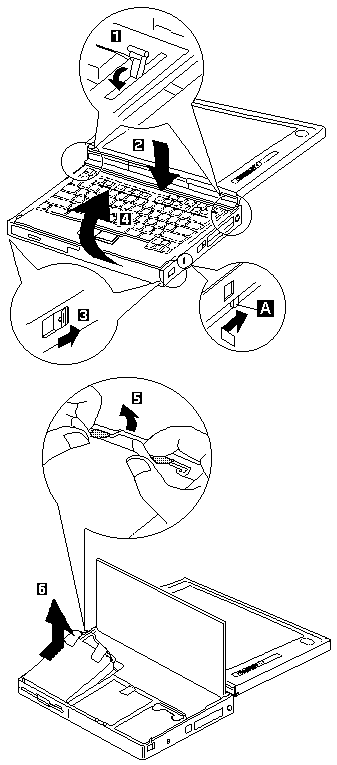
Note: When pulling the lever off the foot 1, separate the lower part of the lever from the foot by inserting a pointed device through the hole in the foot.

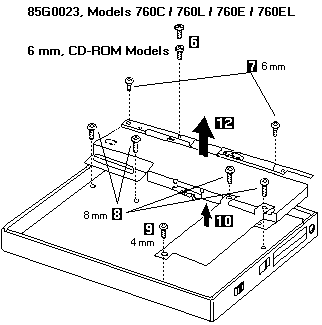
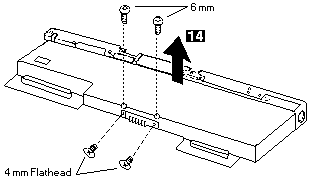
Keyboard disassembly, steps 1 to 4: prying the levers off the feet with a pointed tool, removing two 4 mm screws, flipping the keyboard forward and disconnecting its cables

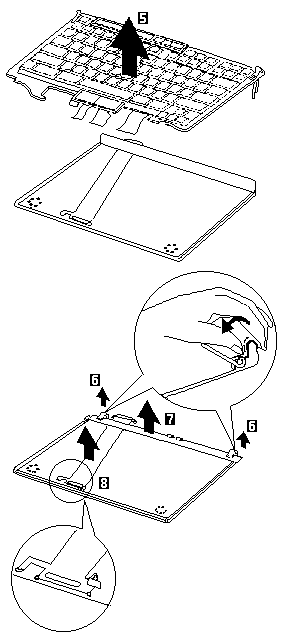
Keyboard cable removal, steps 5 to 8: lifting the keyboard off its base, releasing the latch (6) and lifting out the cable; a circled inset shows how to route the cable when replacing it

Notes:

  1. When removing the latch from the keyboard base 6, push both ends of the latch simultaneously.
  2. When replacing the keyboard cable, place the cable correctly, as shown by the picture in the circle.

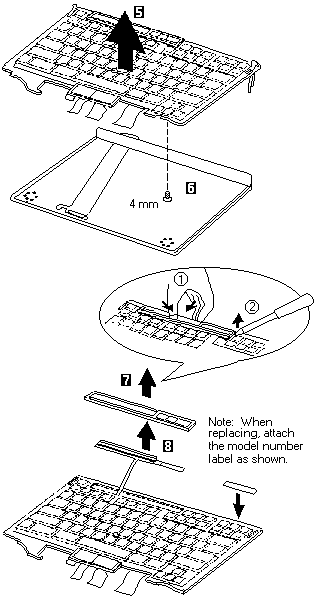
1076 Keyboard, Information Panel #

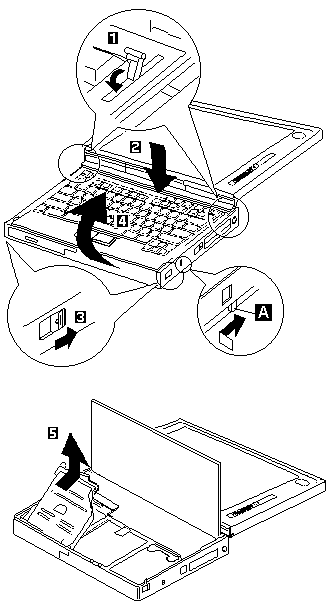
Note: When pulling the lever off the foot 1, separate the lower part of the lever from the foot by inserting a pointed device through the hole in the foot.

Keyboard disassembly, steps 1 to 4: prying the levers off the feet with a pointed tool, removing two 4 mm screws, flipping the keyboard forward and disconnecting its cables

Removing the information panel, steps 5 to 8: lifting off the keyboard, removing a 4 mm screw and prying out the panel; a note says to attach the model number label as shown when replacing

1040 Hard Disk Drive #

Source: Hardware Maintenance Manual Volume 3: ThinkPad Computers, p.399

Attention Attention: Do not drop or apply any shock to the hard disk drive. The hard disk drive is sensitive to physical shock. Incorrect handling can cause damage and permanent loss of data on the hard disk. Before removing the hard disk drive, have the user make a backup copy of all the information on the hard disk. Never remove the hard disk drive while the system is operating or is in suspend mode.

Note: Remove the hard disk drive exactly as shown in the figure. Do not apply any extra force to the hard disk drive when removing it.

Hard disk drive removal: release the removal strap (1), then pull the drive straight out with both hands (2)

Note: After replacing the hard disk drive, latch the removal strap into the correct position.

1050 DIMM Adapter and DIMM #

Removing the DIMMs, steps 1 to 5: sliding the latch, turning the computer upside down, removing the cover, lifting the flap and pushing the socket latches outward to release each DIMM

Note: When installing the DIMM, do the following:

  1. Find the notch 1 on the side of the DIMM.
  2. With the notched end of the DIMM toward the right side of the socket 2, insert the DIMM, at an angle of approximately 20°, into the socket, then press it firmly.
  3. Pivot the DIMM until it snaps into place.

Installing a DIMM: notch 1 toward socket side 2, inserted at about 20 degrees and then pivoted down until it snaps into place

1120 Video Card #

Note: In step 1, gently pushing the area Callout 1, lift the switch cover halfway up Callout 2, as shown. Then pull the switch lever out to remove Callout 3.
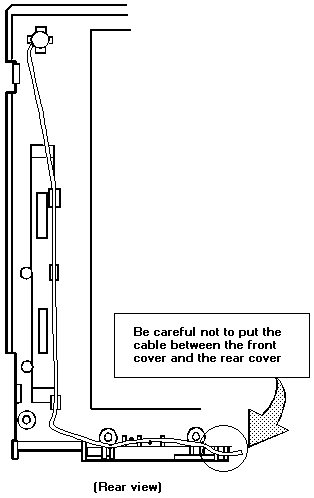
Step 1: pushing the shaded area (1), lifting the switch cover halfway up (2) and pulling out the switch lever (3), with a close-up inset marking area A

Steps 1 to 5: removing the switch parts (1, 2), sliding out the parts at the left side (3, 4) and gently pushing the levers with a screwdriver (5), with close-up insets

Note: In step 5, gently push the levers to avoid flexing them.

Steps 6 to 12: removing screws 6 (P/N 85G0023 on 760C/760L/760E/760EL, 6 mm on CD-ROM models), 7 (6 mm), 8 (8 mm) and 9 (4 mm), then lifting out parts 10 and 12

Note: When removing the video card from the base cover 12, first gently raise the side of the video card facing the interior of the base cover, then pull out the video card.

Removing the upper shield (step 14): two 6 mm screws on top and two 4 mm flathead screws at the side, then lifting the shield off

Attention Check the model. There are two models of 760ED: one has a s-video card built in, and the other has an enhanced video card built in. If you install the incorrect video card, the LCD will not work. Check to be sure which 760ED model you are servicing.

S-Video Card

(760C/760L/760E/760ED/760EL/760LD/760ELD)

Removing the S-video card: disconnecting the cable (15), removing the 4 mm screws (16) and lifting the card off its connectors (17)

Enhanced Video Card

(760CD/760ED)

Removing the enhanced video card, steps 15 to 22: disconnecting the cables, removing the 4 mm and M2 4 mm screws, then turning the card over to unplug its connector

Note: Remove the 4 mm screws at both ends of the MIDI/joystick port connector (17).

When replacing the video card, align the power switch and power actuator 2. Check that the power switch operates correctly before tightening any screws.

Replacing the video card: fitting the power switch (1) and aligning it with the power actuator in the base cover (2)

1160 System Board and PCMCIA Slot Assembly #

Notes:

  1. The system unit serial number must be restored when the system board is replaced. To restore the system unit serial number, select the option Set system identification on the maintenance diskette. The EEPROM on the system board contains the vital product data (VPD): the system unit serial number, system board system number, and other computer-unique data.

    Do not power off the computer when restoring the VPD.

    The system unit serial number label is attached to the base cover.

  2. Before removing and replacing the system board, make sure that the PCMCIA cards are removed and the eject levers are not sticking out.
  3. Do not pull the PCMCIA slot assembly while removing the system board.
  4. When handling the PCMCIA slot assembly, be careful not to disassemble any part of it. The slot assembly is not solidly fixed when it is removed from the system board or the FRU.
  5. Be sure to unlock both ends of the PCMCIA connector before removing the PCMCIA slot assembly from the system board (2).

Separating the PCMCIA slot assembly from the system board, steps 1 to 5: two screws (1), the connector (2), a 6 mm screw (3) and hex head screws (4), then sliding it out (5)

Rear View #

Source: Hardware Maintenance Manual Volume 3: ThinkPad Computers, p.491

Rear view of the ThinkPad 760 and a close-up of its rear connector panel, with numbered callouts 1 to 17 for the doors, ports, jacks and power switch

  1. Rear Door
  2. Connector Door
  3. MIDI/Joystick Port (model-unique)
  4. External Diskette Drive Connector (model-unique)
  5. Rear Infrared Port
  6. System Expansion Connector
  7. Power Shutdown Switch
  8. External Display Connector
  9. Parallel Connector
  10. Serial Connector
  11. Power Jack
  12. Option Cover
  13. Headphone Jack
  14. Microphone/Line-in Jack
  15. Modem/Fax Port
  16. Video In/Out Ports (model-unique)
  17. Power Switch

Front View #

Source: Hardware Maintenance Manual Volume 3: ThinkPad Computers, p.490

Front view of the ThinkPad 760, open, with numbered callouts 1 to 19 for the display, controls, keyboard, TrackPoint and drive bay

  1. LCD
  2. Built-in Microphone
  3. Brightness Control
  4. Keyboard Risers
  5. Auto Tilt Keyboard
  6. External-Input-Device Connector
  7. PCMCIA Slot
  8. PCMCIA Slot
  9. Security Keyhole
  10. Release Latches
  11. Front Infrared Port
  12. Built-in Speaker
  13. Front Palm Rest
  14. TrackPoint III
  15. Removable Diskette Drive or CD-ROM Drive (model-unique)
  16. CD-ROM Eject Button (CD-ROM model)
  17. Fn Key
  18. LCD Indicator Panel
  19. Volume Control

Model 760E (9546) (CD Nonupgradable Type) #

Exploded view of the ThinkPad 760 system unit with numbered callouts 1 to 44 matching the parts listing

LCD Unit, 12.1 SVGA (P/N 29H9226, ASM P/N 29H9029) #

Source: Hardware Maintenance Manual Volume 4: ThinkPad Computers, p.303

1101A LCD Cover

Notes:

  1. Be careful not to scratch the LCD cover when removing the screw covers 1.
  2. The LCD cover has several latches. Release these latches; then remove the LCD cover. Be careful not to break the latches.

Removing the LCD cover, steps 1 to 3: prying off the four screw covers (1), removing the four screws beneath them (2), then the strips and six flathead screws along the bottom edge (3)

Step Length (Quantity) Memo
2 M2.5 x 8 mm (4)
3 M2 x 4.3 mm (6) Flat head

Note: Make sure you use the correct screw when replacing.

Removing the LCD cover, steps 4 to 6: releasing the front cover latches all round, with close-ups of the two latch types (4, 5) and the corner release (6)

1101B LCD Panel, Interface Cable Assembly

  • LCD Cover (1101A)

Note: Be careful not to scratch or soil the surface of the LCD panel when replacing it.

The LCD panel is latched to the rear cover. Remove the LCD panel by bending the rear cover in step 6. Too much force will break the rear cover.

Removing the LCD panel, steps 6 and 7: bending the rear cover outward to free the latched panel, then lifting the panel out

Detaching the interface cable assembly from the LCD panel, steps 8 to 10: the tape pieces (8), the two connectors (9) and the cable attachment point (10)

1101C Hinges

  • LCD Cover (1101A)
  • LCD Panel (1101B) (with interface cable assembly)

Removing the hinges: two M2 x 4.3 mm screws from each hinge (1), then lifting each hinge out (2)

Step Length (Quantity) Memo
1 M2 x 4.3 mm (4)

Note: Make sure you use the correct screw when replacing.

LCD Unit, 12.1 SVGA (P/N 29H9226, ASM P/N 73H6599) #

Source: Hardware Maintenance Manual Volume 4: ThinkPad Computers, p.308

1102A LCD Cover

Notes:

  1. Be careful not to scratch the LCD cover when removing the screw covers 1.
  2. The LCD cover has several latches. Release these latches; then remove the LCD cover. Be careful not to break the latches.

Removing the LCD cover, steps 1 to 6: screw covers (1), screws (2, 3 and 5), side strips (4) and the latches all round the front cover (6), with close-ups of the latch types

Step Length (Quantity) Memo
2 M2.5 x 9 mm (2)
3 M2.5 x 6 mm (2)
5 M2 x 4.3 mm (6) Flat head

Note: Make sure you use the correct screw when replacing.

Lift the LCD front cover, then remove the microphone cable.

Lifting off the LCD front cover (7), freeing the microphone cable (8) and removing the slide knob from the front cover (9)

Note: When replacing: Position the microphone cable as shown.

Microphone cable routing, rear view, with the warning: be careful not to put the cable between the front cover and the rear cover

1102B LCD Panel

  • LCD Cover (1102A)

Note: Be careful not to scratch or soil the surface of the LCD panel when replacing it.

Lift the LCD panel and disconnect the connector for the interface cable. If there is the kapton tape on the rear of the panel, remove it.

Removing the LCD panel, steps 1 to 4: removing two screws (1), lifting the panel (2) and disconnecting the cables (3, 4), with warnings: don’t touch here, and don’t use too much force here

Step Length (Quantity) Memo
1 M2.5 x 6 mm (2)

Note: Make sure you use the correct screw when replacing.

Attention Attention:

  1. The inverter card is very sensitive. Connect the interface cable as shown. Flexing the inverter card with too much force seriously damages the card.
  2. It is not safe to touch the inverter card connecter A. A loose or incorrect connection of the connector can cause a serious problem.

Connecting the interface cable to the inverter card: correct (circle) and incorrect (cross) finger positions for pressing the connector home, with the warning: don’t touch this connector (A)

1102C Interface Cable Assembly, Hinges

  • LCD Cover (1102A)
  • LCD Panel (1102B)
  • 1: When replacing the interface cable assembly
  • 2, 3: When replacing the hinges

Removing the interface cable assembly (1), then the hinges (screws 2, lift out 3), with an inset showing how to remove the hinge covers

Step Length (Quantity) Memo
2 M2 x 4.3 mm (4)

Note: Make sure you use the correct screw when replacing.

When replacing: Replace the kapton tape as shown below.

Rear view of the LCD showing where the kapton tape goes on the interface cable when replacing

LCD Unit, 10.4 SVGA (P/N 29H9227) #

Source: Hardware Maintenance Manual Volume 3: ThinkPad Computers, p.451

1103A LCD Cover

Notes:

  1. Be careful not to scratch the LCD cover when removing the screw covers 1.
  2. The LCD cover has several latches. Release these latches; then remove the LCD cover. Be careful not to break the latches.

Removing the LCD cover, steps 1 to 4: prying off the four screw covers (1), removing the screws (2, 3) and releasing the latches all round the front cover (4), with close-ups of the latch types

Step Length (Quantity) Memo
2 M2.5 x 6 mm (2)
3 M2 x 5 mm (2)

Note: Make sure you use the correct screw when replacing.

Lift the LCD front cover, then remove the microphone cable.

Lifting off the LCD front cover (5), freeing the microphone cable (6) and removing the slide knob (7)

When replacing: Position the microphone cable as shown below.

Microphone cable routing along the edge of the LCD, rear view, with the warning: be careful not to put the cable between the front cover and the rear cover

1103B LCD Panel, Interface Cable Assembly

  • LCD Cover (1103A)

Note: Be careful not to scratch or soil the surface of the LCD panel when replacing it.

Removing the LCD panel with its interface cable: one screw at the top (1) and two screws (2), then lifting the panel out (3), with the warning: don’t touch here

Step Length (Quantity) Memo
1 M2.5 x 4 mm (1)
2 M2 x 4.3 mm (2)

Note: Make sure you use the correct screw when replacing.

When removing the interface cable assembly, remove the kapton tape on the cable, then disconnect the three connecters as shown.

Rear of the LCD panel: disconnecting the interface cable (4) and the two connectors (5), with the kapton tape and the cable core labelled

When replacing: Be careful not to place the core under the LCD panel.

Attention Attention:

  1. The inverter card is very sensitive. Connect the interface cable as shown. Flexing the inverter card with too much force seriously damages the card.
  2. It is not safe to touch the inverter card connecter A. A loose or incorrect connection of the connector can cause a serious problem.

Connecting the interface cable to the inverter card: correct (circle) and incorrect (cross) finger positions for pressing the connector home, with the warning: don’t touch this connector (A)

1103C Hinges

  • LCD Cover (1103A)
  • LCD Panel (1103B) (with interface cable assembly)

Removing the hinges: one screw from each hinge (1), then lifting the hinge out (2), with an inset showing how to remove the hinge covers

Step Length (Quantity) Memo
1 M2.5 x 4 mm (2)

Note: Make sure you use the correct screw when replacing.

LCD Unit, 10.4 VGA (P/N 46H5355) #

Source: Hardware Maintenance Manual Volume 3: ThinkPad Computers, p.456

1104A LCD Cover

Notes:

  1. Be careful not to scratch the LCD cover when removing the screw covers 1.
  2. The LCD cover has several latches. Release these latches; then remove the LCD cover. Be careful not to break the latches.

Removing the LCD cover, steps 1 to 4: prying off the four screw covers (1), removing the screws (2, 3) and releasing the latches all round the front cover (4), with close-ups of the latch types

Step Length (Quantity) Memo
2 M2.5 x 6 mm (2)
3 M2 x 5 mm (2)

Note: Make sure you use the correct screw when replacing.

Lift the LCD front cover, then remove the microphone cable.

Lifting off the LCD front cover (5), freeing the microphone cable (6) and removing the slide knob (7)

Note: When replacing: Position the microphone cable as shown.

Microphone cable routing along the edge of the LCD, rear view, with the warning: be careful not to put the cable between the front cover and the rear cover

1104B LCD Panel

  • LCD Cover (1104A)

Note: Be careful not to scratch or soil the surface of the LCD panel when replacing it.

LCD panel in the rear cover showing the two screws (1) to remove

Step Length (Quantity) Memo
1 M2 x 4.3 mm (2)

Note: Make sure you use the correct screw when replacing.

Lift the LCD panel a bit 2, then disconnect the flexible cable 3 and 4.

Lifting the LCD panel (2) and disconnecting the flexible cables (3, 4), with the warning: don’t touch here

Attention Attention:

  1. The inverter card is very sensitive. Connect the interface cable as shown. Flexing the inverter card with too much force seriously damages the card.
  2. It is not safe to touch the inverter card connecter A. A loose or incorrect connection of the connector can cause a serious problem.

Connecting the interface cable to the inverter card: correct (circle) and incorrect (cross) finger positions for pressing the connector home, with the warning: don’t touch this connector (A)

1104C Interface Cable Assembly, Hinges

  • LCD Cover (1104A)
  • LCD Panel (1104B)
  • 1, 2: When replacing the interface cable assembly
  • 3, 4: When replacing the hinges

Removing the interface cable assembly (screw 1, lift out 2) and the hinges (screws 3, lift out 4), with the cable core labelled

Step Length (Quantity) Memo
1, 3 M2.5 x 4 mm (3)

Note: Make sure you use the correct screw when replacing.

When replacing: Don't locate the core under the LCD panel.

LCD Unit, 11.3 DSTN (P/N 39H6232) #

Source: Hardware Maintenance Manual Volume 3: ThinkPad Computers, p.461

1105A LCD Cover

Notes:

  1. Be careful not to scratch the LCD cover when removing the screw covers 1.
  2. The LCD cover has several latches. Release these latches; then remove the LCD cover. Be careful not to break the latches.

Removing the LCD cover, steps 1 to 4: prying off the six screw covers (1), removing the screws (2, 3) and releasing the latches all round the front cover (4), with close-ups of the latch types

Step Length (Quantity) Memo
2 M2.5 x 6 mm (4)
3 M2.5 x 9 mm (2)

Note: Make sure you use the correct screw when replacing.

Lift the LCD front cover, then remove the microphone cable.

Lifting off the LCD front cover (5), freeing the microphone cable (6) and removing the two slide knobs (7)

Note: When replacing: Position the microphone cable as shown.

Microphone cable routing along the edge of the LCD, rear view, with the warning: be careful not to put the cable between the front cover and the rear cover

1105B LCD Panel

  • LCD Cover (1105A)

Note: Be careful not to scratch or soil the surface of the LCD panel when replacing it.

Removing the three LCD panel screws (1) and disconnecting a flexible cable (2), with a close-up showing how to release the connector latch and pull out the cable

Step Length (Quantity) Memo
1 M2.5 x 6 mm (3)

Note: Make sure you use the correct screw when replacing.

Lift the LCD panel a bit 3, then disconnect the flexible cable 4.

Lifting the LCD panel (3) and disconnecting the flexible cable (4), with a close-up showing how to release the connector latch, and the warning at A: don’t touch here

Attention Attention: It is not safe to touch the inverter card connecter A. A loose or incorrect connection of the inverter card connector A can cause a serious problem. When replacing the inverter card, make sure the connector is connected correctly.

1105C Interface Cable Assembly, Hinges

  • LCD Cover (1105A)
  • LCD Panel (1105B)
  • 1: When replacing the interface cable assembly
  • 2: When replacing the hinges

Removing the interface cable assembly (1) and the hinges (2), with insets showing how to position the cable ends when replacing and how to remove the hinge covers

LCD Unit, 12.1 XGA (P/N 82H8486) #

Source: Hardware Maintenance Manual Volume 3: ThinkPad Computers, p.542

1106A LCD Cover

Notes:

  1. Be careful not to scratch the LCD cover when removing the screw covers 1.
  2. The LCD cover has several latches. Release these latches; then remove the LCD cover. Be careful not to break the latches.

Removing the LCD cover, steps 1 to 4: prying off the four screw covers (1), removing the screws (2, 3) and releasing the latches all round the front cover (4), with close-ups of the latch types

Step Length (Quantity) Memo
2 M2.5 x 9 mm (2)
3 M2.5 x 6 mm (2)

Note: Make sure you use the correct screw when replacing.

Lift the LCD front cover, then remove the microphone cable.

Lifting off the LCD front cover (5), freeing the microphone cable (6) and removing the slide knob from the front cover (7)

Note: When replacing: Position the microphone cable as shown.

Microphone cable routing in the LCD, rear view, with the warning: be careful not to put the cable between the front cover and the rear cover

1106B LCD Panel

  • LCD Cover (1106A)

Note: Be careful not to scratch or soil the surface of the LCD panel when replacing it.

LCD panel in the rear cover showing the two screws (1) to remove

Step Length (Quantity) Memo
1 M2.5 x 6 mm (2)

Note: Make sure you use the correct screw when replacing.

Lift the LCD panel a bit, then disconnect the interface cable connector.

Lifting the LCD panel (2) and disconnecting the interface cable (3, 4), with warnings: don’t touch here, and don’t use too much force here

Attention Attention:

  1. The inverter card is very sensitive. Connect the interface cable as shown. Flexing the inverter card with too much force seriously damages the card.
  2. It is not safe to touch the inverter card connecter A. A loose or incorrect connection of the connector can cause a serious problem.

Connecting the interface cable to the inverter card: correct (circle) and incorrect (cross) finger positions for pressing the connector home, with the warning: don’t touch this connector (A)

1106C Interface Cable Assembly, Hinges

  • LCD Cover (1106A)
  • LCD Panel (1106B)
  • 1: When replacing the interface cable assembly
  • 2, 3: When replacing the hinges

Remove the kapton tape in step 1.

Removing the interface cable assembly with its kapton tape (1), then the hinges (screws 2, lift out 3), with an inset showing how to remove the hinge covers

Step Length (Quantity) Memo
2 M2.5 x 4 mm (2)

Note: Make sure you use the correct screw when replacing.

When replacing: Replace the kapton tape as shown below.

Rear of the LCD panel showing where the three pieces of kapton tape go along the interface cable

LCD Unit, 12.1 SVGA (P/N 82H8496) #

Source: Hardware Maintenance Manual Volume 3: ThinkPad Computers, p.472

1107A LCD Cover

Notes:

  1. Be careful not to scratch the LCD cover when removing the screw covers 1.
  2. The LCD cover has several latches. Release these latches; then remove the LCD cover. Be careful not to break the latches.

Removing the LCD cover, steps 1 to 4: prying off the four screw covers (1), removing the screws (2, 3) and releasing the latches all round the front cover (4), with close-ups of the latch types

Step Length (Quantity) Memo
2 M2.5 x 9 mm (2)
3 M2.5 x 6 mm (2)

Note: Make sure you use the correct screw when replacing.

Lift the LCD front cover, then remove the microphone cable.

Lifting off the LCD front cover (5), freeing the microphone cable (6) and removing the slide knob from the front cover (7)

Note: When replacing: Position the microphone cable as shown.

Microphone cable routing, rear view, with the warning: be careful not to put the cable between the front cover and the rear cover

1107B LCD Panel

  • LCD Cover (1107A)

Note: Be careful not to scratch or soil the surface of the LCD panel when replacing it.

Lift the LCD panel and disconnect the connector for the interface cable. If there is the kapton tape on the rear of the panel, remove it.

Removing the LCD panel, steps 1 to 4: removing two screws (1), lifting the panel (2) and disconnecting the cables (3, 4), with warnings: don’t touch here, and don’t use too much force here

Step Length (Quantity) Memo
1 M2.5 x 6 mm (2)

Note: Make sure you use the correct screw when replacing.

Attention Attention:

  1. The inverter card is very sensitive. Connect the interface cable as shown. Flexing the inverter card with too much force seriously damages the card.
  2. It is not safe to touch the inverter card connecter A. A loose or incorrect connection of the connector can cause a serious problem.

Connecting the interface cable to the inverter card: correct (circle) and incorrect (cross) finger positions for pressing the connector home, with the warning: don’t touch this connector (A)

1107C Interface Cable Assembly, Hinges

  • LCD Cover (1107A)
  • LCD Panel (1107B)
  • 1: When replacing the interface cable assembly
  • 2, 3: When replacing the hinges

Remove the kapton tape in step 1.

Removing the interface cable assembly (1) after taking off its kapton tape, then the hinges (screws 2, lift out 3), with an inset showing how to remove the hinge covers

Step Length (Quantity) Memo
2 M2 x 4.3 mm (4)

Note: Make sure you use the correct screw when replacing.

When replacing: Replace the kapton tape as shown below. Position the microphone cable as shown below.

Rear view of the LCD showing where the kapton tape goes on the interface cable when replacing

How to Disable the Power-On Password #

Passwords

  1. Power-off the computer.
  2. Open the keyboard, and remove the diskette drive or CD-ROM drive and the battery pack.
  3. Install a jumper on the power-on password connector on the left side of the FDD connector. (See Power-On Password Connector for location.)
  4. Reinstall the battery pack and the diskette drive/CD-ROM drive.
  5. Power-on the computer and wait until the POST ends.
  6. Verify that the password prompt does not appear.
  7. After the service check is completed, remove the jumper.

To reactivate the password, set the password again.

Supervisor and Hard Disk Passwords #

Passwords The supervisor password and the hard disk password (HDP) are security features that are used to protect the system and the hard disk data from unauthorized access.

No overriding capability is provided. If only a hard disk password is set, obtaining permission from the password owner to unlock the password is a prerequisite for running diagnostic tests and performing service. If both supervisor password and hard disk password are set, you can enter Easy-Setup by pressing the Enter key or power-on password at the supervisor password prompt. In this case, the Password, Start up, and Initialize icons cannot be selected.

See Password Combinations (POP, HDP, PAP) for more information about passwords.

Password Combinations (POP, HDP, PAP) #

Source: Hardware Maintenance Manual Volume 4: ThinkPad Computers, p.251

When the power-on password (POP), hard disk password (HDP), and supervisor password (PAP) are used, the following situations may occur:

  • When POP is the same as HDP-1 or HDP-2

    The POP prompt appears, but one of the HDP prompts does not appear.

  • When POP is not the same as HDP-1 and HDP-2

    The POP, HDP-1, and HDP-2 prompts all appear.

  • When PAP is used with HDP-1 or HDP-2

    When PAP is used, HDP-1 or HDP-2 are enabled automatically, but no HDP prompt appears. HDP-1 and HDP-2 are set the same as PAP.

Parts Listing #

Source: Hardware Maintenance Manual Volume 3: ThinkPad Computers, p.495

Parts listing Parts Listing 760 (9546, 9547)
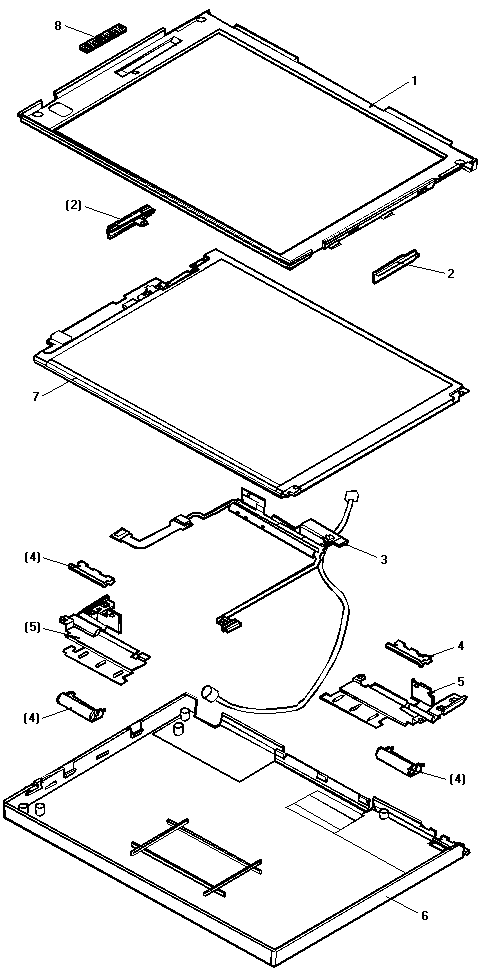
Type 9546

Type 9547

(760L-760LD = 9547 ! see PLET ZG96-0100 -or- COP RSP 9547-01)

LCD Unit's

ThinkPad Option's

Attention ThinkPad/WorkPad - SCREW KIT FRUs

A new range of FRU Screw Kits have been released for various Thinkpad/WorkPad Models. These new Screw Kits contain Nylock screws where the thread of the screws have been coated with Nylon to ensure that the appropriate screw torque is maintained for the life of the product.

  • They maintain tight connections.
  • They do not easily come loose, even with shock or vibration.
  • They need additional force to tighten.
  • They should be used only once.

Do the following when you service one of the below listed machines:

  • Keep the screw kit in your tool bag.
  • Always use new screws.
  • Use a torque screwdriver if available. (see below Screw Tightening Information)

The following screw FRU part numbers have been made available for servicers.

Bulk, kit, and individual screw FRUs are listed.

Use the appropriate FRU P/N that correspond to your usage of screw FRUs.

D/T FRU P/N Qty Description
2608 05K5941 Kit Various screws incl. Nyloc
2609 10L1956 Kit Various screws incl. Nyloc
2611 05K5687 Kit Various screws incl. Nyloc
2621 05K5877 Kit Various screws incl. Nyloc
2635 05K4313 Kit 2 M2.5 x 8mm Nyloc screws
2635 5 M2.5 x 8mm Nyloc screws
2635 1 M2.5 x 16mm flat screw
2635 97H3445 1 Nyloc screw M2.5 x 6mm
2635 97H3446 1 Nyloc screw M2.5 x 8mm
2635 05K4314 1 Nyloc screw M2.5 x 25mm
2635 380Z 05K5725 9 M2.5 x 6mm Flat Head
2635 1 M2.5 x 3mm Flat Head
2635 1 M2.5 x 4.8mm Flat Head
2635 6 Hex Stud
2635 19 M2.5 x 6 Bind Black
2635 7 M2.5 x 8 Bind Black
2635 4 M2 x 6 Bind
2635 3 M2 x 18 Bind
2635 2 M2.5 x 22 Bind Nylock
2635 3 M2.5 x 12 Bind Nylock
2635 1 M2.6 x 4 Bind Yellow
2635 3 M2.6 x 2.8 Bind Red
2635 4 M2 x 1.7 Special Pan Blue
2635 2 M2 x 2.4 Special Pan Yellow
2635 4 M3 x 3 Flat
2635 1 M2.5 x 6 Special
2635 1 M2.5 x 6 Big Head Yellow
2635 1 M2.5 x 25 Bind Nylock
2640 12J0808 Kit 4 M2.5 x 4mm
2640 4 M2.5 x 4mm FLAT/LOC screws
2640 19 M2.5 x 7mm BIND/LOC screws
2640 2 M2.5 x 12mm BND/LOC screws
2640 10 M2.5 x 16mm FLAT screws
2640 1 M2.0 x 13mm PAN screw
2640 6 M2.5 HEX STUD
2640 97H3917 200 Nyloc screw M2.5 x 4mm
2640 97H3918 1000 Nyloc screw M2.5 x 7mm
2640 97H3919 100 Nyloc screw M2.5 x 12mm
2644 05K6083 Kit Various screws incl. Nyloc
2645 05K4841 Kit Various screws incl. Nyloc
9545 05K4464 Kit Various screws incl. Nyloc
9546 97H3449 Kit 20 M2.5 x 4mm BW/N
9546 15 M2.5 x 6mm Nyloc
9546 10 M2.5 x 8mm Nyloc
9546 5 M2.5 x 14mm Nyloc
9546 5 M2 x 14mm PAN W/NY
9546/47 97H3444 1 Nyloc screw M2.5 x 4mm
9546/47 97H3445 1 Nyloc screw M2.5 x 6mm
9546/47 97H3446 1 Nyloc screw M2.5 x 8mm
9546/47 97H3447 1 Nyloc screw M2.5 x 14mm
9546/47 97H3448 1 Nyloc screw M2 x 14mm
9548/49 05K4478 Kit Various screws incl. Nyloc

Screw Tightening Information

Loose screws can cause reliability problems. The IBM ThinkPad/WorkPad computer addresses this problem with nylon-coated screws.

Tighten screws as follows:

Plastic to Plastic

Turn an additional 90 degrees after the screw head touches the surface of the plastic part.

Plastic to plastic: after the screw head touches the plastic, turn the screw 90 degrees more

Logic Card to Plastic

Turn an additional 180 degrees after the screw head touches the surface of the plastic part.

Logic card to plastic: after the screw head touches the card, turn the screw 180 degrees more

Torque screw-drivers can be ordered from:

Techni-Tool
5 Apollo Road
Box 368
Plymouth Meeting
PA 19462
USA
Phone: Sales 1-610-941-2400
Fax: 1-610-828-5623
http://www.techni-tool.com

Common and Option Parts List #

Source: Hardware Maintenance Manual Volume 4: ThinkPad Computers, p.526

Miscellaneous Parts

Part FRU P/N
5.1 GB Hard Disk Drive (9546, 9547 - 760, 765) 00K7907
Security Parts Kit 29H9294
(Includes the following:)
Keyboard Security Plate (760C)
Keyboard Security Plate (760CD)
PC Card Security Plate (760C)
PC Card Security Plate (760CD)
PC Card Security Stopper
Keyboard Security Plate for Dock (760C)
Keyboard Security Plate for Dock (760CD)
PC Card Security Plate (765D, 765L) (not included in FRU P/N 29H9292) 05K4732
Screw Kit 39H7003
(Includes the following:)
M2.5 x 6 Screw (5)
M2.5 x 4 Screw (10)
M2.5 x 8 Screw (5)
M2.5 Nut (10)
Hex Stud D-Sub (5)
Hex Stud Bus (5)
M2.5 x 8 Flathead (5)
M2 x 4 (5)
Screw Cover for Top cover (5)
M2.5 x 4 Flathead (5)
M2.5 x 5 Flathead (5)
Nut M2.5 (5)
M2.6 x 5 Deform (5)
M2.5 x 14 (5)
M2.5 x 4 Thin Head (5)
M1.4 x 1.8 Thin Head (5)
M2 x 4.3 Thin Head (5)
TrackPoint Cap Kit 84G6536
Internal Modem Card
DAA Assembly
Connector for EMEA 12J1572
Austria 59G1041
Australia 59G1040
Belgium 43G3414
Denmark 59G1042
Finland 54F0715
France 4525652
Germany 59G1056
Malaysia 59G1066
Netherlands 80G3480
Norway 59G1044
New Zealand 80H3465
PRC and Hong Kong 54F0693
Sweden 54F0717
Switzerland 59G1057
Taiwan 59G1067
Thailand 59G1064
U.K. 59G1045
PSTN Cable
Austria 58G4386
Australia 58G4343
Belgium 58G4346
Denmark 58G4333
Finland 58G4334
France 58G4335
Germany 58G4347
U.S., Thailand, Malaysia, Singapore, and Hong Kong 43G3398
Netherlands 58G4340
New Zealand and PRC 58G4332
Norway 58G4334
Sweden 58G4336
Switzerland 58G4348
U.K. 58G4345
Options
Notes:
  1. When you replace the AC Adapter or the Quick Charger, use the one for the country you are in, even if the computer is from a different country.
  2. The warranty for the system unit does not apply to all options.
810MB Hard Disk Drive Assembly 29H9366
1.08GB Hard Disk Drive Assembly 29H9367
1.2GB Hard Disk Drive Assembly 29H9228
1.4GB Hard Disk Drive Assembly 82H8884
2.1GB Hard Disk Drive Assembly 82H8489
3GB Hard Disk Drive Assembly (OPT P/N 45H8789) 45H8791
2nd HDD Adapter U.S. Main Flame for TP 770 (OPT P/N 11J8836) 11J8941
2nd HDD Spacer (Adapter), for HDD Model 770 11J8942
2nd HDD Spacer (Adapter), for HDD Model 760 11J8943
SelectaBase 770 11J8822
PC Card Enabler (SelectaBase 770) 11J8823
Battery Spacer for UltraBay II 11J8968
Display Stand 39H7448
CD-ROM Drive (8x) (OPT P/N 45H8786) 82G8851
CD-ROM Drive 12J0424
DVD Drive (for TP 770) (OPT P/N 11J8950) 11J8952
Hard Disk Drive over Pack 39H7040
Second HDD Tray 29H9295
Audio Cable 66G5180
Battery Pack (NiMH) (OPT P/N 41H9720) 29H9233
(external) Battery under Spacer 29H9369
Cable Travel Charger Assembly 85G1531
Car-Battery Adapter 49G1148
Conversion Cable (Game Port) (for TP760xx only) 29H9269
Conversion Cable (Video) 85G1897
Memory
DIMM 8MB (w/o NOTCH) 29H9287
DIMM 16MB (w/o NOTCH) 29H9288
SO-DIMM 8 MB (with NOTCH) 42H2767
SO-DIMM 16 MB (with NOTCH) 42H2768
SO-DIMM 32 MB (with NOTCH) 42H2769
SO-DIMM 64 MB 42H2817
SO-DIMM (SDRAM) 16 MB (OPT.P/N 76H0293) 42H2818
SO-DIMM (SDRAM NP) 32 MB (OPT.P/N 76H0294) 42H2819
SO-DIMM (SDRAM NP) 64 MB (OPT.P/N 20L0241) 20L0242
External Diskette Drive Box Kit 66G5069
FDD (4-mode 2.88MB) 29H9372
FDD External Box Kit 66G5069
Headset 85G1529
Microphone 66G7871
Interface Cable to System for Keyboard 84G2531
Interface Cable to Keyboard for Keypad 84G2532
Mini-DIN to Mini-DIN Cable 84G6474
Model Label 46H6034
Name Label 66G9228
PCMCIA Cartridge 84G1303
PCMCIA RF Cartridge 84G1304
Port Replicator (Model-II 760) 66G3575
Port Replicator with PCMCIA (Model-I 760/765D/765L) 66G3574
PS/2 Miniature Mouse 95F5723
Quick Charger 85G1530
Quick Charger Cable 85G1531
Small Car-Battery Adapter 84G4359
Travel Charger Assembly 85G1530
Wall Plug 85G2367
Numeric Keypad
Belgian 95F5741
Canadian French 95F5466
Danish 95F5467
Dutch 95F5467
French 95F6313
German 95F6314
Greek 95F5467
Hebrew 95F5741
Icelandic 95F5467
Italian 95F6316
Japanese 79F6401
Norwegian 95F5467
Spanish 95F6315
Swedish or Finnish 95F5468
Swiss (French) 95F5711
Swiss (German) 95F5715
Turkish 95F5467
U.K. English 95F5741
U.S. English 95F5741
Black Keypad
French 84G6286
German 84G6280
Italian 84G6292
Norwegian 84G6310
Swedish 84G6304
U.K. English 84G6298
U.S. English 84G2530
Black Keyboard
French 84G6285
German 84G6279
Italian 84G6291
Norwegian 84G6309
Swedish 84G6303
U.K. English 84G6297
U.S. English 84G2529
Accessories
Keyboard/Mouse Y-Cable 54G0444
IDE CD-ROM Adapter Card-Cable (OPT P/N 49H6002) (appr. 80mm card with male 1.25mm connector to cable with 1.25mm female connector) 39H7432
NOTE: This IDE card is needed if the following 3-conditions are met
  • using ThinkPad 760E, 760ED, 760EL or 760ELD
  • using ThinkPad Dock I or II
  • installing IDE device in the Docking Station
(1.25mm connector only - card & cable !!!)
Tools
Tri-Connector Wrap Plug 72X8546
PC Test Card 35G4703
Audio Wrap Cable 66G5180
Screwdriver Kit 95F3598
USB-Parallel Test Cable 05K2580
ThinkPad Hardware Maintenance Diskette Version 1.20 78H5227
ThinkPad Hardware Maintenance Diskette Version 1.40 (TP-770 9548, 9549) 05L1738

Power Cords

Ten power cord plug types, numbered 1 to 10 to match the country list in the power cord table

Attention Warning: Use the power cord certified for your country.

Country FRU P/N
3-Prong
1 Colombia, U.S., Venezuela 25H2207
Korea 25H2207
Japan, 2-prong 85G6665
2 Hong Kong, Singapore, U.K. 25H2215
3 France, Germany, Spain 25H2209
4 Italy 25H2223
5 Australia, New Zealand 25H2205
6 Denmark 25H2211
7 Israel 25H2225
8 Bangladesh, Pakistan, Sri Lanka, South Africa 25H2213
9 Switzerland 25H2221
10 Thailand 25H2219
2-Prong Slim
1 Colombia, U.S., Venezuela 13H5264
Korea 13H5264
Japan 13H5273
2 Hong Kong, Singapore, U.K. 13H5267
3 France, Germany, Spain 13H5270
4 Italy 13H5270
5 Australia, New Zealand 13H5276
6 Denmark 13H5270
7 Israel 13H5270
8 Bangladesh, Pakistan, Sri Lanka, South Africa 13H5279
9 Switzerland 13H5270
10 Thailand 13H5264
3-Prong Slim
1 Colombia, U.S., Venezuela 76H3516
Korea 76H3535
Japan 76H3526
2 Hong Kong, Singapore, U.K. 76H3524
3 France, Germany, Spain 76H3518
4 Italy 76H3530
5 Australia, New Zealand 76H3514
6 Denmark 76H3520
7 Israel 76H3532
8 Bangladesh, Pakistan, Sri Lanka, South Africa 76H3522
9 Switzerland 76H3528
10 Thailand 76H3516

Model 760 LCD Parts List #

Exploded view of the 12.1-inch SVGA LCD unit (ASM P/N 29H9029) with numbered callouts 1 to 8 matching its parts list
LCD Unit, 12.1 SVGA (P/N 29H9226, ASM P/N 29H9029)
Exploded view of the 12.1-inch SVGA LCD unit (ASM P/N 73H6599) with numbered callouts 1 to 8 matching its parts list
LCD Unit, 12.1 SVGA (P/N 29H9226, ASM P/N 73H6599)
Exploded view of the 10.4-inch SVGA LCD unit (P/N 29H9227) with numbered callouts 1 to 7 matching its parts list
LCD Unit, 10.4 SVGA (P/N 29H9227)
Exploded view of the 10.4-inch VGA LCD unit (P/N 46H5355) with numbered callouts 1 to 7 matching its parts list
LCD Unit, 10.4 VGA (P/N 46H5355)
Exploded view of the 11.3-inch DSTN LCD unit (P/N 39H6232) with numbered callouts 1 to 8 matching its parts list
LCD Unit, 11.3 DSTN (P/N 39H6232)
Exploded view of the LCD unit with numbered callouts 1 to 8 matching its parts list
LCD Unit, 12.1 XGA (P/N 82H8486)
Exploded view of the 12.1-inch SVGA LCD unit (P/N 82H8496) with numbered callouts 1 to 8 matching its parts list
LCD Unit, 12.1 SVGA (P/N 82H8496)
Exploded view of the LCD unit with numbered callouts 1 to 8 matching its parts list
LCD Unit, 12.1 SVGA (U.S. P/N 46H5725 - EMEA P/N 11J8867) 9547-760XL
Exploded view of the LCD unit with numbered callouts 1 to 8 matching its parts list
LCD Unit, 12.1 XGA (P/N 46H5735, ASM P/N 46H5731)

ThinkPad - Common Parts Listing #

This section contains FRUs common to most IBM portable, laptop, and notebook computers.

External Diskette Drives

Part FRU P/N
5.25-Inch Diskette Drives:
360KB External (4869-001) 72X6759
360KB External (4869-501) 72X6768
1.2MB External (4869-002) 15X7993
1.2MB External (4869-502) 15X7994
Hard Disk Drive. 1.2GB HDD (for all 9545) 85G8549
5.25-Inch Drive Adapter 72X6757
5.25-Inch Drive Adapter/A 15F7996
5.25-Inch External Diskette Drive Cable (from system board to adapter) 27F4211
Diskette Drive Bus Adapter 72X8524

CD-ROM Drives

Part FRU P/N
Enhanced Internal CD-ROM II Drive (Eject button below slot) 61G1901
Internal CD-ROM I Drive (Eject button above slot) 81F7930
Terminator Kit (for 81F7930) 59F3530
Cleaning Kit (for 81F7930) (Disks, CD Caddy) 59F3562
Internal CD-ROM II Drive (Eject button below slot) 92F0084
Terminator Kit (for 92F0084) 92F0082
Media Kit (for 92F0084) (No cleaning necessary, Test Disk, CD Caddy) 31F4232
Signal Cable 34F0043
Power Cable 72X8521
Remote ID Switch Cable (3510) 92F0086
Audio Card, Cable, Screws (3510) 92F0085
CD Caddy 22F9419
Rail Kit (3510) 34F0041
Headphones 53F3610

SCSI Adapters, Terminators, Cables

Part FRU P/N
SCSI Adapter/A (without Cache) 85F0002
SCSI Internal Cable 64F4127
SCSI Adapter/A (with Cache) 85F0063
Terminator, External (for 85F0063) 33F8464
Terminator, Internal (for 85F0063) 34F0025
Terminator, Internal (for 85F0002) 57F2870
SCSI Fast Adapter (16 bit) 92F0330
SCSI External Cable (for 92F0330) 32G4089
SCSI Internal Cable (for 92F0330) 32G0084
Terminator, Inline (space permitting) 92F0412

Rewritable Optical Drives

Part FRU P/N
3.5-Inch Rewritable Optical Drive 92F0167
Rewritable Optical Cartridge 38F8647
Rewritable Optical Cartridge (5 Pack) 38F8646
Drive Mounting Slide (for 92F0167) 85F0022
Tray with Bezel (for 92F0167) 85F0021
Objective Lens Cleaner (for 92F0167) 38F8681
Prism Lens Cleaner (for 92F0167) 38F8682
3.5-Inch Enhanced Rewritable Optical Drive 92F0167
Mounting Tray 92F0269
Mounting Tray/Bezel (Model 3510) 92F0268

External Keyboard/Mouse

Part FRU P/N
Keyboard Cable 72X8537
Mouse 61X8923
Mouse Ball and Pop-Off Retainer 33F8461
Mouse Ball and Twist-Off Retainer 33F8462
Mouse (New Style) (33G5420) 06H4595
Mouse Retainer Ring 33G5417
Miniature Mouse 95F5723

Enhanced Keyboards (101/102 Key)

Country FRU P/N
Arabic 1391490
Belgian 1391414
Canadian French 1392011
Cyrillic 1393866
Danish 1391407
Dutch 1391511
French 1391402
German 1391403
Greek 1393285
Hebrew 1391408
Italian 1393395
Latin American Spanish 1392015
Norwegian 1391409
Portuguese 1391410
Russian/Cyrillic 1395622
Spanish 1391405
Swedish/Finnish 1391411
Swiss 1391412
Swiss/French 1395881
Swiss/German 1395882
Turkish 1393286
U.K. English 1391406
U.S. English (E/ME/A use only) 1396790
U.S. English 1392090
Yugoslavian 1393669

Optional Enhanced Keyboards (101/102 Key)

Part FRU P/N
with PS/2 Style Cable 59G7980
with AT Style Cable 59G7981
with 25mm PS/2 Trackball 59G7982
with 25mm Serial Trackball 59G9757

Keybutton Kits (101/102 Key)

Part FRU P/N
Keybutton Kits (R), Belgian 1392033
Keybutton Kits (R), Canadian French 1392032
Keybutton Kits (R), Danish 1392026
Keybutton Kits (R), Dutch 1392034
Keybutton Kits (R), French 6447047
Keybutton Kits (R), German 6447048
Keybutton Kits (R), Italian 6447049
Keybutton Kits (R), Norwegian 1392028
Keybutton Kits (R), Portuguese 1392029
Keybutton Kits (R), Spanish 6447050
Keybutton Kits (R), Spanish / Latin 1392035
Keybutton Kits (R), Swedish 1392030
Keybutton Kits (R), Swiss / French / German 1392031
Keybutton Kits (R), U.K. English 6447046
Keybutton Kits, U.S. English 6447045

Japanese Keyboard Type 2 (106 Key, DBCS Support)

Part FRU P/N
Japanese Keyboard 94X1110
Keyboard Cable 94X1147

Space-Saving Keyboards (84/85 Key)

Part FRU P/N
Canadian French 1396046
Spanish/Latin 1396047
U.S. English 1393290
Cable Assembly, External 1393082

Tools and Miscellaneous

Part FRU P/N
Audio Wrap Cable 66G5180
Ethernet BNC T-Connector 84F8207
Ethernet BNC 50-ohm Terminator (2 required) 85F0037
Grounding Wire Set 38F4684
Keyboard Key Cap Removal Tool 6110464
PC Test Card 33G4703
Screwdriver Kit 95F3598
SCSI Terminator (any SCSI device, space permitting) 92F0142
SCSI Terminator Kit (R-PAC Terminator Modules (3) for 40, 60, 80, 120, and 160MB SCSI Hard Disk Drives) 92F0143
Wrap Plug Ethernet D-Shell 85F0036
Wrap Plug, Tri-Connector 72X8546
Wrap Plug (6157 Tape Attachment Adapter/A) 4178459
Wrap Plug (Token-Ring Network Adapter/A) 6165899
Plastic Envelope (For Wrap Plug) 6138013

TV Tuner #

The TV Tuner Pack (hereafter called TV Tuner) is an option for watching TV programs or videos on the IBM TFT color notebook computer. The computer changes to TV reception when the removable diskette drive is replaced with the TV Tuner.

The TV screen and normal computer display are easily switched by using the Hot key on the front panel of the TV Tuner.

Identifying Names and Functions

The following figure and table show the names and functions of each part of the TV Tuner.

TV Tuner, showing the front panel controls and the side jacks and connectors numbered 1 to 13

Icons Functions
1 Front Panel Used to change the TV channels, switch TV mode to computer mode, and operate most functions of the TV Tuner.
2 Headphone Jack Connects the headphones.
3 Power Indicator Shows the TV Tuner is powered on.
4 Power Switch Powered on and off the TV Tuner.
5 Hot Key Switches between the TV screen and computer screen.
6 Up Switch Increases the value such as the channel number.
7 Down Switch Decreases the value such as the channel number.
8 Function Key Enters the mode to change the value of each function, such as TV channel or color contrast. (See Using the Function Key.)
9 TV/EXT Switch Switches the TV mode or external video mode.
10 Volume Knob Controls the speaker volume.
11 Audio-In Jack Connects the audio-in connector of the AV cable.
12 Video-In Jack Connects video-in connector of the AV cable.
13 RF Connector RF (antenna) connector Connects the active antenna unit or antenna cable.

Using the Front Panel

The following table shows how to operate all functions of the TV Tuner with the controls on the front panel.

Key Function
Power Power switch Turns on the TV Tuner. This key is used only when the computer is turned on.
Hot Key Hot key Switches computer display and TV screen.
Up Up switch Increases the value of parameters, Channel Number, Color, Tint, Brightness, Contrast, Auto Tuning Sensitivity, On-screen Message Selection.
Down Down switch Decreases the value of parameters, Channel Number, Color, Tint, Brightness, Contrast, Auto Tuning Sensitivity, On-screen Message Selection.
Function Fn key Selects a function mode to adjust each function parameter. (See Using the Function Key.)
TV/Ext TV/EXT button Switches the displayed video source between the receiving TV broadcast program and external devices such as VCR, video camera recorder, laser disk, and so on.

Diskette Drive (Model Unique) #

Note: If the security latch A is at the left position, push and slide it to the right position (unlock).

Removing the diskette drive: releasing and raising the keyboard (steps 1 to 4), then pulling up the drive strap (5) and lifting the drive out (6); inset A shows the security latch

CD-ROM Drive (Model Unique) #

Attention Attention: Remove the CD-ROM drive exactly as shown in the figure. Do not apply any extra force to the CD-ROM drive when removing it.

Note: If the security latch A is at the left position, push and slide it to the right position (unlock).

Removing the CD-ROM drive: releasing and raising the keyboard (steps 1 to 4), then lifting the drive straight out (5); inset A shows the security latch

Safety Notice 1 #

Warning Safety Notice 1

Before the computer is powered-on after FRU replacement, make sure all screws, springs, or other small parts are in place and are not left loose inside the computer. Verify this by shaking the computer and listening for rattling sounds. Metallic parts or metal flakes can cause electrical shorts.

Avant de remettre l'ordinateur sous tension après remplacement d'une unité en clientèle, vérifiez que tous les ressorts, vis et autres pièces sont bien en place et bien fixées. Pour ce faire, secouez l'unité et assurez-vous qu'aucun bruit suspect ne se produit. Des pièces métalliques ou des copeaux de métal pourraient causer un court-circuit.

Bevor nach einem FRU-Austausch der Computer wieder angeschlossen wird, muß sichergestellt werden, daß keine Schrauben, Federn oder andere Kleinteile fehlen oder im Gehäuse vergessen wurden. Der Computer muß geschüttelt und auf Klappergeräusche geprüft werden. Metallteile oder -splitter können Kurzschlüsse erzeugen.

Prima di accendere l'elaboratore dopo che é stata effettuata la sostituzione di una FRU, accertarsi che tutte le viti, le molle e tutte le altri parti di piccole dimensioni siano nella corretta posizione e non siano sparse all'interno dell'elaboratore. Verificare ciò scuotendo l'elaboratore e prestando attenzione ad eventuali rumori, eventuali parti o pezzetti metallici possono provocare cortocircuiti pericolosi.

Antes de encender el sistema despues de sustituir una FRU, compruebe que todos los tornillos, muelles y demás piezas pequeñas se encuentran en su sitio y no se encuentran sueltas dentro del sistema. Compruébelo agitando el sistema y escuchando los posibles ruidos que provocarían. Las piezas metálicas pueden causar cortocircuitos eléctricos.

Safety Notice 2 #

Warning Safety Notice 2

Some standby batteries contain a small amount of nickel and cadmium. Do not disassemble it, recharge it, throw it into fire or water, or short-circuit it. Dispose of the battery as required by local ordinances or regulations. Use only the battery in the appropriate parts listing. Use of an incorrect battery can result in ignition or explosion of the battery.

Certaines batteries de secours contiennent du nickel et du cadmium. Ne les démontez pas, ne les rechargez pas, ne les exposez ni au feu ni à l'eau. Ne les mettez pas en court-circuit. Pour les mettre au rebut, conformez-vous à la réglementation en vigueur. Lorsque vous remplacez la pile de sauvegarde ou celle de l'horloge temps réel, veillez à n'utiliser que les modèles cités dans la liste de pièces détachées adéquate. Une batterie ou une pile inappropriée risque de prendre feu ou d'exploser.

Die Bereitschaftsbatterie, die sich unter dem Diskettenlaufwerk befindet, kann geringe Mengen Nickel und Cadmium enthalten. Sie darf nur durch die Verkaufsstelle oder den IBM Kundendienst ausgetauscht werden. Sie darf nicht zerlegt, wiederaufgeladen, kurzgeschlossen, oder Feuer oder Wasser ausgesetzt werden. Die Batterie kann schwere Verbrennungen oder Verätzungen verursachen. Bei der Entsorgung die örtlichen Bestimmungen für Sondermüll beachten. Beim Ersetzen der Bereitschafts- oder Systembatterie nur Batterien des Typs verwenden, der in der Ersatzteilliste aufgeführt ist. Der Einsatz falscher Batterien kann zu Entzündung oder Explosion führen.

Alcune batterie di riserva contengono una piccola quantità di nichel e cadmio. Non smontarle, ricaricarle, gettarle nel fuoco o nell'acqua né cortocircuitarle. Smaltirle secondo la normativa in vigore (DPR 915/82, successive disposizioni e disposizioni locali). Quando si sostituisce la batteria dell'RTC (real time clock) o la batteria di supporto, utilizzare soltanto i tipi inseriti nell'appropriato Catalogo parti. L'impiego di una batteria non adatta potrebbe determinare l'incendio o l'esplosione della batteria stessa.

Algunas baterías de reserva contienen una pequeña cantidad de níquel y cadmio. No las desmonte, ni recargue, ni las eche al fuego o al agua ni las cortocircuite. Deséchelas tal como dispone la normativa local. Utilice sólo baterías que se encuentren en la lista de piezas. La utilización de una batería no apropiada puede provocar la ignición o explosión de la misma.

Safety Notice 3 #

Warning Safety Notice 3

The battery pack contains small amounts of nickel. Do not disassemble it, throw it into fire or water, or short-circuit it. Dispose of the battery pack as required by local ordinances or regulations. Use only the battery in the appropriate parts listing when replacing the battery pack. Use of an incorrect battery can result in ignition or explosion of the battery.

La batterie contient du nickel. Ne la démontez pas, ne l'exposez ni au feu ni à l'eau. Ne la mettez pas en court-circuit. Pour la mettre au rebut, conformez-vous à la réglementation en vigueur. Lorsque vous remplacez la batterie, veillez à n'utiliser que les modèles cités dans la liste de pièces détachées adéquate. En effet, une batterie inappropriée risque de prendre feu ou d'exploser.

Akkus enthalten geringe Mengen von Nickel. Sie dürfen nicht zerlegt, wiederaufgeladen, kurzgeschlossen, oder Feuer oder Wasser ausgesetzt werden. Bei der Entsorgung die örtlichen Bestimmungen für Sondermüll beachten. Beim Ersetzen der Batterie nur Batterien des Typs verwenden, der in der Ersatzteilliste aufgeführt ist. Der Einsatz falscher Batterien kann zu Entzündung oder Explosion führen.

La batteria contiene piccole quantità di nichel. Non smontarla, gettarla nel fuoco o nell'acqua né cortocircuitarla. Smaltirla secondo la normativa in vigore (DPR 915/82, successive disposizioni e disposizioni locali). Quando si sostituisce la batteria, utilizzare soltanto i tipi inseriti nell'appropriato Catalogo parti. L'impiego di una batteria non adatta potrebbe determinare l'incendio o l'esplosione della batteria stessa.

Las baterías contienen pequeñas cantidades de níquel. No las desmonte, ni recargue, ni las eche al fuego o al agua ni las cortocircuite. Deséchelas tal como dispone la normativa local. Utilice sólo baterías que se encuentren en la lista de piezas al sustituir la batería. La utilización de una batería no apropiada puede provocar la ignición o explosión de la misma.

Safety Notice 4 #

Warning Safety Notice 4

The lithium battery can cause a fire, explosion, or severe burn. Do not recharge it, remove its polarized connector, disassemble it, heat it above 100°C (212°F), incinerate it, or expose its cell contents to water. Dispose of the battery as required by local ordinances or regulations. Use only the battery in the appropriate parts listing. Use of an incorrect battery can result in ignition or explosion of the battery.

La pile de sauvegarde contient du lithium. Elle présente des risques d'incendie, d'explosion ou de brûlures graves. Ne la rechargez pas, ne retirez pas son connecteur polarisé et ne la démontez pas. Ne l'exposez pas à une temperature supérieure à 100°C, ne la faites pas brûler et n'en exposez pas le contenu à l'eau. Mettez la pile au rebut conformément à la réglementation en vigueur. Une pile inappropriée risque de prendre feu ou d'exploser.

Die Systembatterie ist eine Lithiumbatterie. Sie kann sich entzünden, explodieren oder schwere Verbrennungen hervorrufen. Batterien dieses Typs dürfen nicht aufgeladen, zerlegt, über 100 C erhitzt oder verbrannt werden. Auch darf ihr Inhalt nicht mit Wasser in Verbindung gebracht oder der zur richtigen Polung angebrachte Verbindungsstecker entfernt werden. Bei der Entsorgung die örtlichen Bestimmungen für Sondermüll beachten. Beim Ersetzen der Batterie nur Batterien des Typs verwenden, der in der Ersatzteilliste aufgeführt ist. Der Einsatz falscher Batterien kann zu Entzündung oder Explosion führen.

La batteria di supporto e una batteria al litio e puo incendiarsi, esplodere o procurare gravi ustioni. Evitare di ricaricarla, smontarne il connettore polarizzato, smontarla, riscaldarla ad una temperatura superiore ai 100 gradi centigradi, incendiarla o gettarla in acqua. Smaltirla secondo la normativa in vigore (DPR 915/82, successive disposizioni e disposizioni locali). L'impiego di una batteria non adatta potrebbe determinare l'incendio o l'esplosione della batteria stessa.

La bateria de repuesto es una bateria de litio y puede provocar incendios, explosiones o quemaduras graves. No la recargue, ni quite el conector polarizado, ni la desmonte, ni caliente por encima de los 100°C (212°F), ni la incinere ni exponga el contenido de sus celdas al agua. Deséchela tal como dispone la normativa local.

Safety Notice 5 #

Warning Safety Notice 5

If the LCD breaks and the fluid from inside the LCD gets into your eyes or on your hands, immediately wash the affected areas with water for at least 15 minutes. Seek medical care if any symptoms from the fluid are present after washing.

Si le panneau d'affichage à cristaux liquides se brise et que vous recevez dans les yeux ou sur les mains une partie du fluide, rincez-les abondamment pendant au moins quinze minutes. Consultez un médecin si des symptômes persistent après le lavage.

Die Leuchtstoffröhre im LCD-Bildschirm enthält Quecksilber. Bei der Entsorgung die örtlichen Bestimmungen für Sondermüll beachten. Der LCD-Bildschirm besteht aus Glas und kann zerbrechen, wenn er unsachgemäß behandelt wird oder der Computer auf den Boden fällt. Wenn der Bildschirm beschädigt ist und die darin befindliche Flüssigkeit in Kontakt mit Haut und Augen gerät, sollten die betroffenen Stellen mindestens 15 Minuten mit Wasser abgespült und bei Beschwerden anschließend ein Arzt aufgesucht werden.

Nel caso che caso l'LCD si dovesse rompere ed il liquido in esso contenuto entrasse in contatto con gli occhi o le mani, lavare immediatamente le parti interessate con acqua corrente per almeno 15 minuti, poi consultare un medico se i sintomi dovessero permanere.

Si la LCD se rompe y el fluido de su interior entra en contacto con sus ojos o sus manos, lave inmediatamente las áreas afectadas con agua durante 15 minutos como mínimo. Obtenga atención medica si se presenta algún síntoma del fluido despues de lavarse.

Safety Notice 6 #

Warning Safety Notice 6

To avoid shock, do not remove the plastic cover that surrounds the lower portion of the inverter card.

Afin d'éviter tout risque de choc électrique, ne retirez pas le cache en plastique protégeant la partie inférieure de la carte d'alimentation.

Aus Sicherheitsgründen die Kunststoffabdeckung, die den unteren Teil der Spannungswandlerplatine umgibt, nicht entfernen.

Per evitare scosse elettriche, non rimuovere la copertura in plastica che avvolge la parte inferiore della scheda invertitore.

Para evitar descargas, no quite la cubierta de plástico que rodea la parte baja de la tarjeta invertida.

Safety Notice 7 #

Warning Safety Notice 7

Though main batteries have low voltage, a shorted or grounded battery can produce enough current to burn combustible materials or personnel.

Bien que le voltage des batteries principales soit peu élevé, le court-circuit ou la mise à la masse d'une batterie peut produire suffisamment de courant pour brûler des matériaux combustibles ou causer des brûlures corporelles graves.

Obwohl Hauptbatterien eine niedrige Spannung haben, können sie doch bei Kurzschluß oder Erdung genug Strom abgeben, um brennbare Materialien zu entzünden oder Verletzungen bei Personen hervorzurufen.

Sebbene le batterie di alimentazione siano a basso voltaggio, una batteria in corto circuito o a massa può fornire corrente sufficiente da bruciare materiali combustibili o provocare ustioni ai tecnici di manutenzione.

Aunque las baterías principales tienen un voltaje bajo, una batería cortocircuitada o con contacto a tierra puede producir la corriente suficiente como para quemar material combustible o provocar quemaduras en el personal.

Safety Notice 8 #

Warning Safety Notice 8

Before removing any FRU, power-off the computer, unplug all power cords from electrical outlets, remove the battery pack, then disconnect any interconnecting cables.

Avant de retirer une unité remplaçable en clientèle, mettez le système hors tension, débranchez tous les cordons d'alimentation des socles de prise de courant, retirez la batterie et déconnectez tous les cordons d'interface.

Die Stromzufuhr muß abgeschaltet, alle Stromkabel aus der Steckdose gezogen, der Akku entfernt und alle Verbindungskabel abgenommen sein, bevor eine FRU entfernt wird.

Prima di rimuovere qualsiasi FRU, spegnere il sistema, scollegare dalle prese elettriche tutti i cavi di alimentazione, rimuovere la batteria e poi scollegare i cavi di interconnessione.

Antes de quitar una FRU, apague el sistema, desenchufe todos los cables de las tomas de corriente eléctrica, quite la batería y, a continuación, desconecte cualquier cable de conexión entre dispositivos.